This article guides readers through building an "Emotionally Unavailable Plant," a humorous robot that avoids affection. Using capacitive sensing, the plant detects touch intensity and reacts by making annoying sounds or driving away. The project utilizes an Arduino Uno, motors, an ultrasonic sensor for obstacle avoidance, and a piezo buzzer. Constructed with 3D-printed parts, the robot offers a playful take on toxic relationships, allowing users to create a companion that demands space.
- 3D printed platform
- Plant pot cover case
- 360 degree wheel
- Non-conductive material (rubber gloves)
- Arduino Uno R3
- Mega breadboard
- 1MΩ resistor
- Piezo buzzer
- H-bridge L293D Motor driver
- Button
- Male header pins
- 2x 9V batteries
- Battery snaps
- 2x motorized wheels or TT motors
- Ultrasonic sensor HC-SR04
- Crocodile clip
- Jumper wires
- Hot glue gun and superglue
- Craft knife and screwdriver
- Soldering iron (optional)
- Favorite plant
Since the pandemic started, and working from home became the new norm, your plant has been your most faithful companion. Bringing life and color to your desk, cheering you up during your long and lonely days, easy to take care of… Yeah, buying that plant was definitely a good idea. And, unlike humans, your plant will never let you down and break your heart, right?
But… aren’t you tired of healthy relationships? Don’t you miss the thrills of doubt and uncertainty? Don’t you want to feel the need to be comforted? We see you, and we hear you.
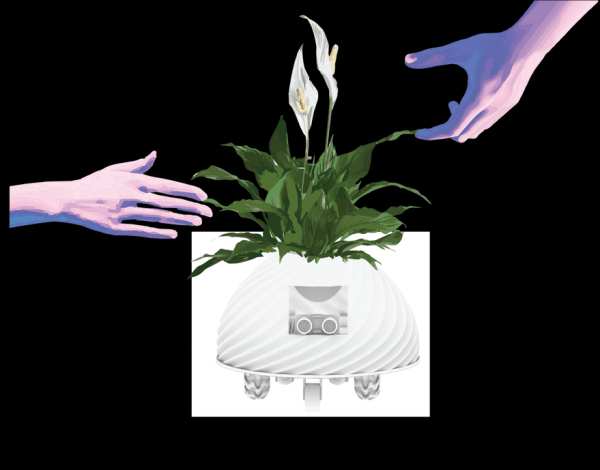
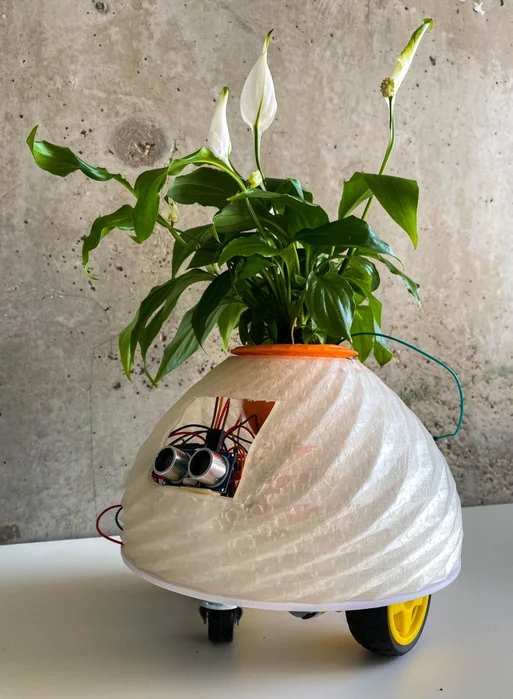
Let us introduce you to the very first Emotionally Unavailable Plant: the plant that will bring you the toxic relationship you didn’t know you needed.
A plant that doesn’t want you to get attached to it, is exasperated by your affection, and wants to have nothing to do with your personal problems. As long as you keep your relationship casual, your plant will stay around and even make cute sounds. But beware, if your petting become too intrusive, it will quickly run away from you and your silly feelings.
And do you know what the best part is? You get to build this lovely companion yourself!
Yes, your relationship with your favorite plant will probably deteriorate, but don’t you think it’s time to free it from your bad vibes and mood swings? Come on, dry your tears and follow our easy tutorial, your plant will thank you.
This project was conducted by Ivana Trifunovic, Selin Sevim, and Alina Turean as a part of the Computational Design and Digital Fabrication seminar in the ITECH master program.
Supplies
Here’s everything you’ll need to build your own Emotionally Unavailable plant.
Robot body
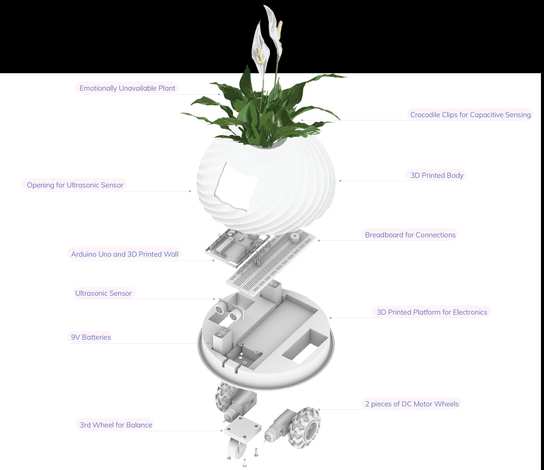
The body of our robot is composed of 3 main elements:
- A platform
- A plant pot
- And a cover case
We 3D printed all of them. If you don’t have access to a 3D printer, a laser cutter can or manual cut will also work perfectly.
You will also need:
- 1x 360 degree wheel (example)
- Some non-conductive material (i.e. rubber gloves)
Electronics
If you are new to electronics, we recommend that you get an Arduino Starter Kit, that will contain most of the components needed for this project
From Arduino Starter Kit
- 1x Arduino Uno R3
- 1x Mega breadboard (or two small breadboards)
- 1x 1MΩ resistor
- 1x Piezo buzzer
- 1x H-bridge L283D Motor driver
- 1x Button
- Male header pins
Additional components
- 2x 9V batteries (you’ll likely need more for prototyping) + battery snaps
- 2x motorized wheels (example) or 2 TT motors and custom wheels
- 1x Ultrasonic sensor (HC-SR04)
- 1x crocodile clip
- Lots of wires (Female to Male, Male to Male). We highly recommend rigid core jumper wires (example) to have a circuit that is as flat and insulated as possible (we’ll develop this point in Step 3)
Prototyping tools
- Hot glue gun, superglue, and duct tape
- Craft knife
- Screw driver
- A soldering iron is not mandatory but very practical to have at hand!
And most importantly…
Your favorite plant!!!
Our robot is made for small plants, around 20cm high. This is mainly due to the weight our motors can take, but you can adapt it to your own materials.
Any type of plant will work, but the more wet the soil is, the better 🙂
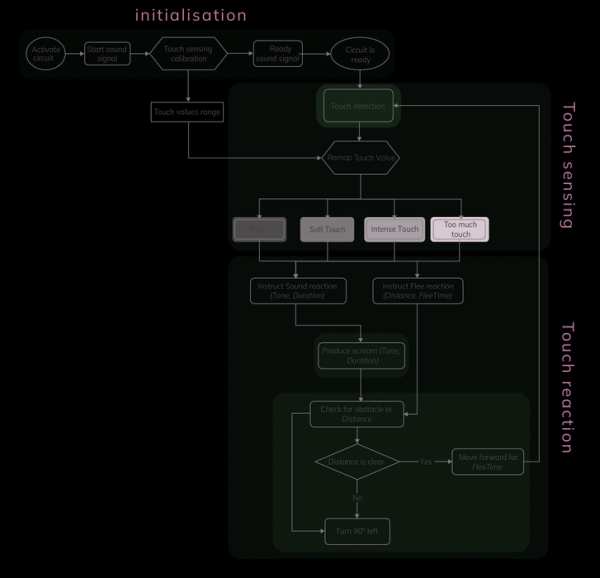
Step 1: Logic and Setup
Capacitive sensing
Our emotionally unavailable companion uses capacitive sensing to detect your intrusive presence.
The capacitiveSensor library turns two Arduino pins into a capacitive sensor, which can sense the electrical capacitance of the human body.
The moist soil of your plant is a conductive material, and makes a perfect touch sensor! With just two wires and a 1MΩ resistor, we are able to detect if you are in contact with your plant, and how intense is this contact.
If you are eager to learn more about capacitive sensing, this Arduino page provides a good explanation, as well as this page.
Other sensors and actuators
Motors
To allow your plant to escape your caresses, we use a simple H-Bridge L293D driver that controls the two motorized wheels. It is the most convenient and space-effective option to control the two motorized wheels. We recommend reading this article if you want to have a better understanding on how to use it.
Ultrasonic sensor
You wouldn’t want your favorite companion to hurt a wall when moving around, would you? Adding an ultrasonic sensor in front of your platform, secures your plant from any obstacle on its way for freedom!
Before any movement is initiated, the Ultrasonic sensor will calculate the distance to the nearest obstacle, and check that there is enough free space for your plant to run away safely. If an obstacle is too close, it will initiate a 90° turn to the left, and check again.
Piezo buzzer
Because we know how pleasant it is to play with your plant leaves, we made sure to give your plant enough ways to convince you to leave it alone. We added a small piezo buzzer that produces nice, melodic… okay, pretty annoying sounds when you become too tactile.
Touch thresholds
Your plant will have four different levels of tolerance. The more you touch it, the more intense will be the reaction.
Flirty
If your caresses stay light, your plant will make cute sounds of appreciation that will make you love it even more than you already do. But don’t get too attached, its patience is very limited!
Soft
If you become a bit more adventurous, your plant will make a small move, and the sound will become less friendly. Your companion will stay reachable, but take this as a warning!
Intense
If you can’t refrain your affection, your plant will have no other choice but to drive itself far away from you. The message should be clear now, right?
Too much
How do you dare touching your poor plant even more? Your audacity will be punished by a long, high-pitched sound, and your plant will definitely get away from your wandering hands.
Step 2: Let’s Make a Fancy Plant Pot
To give your favorite plant an opportunity to express its feelings, you’ll first have to built it a new home that has more features and space to play with.
We have chosen to go with a fancy 3D printed case for which we provided the files that are ready-to-print. But having a 3D-printer shouldn’t be a criteria for you to follow this tutorial! The pot can be achieved in many ways, so it’s your time to be creative and mind-blow us with cool designs ideas that match your plant character 😉
The design is composed of 3 main parts:
- A base platform that will host the wheels and all the electronic components. In addition to the main platform, a few other pieces make it even better.
- A case to contain all the messy jumpers and give a cool aesthetics
- A cover pot that sits in the top, in which you can directly transplant your plant!
Let’s construct it:
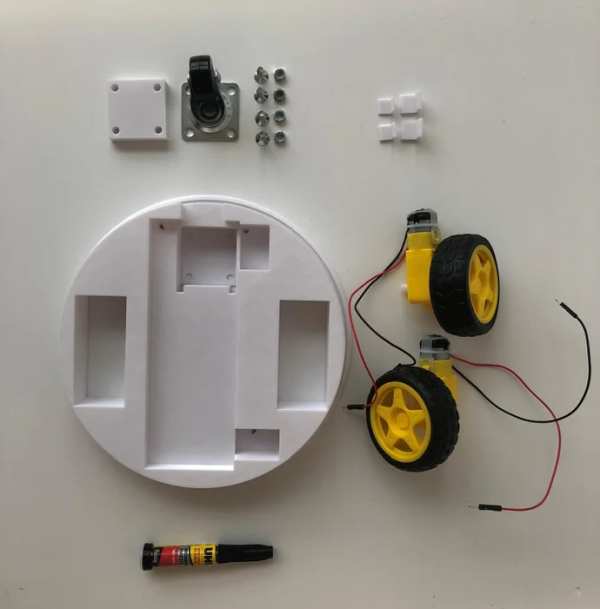
- Start by 3D-printing all the parts in the file provided just below, or build your own pieces.
- Glue the additional platform parts on the platform. Refer to the pictures for their location
- Fix your two motorized wheels (we used superglue but there are plenty of options to make them stay in place) and your additional wheel on the platform
- Position your breadboard and batteries in the holes. Fix your Arduino Uno above one of the wheels (we only used tape because we want the electronics part to be fully dismantable and handy for prototyping).
Now, get your plant ready:
- Transplant your plant to the 3D-printed pot. Remember to always water it away from the electronic part!
- Wrap the pot with a non-conductive material (here we used a custom cap made of rubber gloves). This step is very important to insulate the moist (and conductive!) soil from the wires, and thus to avoid interfering in our electric field.
Your plant can now sit proudly on the case and is ready to deal with your annoying emotional behavior!
Step 3: Giving Your Plant a Voice (Wiring)
Now that your plant has a nice body, it’s time to give it ways of expressions! Get your wires ready, it is time to connect everything.
A few recommendations before starting:
To make our capacitive sensor as reliable as possible, it is crucial to maintain the electronic field surrounding the wires as far away as possible from our plant’s soil. So, no messy wiring here! We used flat, solid core wires as much as possible. We also opted for a Mega breadboard, to keep the middle of our platform as “clear” as possible from electronic interference.
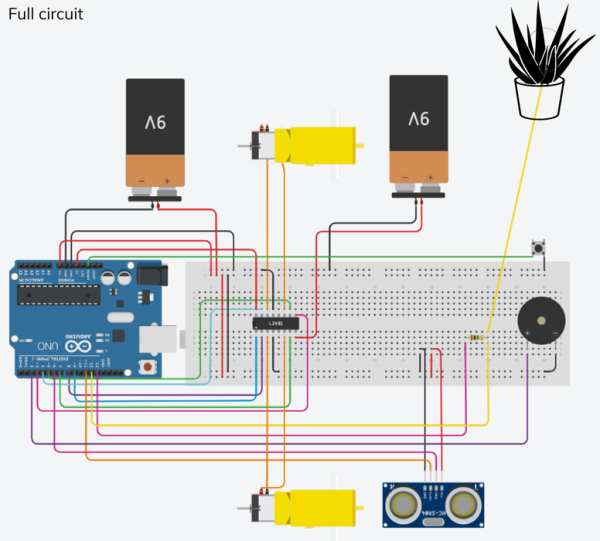
For each step, you can refer to the attached wiring diagrams and pictures. Please make sure to also check your components datasheets as wiring can slightly differ from one to another!
We strongly recommend that you test your wiring after each step before going on to the next one. This makes troubleshooting way easier! For each step, we provided a test code that will help you check that your components are working the way you want them to.
Start by wiring the motor driver
- Attach the L293D H-Bridge to the end of your breadboard that is closer to the wheels.
Connect as following:
- Start with the Battery: Vcc2 is connected to the positive side, the negative side goes to the negative bus of the breadboard. Connect the negative bus to Arduino GND pin.
- Vcc1 to Arduino 5V pin
- ENA to Arduino pin 9
- IN1 to Arduino pin 8
- IN2 to Arduino pin 7
- IN3 to Arduino pin 5
- IN4 to Arduino pin 4
- ENB to Arduino pin 3
- Connect OUT1 and OUT2 to the 1st motor. Connect OUT3 and OUT4 to the second one. There is no wrong or right order for your motor connections as you’ll find out by running the code if they go in the right direction or not and will be able to interchange them.
- Common all the grounds by adding a wire that goes from one negative bus of your breadboard to the other one. Do the same for the two positive sides.
Check that your two motors are running correctly. The code provided will test basic functions such as moving forward, backward, acceleration…
Step 2: add the Ultrasonic sensor and the 2nd battery
- Fix your Ultrasonic sensor in front of the platform, on the small promontory designed for this purpose.
Connect as following:
- Vcc to the breadboard, with one wire connecting it to the positive bus
- Trig to Arduino pin 6
- Echo to Arduino pin 11
- Gnd to the breadboard, with one wire connecting it to the negative bus
From now on, you need to connect the 2nd battery to make the circuit work away from your computer
- Connect the positive side to the positive bus of the breadboard. Add one wire from the positive bus to Arduino Vin pin
- Connect the negative side to Arduino GND pin
Check that the sensor is working well. The code will allow you to print the distance between the sensor and an obstacle.
Step 3: add the Piezo buzzer
We recommend to add the piezo on the opposite side of your breadboard, as our goal is to keep the center of the platform as wire-free as possible.
Connect as following:
- Plug your piezo on your breadboard
- Connect one leg to the negative bus
- Connect the other leg to Arduino pin 2
Check that your buzzer is working well. The code will produce basic bips every second.
- Connect as following:
- Plug the 1MΩ resistor to your breadboard
- Connect one leg to Arduino Digital pin 12, and add another wire on the same line. This wire will go in the soil of your plant. You can also use a crocodile clip here.
- Connect the other leg of the resistor to Arduino digital pin 13
Check that your capacity sensor works well. You can simply start by touching the end of the wire, and then plug it into your plant’s soil and try touching the leaves of the plant. The code will allow you to read touch values (you’ll need to install a special library, please refer to the next section for more details).
Finally, let’s add a reset button. This will make the testing and troubleshooting a lot more convenient.
- Connect one leg of your button to the negative bus of the breadboard
- Connect the other one to Arduino Reset pin
Step 4: Understanding Your Plant Signals (Coding)
It is now time to open your computer, and start talking to your plant. The attached code already contains everything you need!
First, install the necessary library
You’ll need a special library to read the capacitive sensing values. You can download it directly from the Arduino IDE by going to Sketch – Include Library – Manage Libraries. Search for CapacitiveSensor, and install it.
Let’s go through the code
We can break down the code into 4 parts.
1) Inputs and variable definitions
- First, define the 4 touch thresholds and their reactions. You will need to tune those values depending on your material, space available, and the kind of relationship you want with your plant!
- We then define the variables we need for the calibration step, and all the sensor and actuators we use. You’ll only need to modify those if you use different Arduino pins.
2) Functions definition
This is where the main functions of our project are created.
- Calibration of touch values
- Distance to obstacle calculation
- Motor moves function
- And most importantly, the Flee loop that will be triggered when you touch your plant.
3) Void Set-up
When you run the program, the first 5 seconds are dedicated to the calibration of your capacitive sensor. For optimum results, you should do this calibration with your cover and your plant pot on top of the platform to have values as accurate as possible (this is why having a reset button outside of the cover case is very handy!). During the calibration window, touch your plant as much as possible, and don’t touch it at all: the goal is to gather the maximum and minimum touch values. A bip will indicate you when the calibration starts and ends.
4) Void Loop
You are now ready to start playing with your plant! The main loop is pretty straightforward:
- The capacitive sensor collect touch values that are mapped on a 0 to 100 range
- Depending on the threshold it falls into, the touch triggers two reactions: sound (with the tone() function), and movement (with the FleeLoop)
Step 5: Tips and Improvements
As we wanted a completely removable system, we have chosen not to solder our components and to use a breadboard. But if you aim for a more definitive machine, soldering will make everything more reliable! If some of your wires do not connect in a stable way, soldering them to a male header pin and plug this pin in the breadboard will definitely help.
What comes next…
There are many other useless features that you could add to make your relationship with your plant as toxic as you’ve always dreamed to. Here are a few ideas of further implementations: add a screen to ease out the dialogue, add color-coded LEDs to assert boundaries, add more extreme reactions in case of repetitive contacts…
However, it is good to keep in mind that we are playing with micro-electronics here, and not-so-strong components. We realized that adding too many features was creating a lot of interference, confusing our capacitive sensor.
To take this project to the next step, one should consider getting rid of the breadboard and re-design the platform and case in order to have as many distance as possible between the wires of the different components.
A note on more advanced touch sensing
If you are interested by touch sensing technologies, and would like to dig deeper in the topic, we recommend you to check out the Touché project by Disney researchers. By using Swept Frequency Capacitive Sensing, they are able to detect much more precisely the kind of contact you have with an object.
Thanks to dedicated members of the Arduino community, this technology has been implemented to Arduino a few years ago. A library and tutorials are available online. (custom Touché shield; plant application).
Check out those links! We would love to try to implement this technology to our project, so let us know if you achieved it!
Step 6: Send Us Pictures!
If you have reached this step: congratulations! We hope you enjoyed the making (or the reading) of this tutorial as much as we did.
If you have any question regarding the tutorial, please don’t hesitate to reach out in the comment section and we will do our best to help. This project is beginner friendly, and is a good opportunity to get started with electronics in a fun and rewarding way 🙂
As this is our very first Arduino project, we would also love to hear your feedbacks and suggestions for further development!
Last but not least, we are looking forward to see pictures of your own Emotionally Unavailable Plant!!
Source: Emotionally Unavailable Plant
- How does the plant detect human touch?
The robot uses capacitive sensing via two Arduino pins and a 1MΩ resistor connected to the moist soil of the plant. - Can I build this without a 3D printer?
Yes, you can use a laser cutter or manual cutting to create the body components if you do not have access to a 3D printer. - What happens if I touch the plant too much?
If contact becomes intrusive, the plant will produce high-pitched annoying sounds and drive itself away to escape. - How do I prevent the plant from hitting obstacles?
An ultrasonic sensor checks the distance to nearby objects before moving and initiates a turn if the path is blocked. - Why is non-conductive material needed on the pot?
Wrapping the pot prevents the conductive moist soil from interfering with the electric field and the capacitive sensor readings. - Is soldering required for this project?
No, soldering is optional; the authors recommend using a breadboard for prototyping but suggest soldering for a more permanent setup. - What library is needed for the code?
You must install the CapacitiveSensor library within the Arduino IDE to read the touch values from the soil. - How long does the calibration process take?
The program dedicates the first five seconds to calibrating the capacitive sensor by gathering maximum and minimum touch values. - Can I add more features like LEDs?
Yes, you can add features like color-coded LEDs, though adding too many may cause interference with the sensors. - What size plant works best for this robot?
The robot is designed for small plants around 20cm high due to the weight limitations of the motors.