Hello everyone! As the title says, I built an electric go kart which is powered by arduino! Here’s a quick video to make you certain that this is the next thing you’re going to build.
NEW VIDEO! Made for the Boca Bearings Innovation contest– please vote for me when it starts in September!
(Old video for reference: http://tinypic.com/player.php?v=w8x2s9&s=8)
My background: I’m a 15 year old high school student from California. My hobbies include building stuff, reading, and studying Japanese.
I’ve also entered into the Epilog Challenge contest, please vote for me!
A quick disclaimer: I take no responsibility for any injuries to yourself or anyone else. Electricity is DANGEROUS. Chain drives are EVEN MORE DANGEROUS. They could easily cut a finger off or worse. Wear a helmet when attempting things like this.
With that out of the way 🙂
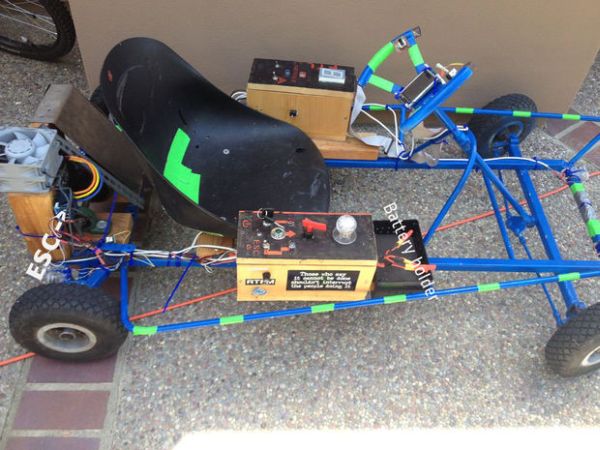
Overview:
The drive setup uses a Hobbywing Xerun 150A brushless electronic speed controller to control a Savox BSM5065 450Kv motor. Batteries are 3x zippy lithium polymer – 5 cells, 5000mah. The motor has two large fans I pulled out of an old computer for cooling, mounted right over the motor. The chain drive is a 1:10 overall ratio, using a 15 tooth on the motor chained to a 30 tooth on the jackshaft, and a 9 tooth from the jackshaft to a 45 tooth on the wheel. The tires are 10″ diameter so at 20 volts the top speed is around 30 mph. The ESC is controlled via PWM from the arduino. A throttle potentiometer on the steering wheel controls this. Constant current is around 40-50A, and the batteries last around 30 minutes with an average speed of 10-15mph. It requires a small push to get started (really, the motor just has to be rotating) and accelerates extremely fast. (and if anyone’s wondering why it says FTL on the left control box, it’s short for Faster than Light, which is the name I gave it.)
This is not going to be a guide to building this, because it’s far too complex and every step wasn’t documented, but rather detailed information for anyone who wants to make something similar.
I’m going to assume the reader has a decent understanding of electronics, Arduino, and radio control power systems.
Step 1: Drive System – Chains and Sprockets
(approximate) parts list:
(all sprockets are for #35 chain)
1x – 5/8″ diameter jackshaft
2x – 5/8″ bore pillow blocks with ball bearing
1x – 5/8″ bore 45 tooth sprocket (Wheel)
1x – 5/8″ bore 9 tooth sprocket (jackshaft #2, chained to wheel)
1x – 5/8″ bore 30 tooth sprocket (jackshaft #1, chained to motor)
1x – (explained below) ? bore 15 tooth sprocket (motor)
3-4x – 5/8″ bore shaft collars
red loctite – 1 small tube should be enough, I barely used half of it.
enough #35 chain
Just a quick note: This uses a sensorless brushless motor. They are not capable of starting under load. It may need a quick push before it can start. Don’t try to start them under load. I already had one motor burn out because it stalled and the current burnt the coils’ insulation. Sensored motors overcome this problem.
This is fairly straightforward. Select sprockets with the correct bore and chain size (which in my case was 5/8″ and #35) and chain them together. The motor sprocket, however, will be harder. My motor’s shaft was 6mm, a metric size. I found a bushing with an inner diameter of 6mm and an outer diameter of 3/4″, effectively acting as a metric to imperial converter. I then attached a 3/4″ bore sprocket to the bushing and put it onto the motor. Position the set screws of the sprocket in such a way as to clamp the bushing onto the motor’s shaft, and add Loctite (unless you want to be able to remove it). Be careful to use the shaft already extending out of the motor instead of the (usually) included propeller adapter. Otherwise, the motor may bend from lateral stress, which it isn’t designed for. (Mine was an rc airplane motor, so it’s built for spinning propellers.) The motor mount I used was the Great Planes Large motor mount. However, I had to drill extra holes because the motor had a different mounting pattern.
More detail: Electric Arduino Go-kart