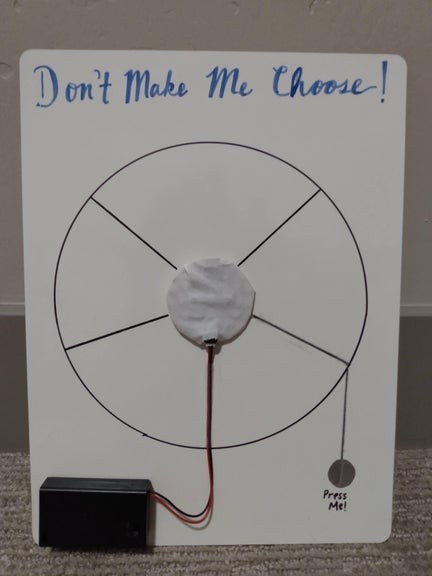
So much of our lives is spent making choices. Cut down on that time by making your own “Don’t Make Me Choose” project. This project uses the lights on a Circuit Playground to point to a specific item you have listed on the whiteboard. This project is great for choosing a date night activity, place to eat, movie to watch, or randomizing your child’s chore assignments.
This project is fairly simple, but it does require a basic knowledge of how to use a Circuit Playground. Happy creating!
Supplies:
A small white board and white board markers
1 circuit playground
Circuit playground battery pack
Circuit playground data transfer cord
1 permanent marker
Scotch Tape
Scissors
Ruler
Cloth** (big enough to cover Circuit Playground)
**Optional
Step 1: Upload Code to the Circuit Playground
I used the AdaFruit platform to create my code. Click here to access the code. Download the code and load it onto your Circuit Playground.
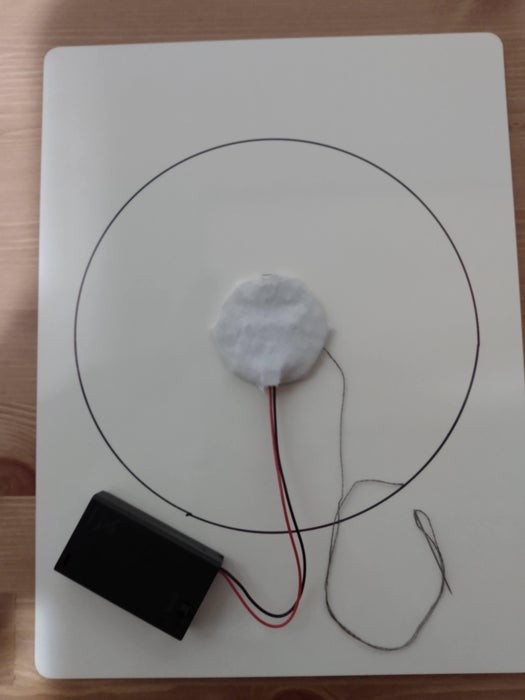
Step 2: Draw a Circle
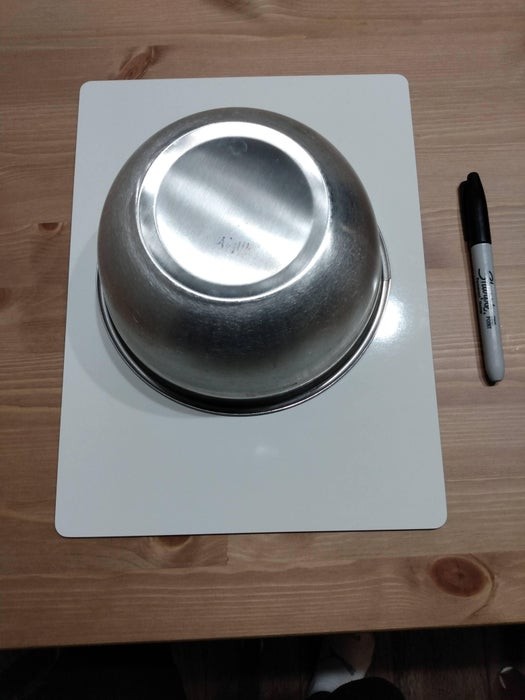
Take your whiteboard and permanent marker and draw a circle in the center of your white board. I used a large bowl as a stencil, but this can also be done free-hand.
Step 3: Preparing the Circuit Playground
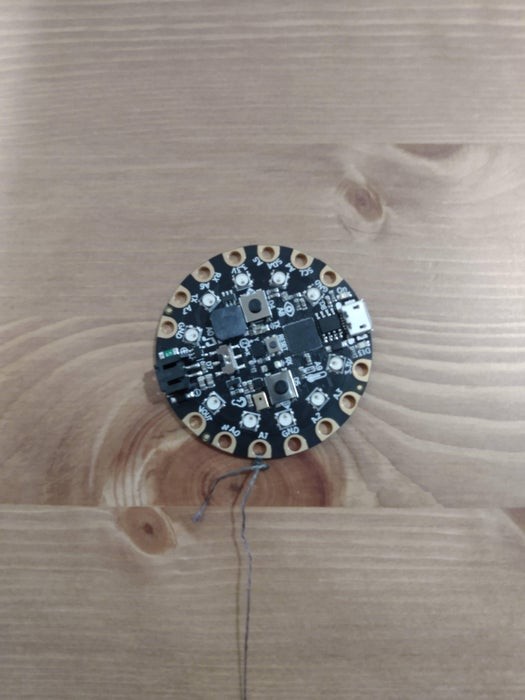
Set aside the white board and gather your Circuit Playground and conductive thread.
Cut a long piece of thread and wind it tightly around the A1 pin (or whichever pin you have set to activate the sensor and run the code) and then tie a knot to ensure the thread stays secure.
Step 4: Option: Cover the Circuit Playground in Cloth
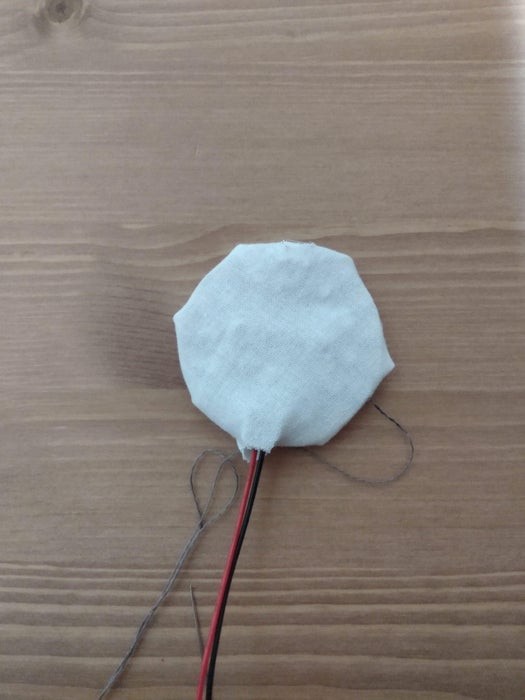
I found the Circuit Playground’s light to be very bright and I wanted to cover the Circuit Playground to make it less distracting.
First, make sure you unplug your battery pack from the Circuit Playground. Then cut your cloth to a size that will cover the Circuit Playground. Use a needle to thread the conductive thread through the cloth and use scissors to cut small holes* where the battery pack and data transfer cord plug into the Circuit Playground. Using Scotch tape, secure the fabric to the back of the Circuit Playground.
*I found it easier secure some of the fabric before cutting the holes and then completing the securing process after the holes were cut.
Step 5: Secure the Circuit Playground
Using Scotch Tape, secure the Circuit Playground in the center of the circle you drew in Step 2.
Step 6: Draw the Section Lines
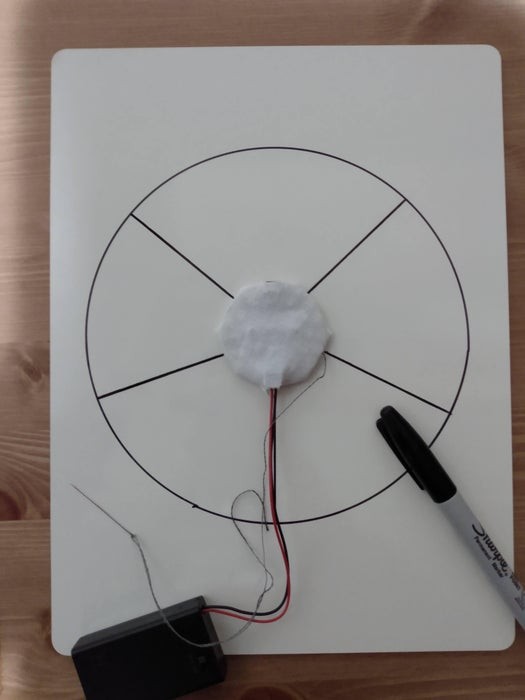
For this step, you will need a permanent marker and ruler. It is also helpful to know where the lights on your Circuit Playground are if you chose to cover it. I did this by uploading some code to my Circuit Playground that lit up all the lights and then re-uploading the project code.
Once you know where your lights are, use your marker and your ruler to draw five sections in the circle. Each section should contain two lights from the Circuit Playground within their boundaries. These sections do not need to be even.
To keep things neat, I drew one my lines from the battery pack and one close to the conductive thread. This will help hide those details in the final step.
Step 7: Secure the Battery Pack, Conductive Thread, and Add Push Button

Using Scotch Tape, secure the battery pack cord along one of the section lines you drew earlier until you reach the edge of the circle. Then take a rolled piece of tape and put it on the back of the battery pack. Now adhere it to the white board.
Now, take another piece of of tape and use it to adhere the conductive thread to the white board in the same way as the battery pack cord. Ensure thread is tight so the circuit will still work. Once reaching the edge of the circle, use another piece of tape to adhere the thread parallel to the edge of the board. DO NOT cover all of the thread with Scotch tape.
Take your scissors and cut a piece of conductive tape. I shaped mine in a circle, but you can make it any shape you want. Peel the paper off the back of the tape and stick it on top of the exposed conductive thread. I like to put this button right below where the Scotch tape stops covering the thread. Trim off any thread that may be hanging out from below the conductive tape button.
Now you can decorate the board however you would like.
Congratulations! You have now completed your project! Now you can write items in the sections, turn on your battery pack, press the conductive tape button and watch the lights spin around to make your choice! Using a whiteboard marker will allow you to use this project again and again.
Source: “Don’t Make Me Choose” – a Randomized Light Wheel