Summary of DIY Muscle Sensor / EMG Circuit for a Microcontroller
Summary: This article explains how to build a DIY muscle sensor (EMG) circuit for hobby projects using common components and two 9V batteries to create ±9V supplies. It covers required parts, powering with series batteries and ground referencing, and initial signal acquisition using an INA106 differential amplifier to amplify electrode signals for use with microcontrollers, prosthetics, robotics, or games.
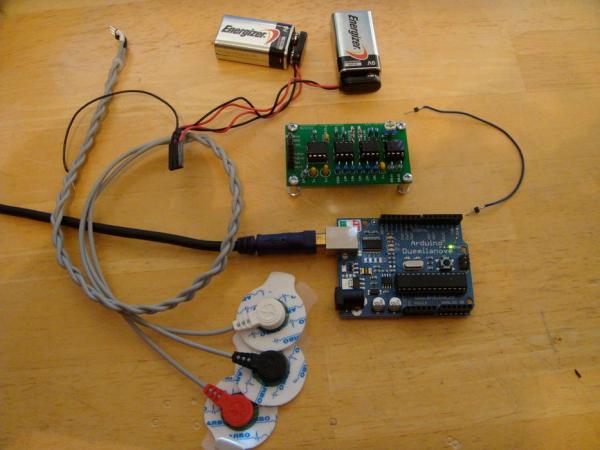
Parts used in the DIY Muscle Sensor / EMG Circuit:
- 3x TL072 IC Chip
- 1x INA106 IC Chip
- 1x EMG Cables (set of 3)
- 3x EMG Electrodes
- 2x 9V Battery
- 2x 9V battery clips
- 2x 1.0 uF Tantalum capacitors
- 1x 0.01 uF Ceramic Disc capacitor
- 1x 1.0 uF Ceramic Disc capacitor
- 3x 150 kOhm 1% resistors
- 2x 1 MOhm 1% resistors
- 2x ~80.6 kOhm 1% resistors (around 80k acceptable)
- 6x 10 kOhm 1% resistors
- 1x 100 kOhm Trimmer
- 1x 1 kOhm 1% resistor
- 2x 1N4148 Diode
- Jumper wires
- 3x Alligator clip cables
- Optional: Oscilloscope
- Optional: Multimeter
Measuring muscle activation via electric potential, referred to as electromyography (EMG) , has traditionally been used for medical research and diagnosis of neuromuscular disorders. However, with the advent of ever shrinking yet more powerful microcontrollers and integrated circuits, EMG circuits and sensors have found their way into prosthetics, robotics and other control systems. Yet, EMG systems remain expensive and mostly outside the grasp of modern hobbyist.
This instructable will teach you how to make your own muscle sensor / EMG circuit to incorporate into your next project. Use it to control video games, robot arms, exoskeletons, etc.
Click on the video below for a demonstrations on how to hook up and use your EMG circuit board!
You can now also purchase EMG sensors, kits, cables and electrodes at www.AdvancerTechnologies.com!
Muscle Sensor Kit (now also on SparkFun)
Muscle Sensor Electrodes
Note: This sensor is not intended for use in the diagnosis of disease or other conditions, or in the cure, mitigation treatment, or prevention of disease, in a man or other animals.
About Advancer Technologies
Advancer Technologies is a company devoted to developing innovative game-changing biomedical and biomechanical technologies and applied sciences. Additionally, Advancer Technologies promotes all forms of interest and learning into biomedical technologies. To help culture and educate future great minds and concepts in the field, they frequently post informative instructions on some of their technologies. For more information, please visit www.AdvancerTechnologies.com .
Step 1: Materials

Click on the links to go to where you can buy items/order free samples.
Circuit Chips
3x TL072 IC Chip – Free Samples
1x INA106 IC Chip – Free Samples
Cables and Electrodes
1x EMG Cables (set of 3)… Note: you could optionally connect the alligator clips directly to the electrodes.
3x EMG Electrodes
Power
2x 9V Battery
2x 9V battery clips
Capacitors
• 2x 1.0 uF Tant
• 1x 0.01 uF Ceramic Disc
• 1x 1.0 uF Ceramic Disc
Resistors
• 3x 150 kOhm 1%
• 2x 1 MOhm 1%
• 2x 80.6 kOhm 1%
(Note: You don’t need exactly 80.6k resistors. Anything around 80k
should suffice. Our MyoWare sensor uses 82k resistors for example.)
• 6x 10 kOhm 1%
• 1x 100 kOhm Trimmer
• 1x 1 kOhm 1%
Misc
• 2x 1N4148 Diode
• Jumper wires
• 3x Alligator clip cables
Optional
• 1x Oscilloscope
• 1x Multimeter
Step 2: POWER SUPPLY
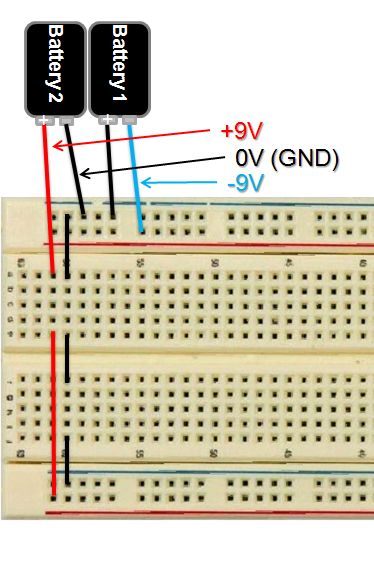
To start things off, you’ll need both a positive and negative voltage power supply. We will make these using two 9V batteries.
Now, everyone knows what a positive voltage power supply is, (e.g. common battery) but how do you go about making a negative voltage power supply?
Common electrical circuit rule of thumb is when you connect two batteries in series (eg positive terminal of battery 1 connected to the negative terminal of battery 2) then measure the voltage from the negative terminal of battery 1 and the positive terminal of battery 2, the measured voltage is equal to the summation of the voltages of battery 1 and battery 2.
For this circuit we want a +9V and a -9V power supplies. If we connect our two 9V batteries in series, we will get a power supply of +18V. So how do we get the -9V from these two?
It might help to think about what voltage actually means… voltage is an electrical potential difference. The keyword here is difference. Voltages are only meaningful in terms of the reference point (or more commonly referred to as ground). A voltage is the electrical potential between this reference point and the point you are measuring. Do you see the answer yet?
We do indeed get a +18V voltage reading if we use battery 1’s negative terminal as the reference point… but what if we choose the connection between battery 1’s positive terminal and battery 2’s negative terminal? If we use this point as our reference or ground, then battery 2’s positive terminals voltage will be +9V and battery 1’s negative terminal will be -9V!
Using your breadboard, 9V batteries and battery clips, connect the battery clip wires as shown. However, for the time being, disconnect the positive terminal of battery 2 and the negative terminal of battery 1. It is good practice to always disconnect your power while you assemble a circuit. At the end of the assembly we will reconnect these wires to power the circuit on. (You could also add switches to do this)
Step 3: SIGNAL ACQUISITION
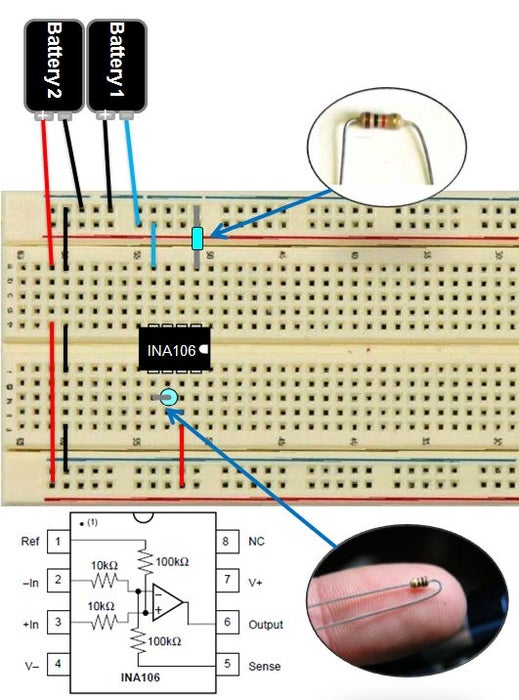
Next, we will work on the signal acquisition phase of your EMG circuit which we will use to measure your body’s nervous system’s electrical impulses used to activate muscle fibers.
First, get out your INA106 IC chip (chip A) and insert it into your breadboard as illustrated above. The INA106 is a difference amplifier which will measure and amplify (G=110) the very small voltage differences between the two electrodes you place on your muscle.
Next, grab two 1 M ohm resistors, bend them and then plug them in to your breadboard like the two examples shown. One should connect pins 5 and 6 and the other should bridge pin 1 to your ground rail of your board.
Don’t worry about the other pins of the INA106 for now; we’ll come back to those later.
Read more: DIY Muscle Sensor / EMG Circuit for a Microcontroller
- What is the purpose of this DIY muscle sensor?
To measure muscle activation via electromyography for use in projects like prosthetics, robotics, exoskeletons, or game control. - What power supplies are required for the circuit?
Two 9V batteries configured to provide a +9V and a -9V supply using their series connection and a midpoint ground reference. - How is the negative voltage supply created?
By connecting two 9V batteries in series and using the junction between the batteries as the circuit ground, yielding +9V and -9V relative to that midpoint. - Which amplifier is used for signal acquisition?
The INA106 difference amplifier is used to measure and amplify the small voltage difference between two electrodes with a gain of 110. - How many TL072 chips are needed?
Three TL072 IC chips are listed as required parts. - What electrode and cable components are needed?
A set of 3 EMG cables and 3 EMG electrodes are required, with the option to connect alligator clips directly to electrodes. - Are exact resistor values required for the ~80k resistors?
No, anything around 80k is acceptable; the article notes the MyoWare sensor uses 82k as an example. - Is this sensor intended for medical diagnosis?
No, the sensor is not intended for diagnosis, treatment, or prevention of disease in humans or animals.