A professional air hockey setup is usually available only in arcades due to the sophisticated systems that are required to operate it. Our goal was to build a DIY air hockey table, bringing this gaming experience at home.
By using commonly available materials we have succeeded in making a cost effective and easy to build air hockey table. Our project uses the power of modern technologies such as lasercutting and 3d printing to make a customized and easily scalable system letting one build the game according to their preferences.
There is no better joy than seeing the puck gliding smoothly on the cushion of air and dropping into the goal. Follow on to build your very own air hockey game and we can ensure you that it will lead to hours of fun!
Do drop a vote in the games contest if you liked the project and check the video linked above.
Step 1: Overview of the Playfield

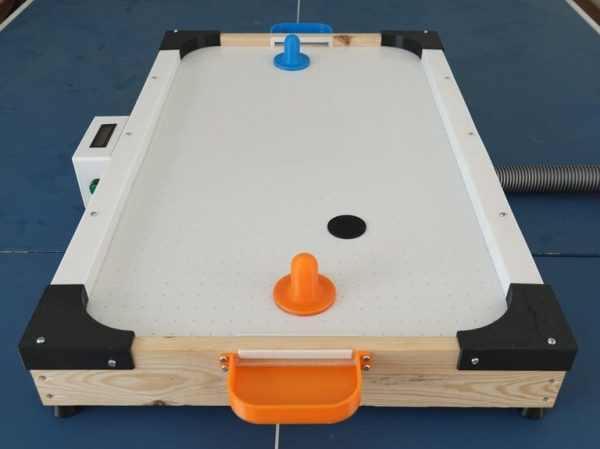
To conceptualize the air hockey table, we first designed it on fusion 360. We customized our playfield to a reasonable size making it easy to setup yet keep the fun factor of the game. Here are few features of our diy system:
- Using the power of digital fabrication, various parts like the playfield and strikers were made. With present laser-cutting and 3d printing precision the components have a clean look and are durable.
- An electronic counter facilitates keeping track of the score and provides a display for maximum three digit numbers.
- The design uses a vacuum cleaner that features a blower option to provide the playfield with constant airflow. Giving another purpose to the vacuum cleaner and making it house friendly.
- Embedded LED strips enhances the gaming atmosphere and adds an aesthetic aspect.
- The use of common household materials drastically reduces the cost to build this game.
- Form factor makes it easy to mount on a table or a floor and lets one store it away conveniently too.
Step 2: Principles of Air Hockey
The principles of air hockey are very similar to regular ice hockey, the primary differences are:
- Air hockey is a game which can be played on a tabletop whereas hockey is a game that requires a big arena/field
- Hockey is played as a team of 6 whereas air hockey is usually a single player game
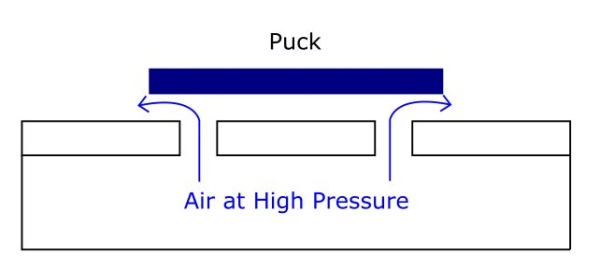
- And finally, in hockey, the puck is made to slide smoothly across the playfield using a layer of ice whereas in air hockey a cushion of air essentially levitates the puck millimeters above the playfield reducing friction. This makes the game extremely fast-paced and enjoyable.
The lift generated to levitate the puck is achieved by creating tiny holes all over the playfield in a grid that blows air at high pressure from underneath. The air is then forced through these holes and exits with a high velocity countering the weight of the puck making it float on a layer of thin air.
Step 3: Materials Needed:
The following is the list of all the components needed to make your very own air hockey table. All parts should be commonly available and easy to find.
HARDWARE :
- 1/4″ Plywood – dimensions; 80cm by 50cm
- 1″ by 4″ Pine Wood Plank – 8 ft long
- 3D Printing Filament– PLA or ABS
- M3 Threaded Insert x 8 – (optional)
- M3 Bolt x 8 – 2.5cm long
- Wood Screw x 12 – 6cm long
- Wood Screw x 30 – 2.5cm long
- Acrylic
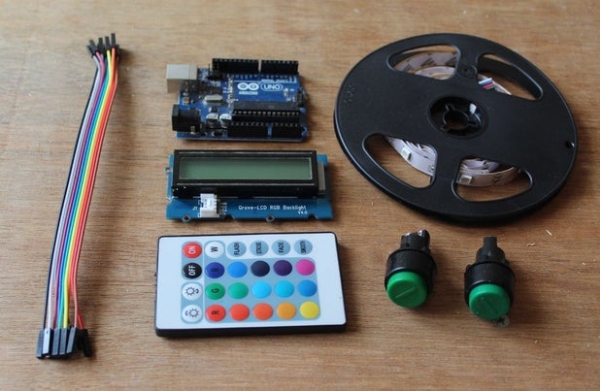
ELECTRONICS :
- Arduino Uno
- Push Button x 2
- LCD Display
- LED strip (RGB)
- Jumpwire
- 12V Adapter
The total cost of the model came to around 50$ which in comparison to the products in the market is almost half the cost!
Step 4: 3D Printing
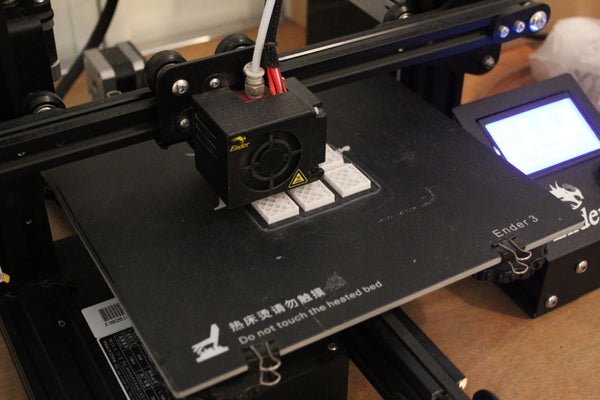
We used a 3d printer to make several of the custom parts. As most parts didn’t need much strength, we printed them in PLA which we recommend as it is also easy to print. The following list contains the total number of parts and their printing specifications. All the STL files are provided in a folder attached below, allowing one to make their needed modifications if necessary.
- Striker x 2, 20% infill (one colour for each player)
- Goal x 2, 20% infill (one colour for each player)
- Corner Guard x 2, 40% infill
- Corner Guard (mirrored) x 2, 40% infill
- Electronics Compartment x 1, 20% infill
- Acrylic Spacer x 12, 20% infill
The parts took a total of 48 hours to print and were done on our ender 3 printer.
Read more: DIY Low Cost Air Hockey Table