Summary of DIY Li-ion Capacity Tester !
This article explains how to build a Li-ion battery capacity tester using an Arduino. It defines battery capacity (mAh/Ah) and addresses the difficulty of manual calculations due to voltage drops, proposing an automated solution. The project uses specific electronic components to measure current, voltage, and time to calculate total capacity accurately.
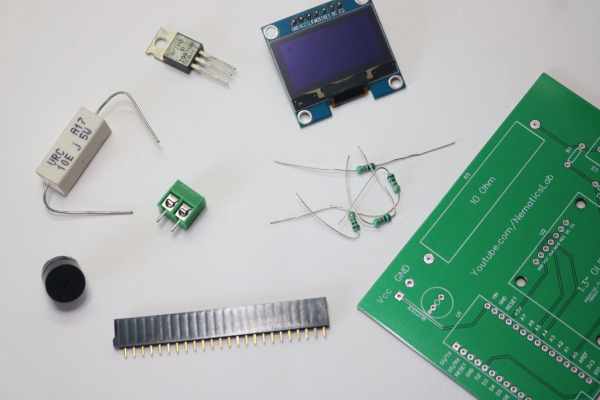
Parts used in the DIY Li-ion Capacity Tester:
- PCB
- Power Resistor
- 10k Resistor
- OLED Display
- Arduino
- Buzzer
- Screw Terminal
- Female Headers
- IRFZ44N N Channel Mosfet
When it comes to building the battery packs, Li-ion cells are one of the best choices without the doubt. But if you get them from old laptop batteries then you might want to do a capacity test before building the battery pack.
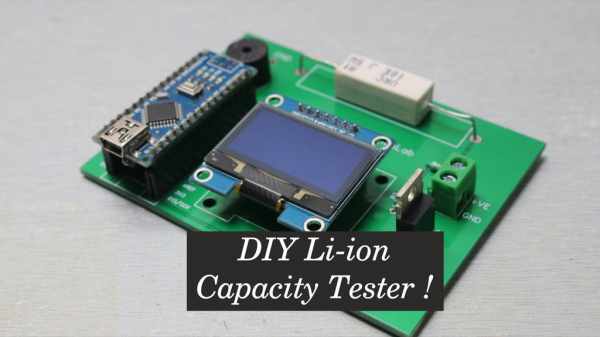
So today I will show you how to make a Li-ion capacity tester using an Arduino.
So let’s get Started!
Step 1: Watch the Video !
If you don’t want to read all the stuff you can watch my video!
Step 2: Everything We Need
1) PCB (I ordered Online but you can use Zero PCB)- https://www.gearbest.com/diy-parts-components/pp_6…
2) Power Resistor –https://www.gearbest.com/diy-parts-components/pp_2…
3) 10k Resistor- https://www.gearbest.com/diy-parts-components/pp_2…
4) OLED – https://www.gearbest.com/lcd-led-display-module/pp…
5) Arduino- https://www.gearbest.com/boards-shields/pp_1313295…
6) Buzzer- https://www.gearbest.com/multi-rotor-parts/pp_1525…
7) Screw Terminal- https://www.gearbest.com/diy-parts-components/pp_1…
8) Female Headers- https://www.gearbest.com/diy-parts-components/pp_6…
9) IRFZ44N N Channel Mosfet – https://www.banggood.com/2Pcs-IRFZ44N-Transistor-N…
Step 3: What Is Capacity !
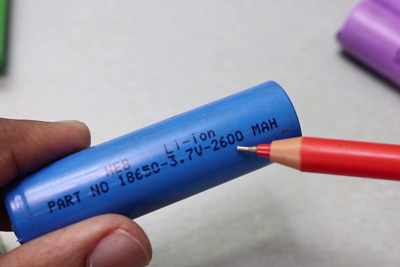
Before building the capacity tester we must know what is capacity. Unit for capacity is mAh or Ah. If you take a look at any Li-ion cell they will mention its capacity on it as one shown mentions 2600 mAh on it. Basically what this means is that, if we connect a load across it which draws 2.6A then this battery would last for an hour. Similarly, if I have a 1000 mAh battery and load draws 2A then it would last for 30 min, And this is what an Ah or mAh means.
Step 4: Practically Not Possible

But calculating in this way is practically not possible because we all know V=IR. Initially, our battery voltage will be 4.2V if we keep the resistance constant there will be some current flowing through the load. But over the time battery voltage will decrease and so does our current. This will make our calculations much difficult than expected because we will need to measure the current and the time for every instance.
Now to perform all calculations it is not practically possible so here we will use an Arduino which will measure the current time and the voltage, process the information and in the end give us the capacity.
Step 5: Schematic, Code & Gerber Files
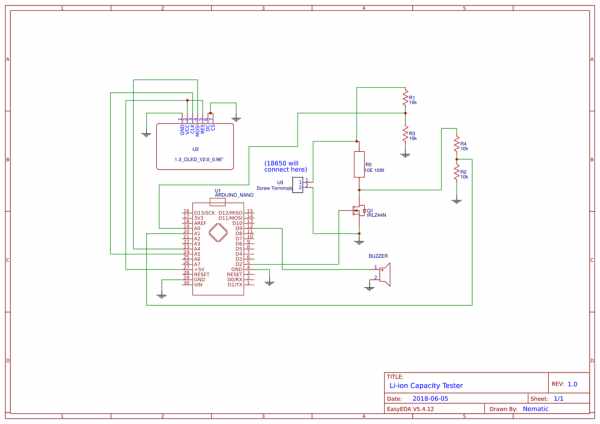
Note!
I had an SPI OLED lying around so converted it to I2C and used it. If you want to learn how to convert SPI to OLED look at my previous tutorial –https://www.instructables.com/id/OLED-Tutorial-Con…
Here is the link to my Project if you want to make changes to PCB and Schematic
https://easyeda.com/nematic.business/18650-Capacit…
Source: DIY Li-ion Capacity Tester !
- What is the best choice for building battery packs?
Li-ion cells are one of the best choices without doubt. - Why should you test old laptop batteries before building a pack?
You might want to do a capacity test before building the battery pack if you get cells from old laptop batteries. - How does this project calculate battery capacity?
The Arduino measures the current, time, and voltage to process information and give the capacity. - Why is manual calculation of capacity practically not possible?
Voltage decreases over time while resistance is constant, causing current to drop and making manual calculations difficult. - What unit is used for battery capacity?
The unit for capacity is mAh or Ah. - Can you use a Zero PCB instead of ordering one?
Yes, you can use a Zero PCB instead of ordering one online. - What happens if you connect a load that draws 2.6A to a 2600 mAh battery?
The battery would last for an hour. - Does the author recommend watching a video first?
Yes, the author provides a video link for those who do not want to read all the text. - What did the author do with their SPI OLED module?
The author converted it to I2C and used it because they had one lying around.