Summary of DIY Arduino Unit Converter: How to use LCD
This article guides users in setting up an Arduino project featuring a 16x2 LCD display and two potentiometers. It details wiring connections, including backlight control via a resistor, and provides code examples using the LiquidCrystal library to initialize the screen, print text on multiple lines, and manage cursor positioning. The guide also covers troubleshooting common display issues like blank screens or white squares by adjusting potentiometers and verifying pin configurations.
Parts used in the Arduino LCD Project:
- Arduino
- Breadboard
- LCD screen (16x2)
- Two 50k potentiometers
- 150 ohm resistor
- Jumper wires
Step 1: Ingredients:
Electronics
- Arduino
- Breadboard
- LCD*
- 2x 50k pots
- 150 ohm resistor
- Jumper wires, and tons of them!
If you do not want to use a LCD then you will have to use serial monitor. Wherever you see lcd.print just change it to Serial.print. Instead of lcd.begin change it to Serial.begin(9600);.
Step 2: The LCD
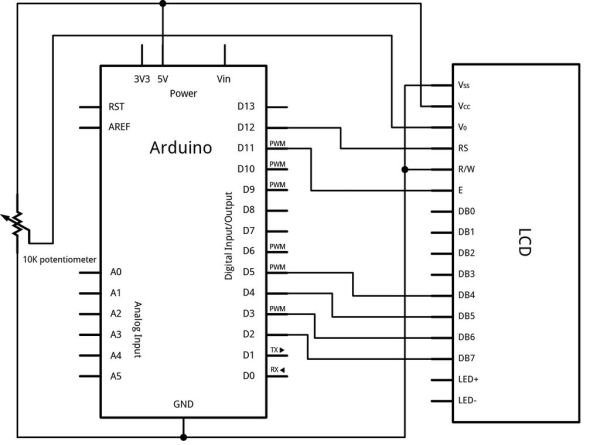
So the first thing I did was go to the Arduino website and see how to hook up my LCD screen. I’ve attached the schematic.
For the backlight hook up pin (K) on the LCD to ground, and pin (A) on the LCD to pin 10 on Arduino through the 150 ohm resistor.
We need to learn to how to use this LCD screen, so I’ve included a little information on this. Arduino already has a library for the LCD, so we need to include this. We can accomplish this by typing in our code before the setup, #include <LiquidCrystal.h> . Now our LCD library is included. The next thing to do is to tell Arduino what pins we are hooking up to the LCD. We do this by typing in this before the setup function, LiquidCrystal lcd(12, 11, 5, 4, 3, 2); These are the pins Arduino will send data to the LCD through.
So this is what our sketch is going to look like so far.
Now lets learn a little bit about using the LCD functions.
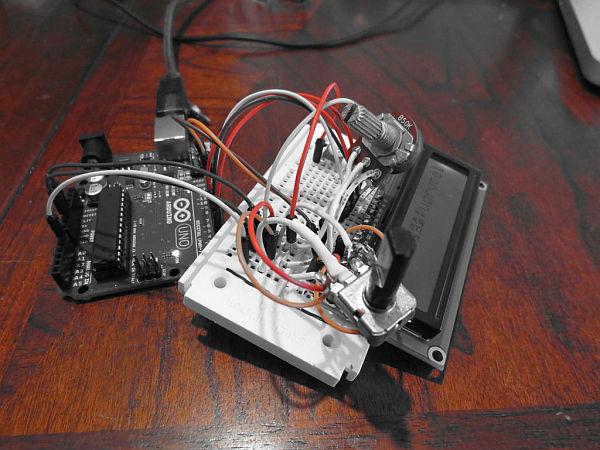
- lcd.begin(16,2); // this is for setting up the number of column and rows. If you look in pictures 2 and 3 you can see the amount of columns and in picture 3 you can see the amount of rows.
- lcd.print(” “); // this is how we print text on the screen. Your text goes in between the the quotes. The quotes are needed.
- lcd.clear(); // this is how we clear all text from the screen.
- lcd.setCursor(0,1); // This is how we put text on the second row.
So put all this to a little bit of use. Hook up your screen, then type in this code.
If you copy this, paste in your sketch, and upload to your board, you should see the LCD light up and the text appear, “I’m cool”.
Troubleshooting:
- All I see is white squares or the screen is just blue (or your lcd backlight color)!
- The screen does not light up!
Solution:
- Turn the potentiometer all the way to one side then the other. You should see the text appear. If so, slowly adjust the pot until the text is clear
- Make sure all your connections are right.
- Make sure [ lcdbl ] is set to [ OUTPUT ]
Now, lets put some text on the bottom row. If you recall, we need to offset the cursor. We do this by typing in lcd.setCursor(0,1);
See the revised code.
Upload this to your Arduino and see what happens!
Step 3: Hooking up the Second Potentiometer
Alright, now that we know how to use the LCD, we need to move one. The first step is to hook up our second potentiometer. We will do this by hooking up the two outer pins to 5v and GND, and the middle pin the Arduino pin A0.
Now of course we need to set this up with Arduino. This is how:
For more detail: DIY Arduino Unit Converter: How to use LCD
- How do I connect the LCD backlight?
Connect pin K on the LCD to ground and pin A to Arduino pin 10 through a 150 ohm resistor. - What library is required for the LCD?
You must include the LiquidCrystal.h library before the setup function. - How do I set the cursor to the second row?
Use the command lcd.setCursor(0,1) to place text on the second row. - Can I use the serial monitor instead of an LCD?
Yes, replace lcd.print with Serial.print and change lcd.begin to Serial.begin(9600). - Why does my screen show white squares or remain blue?
Turn the potentiometer fully to one side then the other to adjust contrast until text appears. - How do I wire the second potentiometer?
Connect the two outer pins to 5v and GND, and the middle pin to Arduino pin A0. - What command turns on the LCD backlight?
Use digitalWrite(lcdbl, HIGH) after setting the pin as OUTPUT. - How many columns and rows does the example LCD have?
The example setup uses a 16 column by 2 row display initialized with lcd.begin(16,2).