Summary of DIY ACRYLIC INDIGO BUTTERFLY LAMP.
This article details the construction of an Indigo Butterfly Acrylic LED Lamp featuring engraved designs and a wooden base. The project utilizes 18 WS2812B addressable RGB LEDs controlled by an Arduino Pro Mini, offering six lighting modes adjustable via two potentiometers for speed, brightness, and color selection. The lamp includes interchangeable acrylic cylinders, a cotton cloud effect at the base, and runs on a 5V power supply with low wattage consumption.
Parts used in the Indigo Butterfly Lamp:
- Clear Acrylic Cylinder Tube
- Clear Acrylic sheet
- Wooden Cylinder block
- 18x WS2812B LEDs
- Arduino Pro Mini
- Capacitor 1000uf 16v
- 2x 10kohm potentiometer
- Epoxy Glue
- Foam sheet
- Masking Tape
- Wires
- Vinyls
- Old USB Cable
- Wood Wax
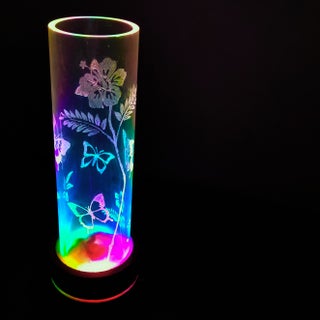
The Indigo Butterflies looks so awesome, Aren’t they?
Colors, Colors, Everywhere. Some are here, and some are there.
Mood Lighting to be Happy, Relaxed, or Focused.
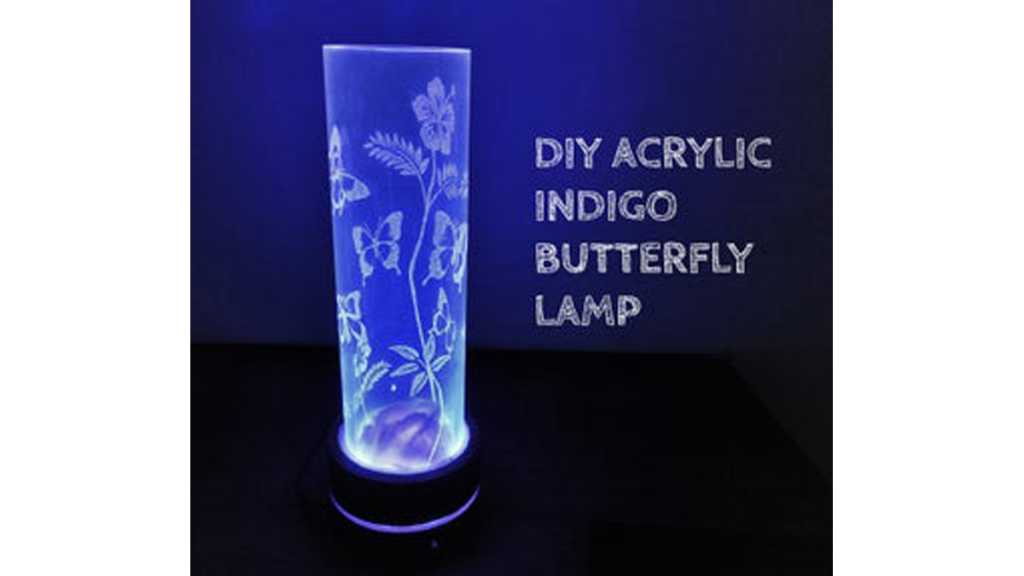
In this Instructable I’ll show you how I build an Acrylic LED Lamp with WS2812B addressable RGB LEDs, Acrylic Cylinder with engraved butterflies and flowers on it and Wooden base with circular RGB Ring in between. Using 18 RGB-LEDs each controlled by a single WS2812 RGB-Controller. It uses only 5 or 6 watt and providing 6 different modes that are controlled by a Arduino pro mini 328 5V/16MHz board and runs on 5v power supply.
The potentiometers with knobs are used to switch between the modes and control speed, color or brightness of the several modes.
The single Base can be used by many interchangeable acrylic cylinders with different Designs and patterns.
There is also some cotton at the bottom of the Acrylic tube, which turns out to be like a coloured cloud, too satisfying to watch.
MODE is be changed by the First Knob.
Speed and Brightness is controlled by the second Knob.
- MODE1 : Only one Color. (any of choice).
- MODE 2 : Running through the Rainbow (unicolor).
- MODE 3: Running through the Rainbow (chasing mode).
- MODE 4: Running through Rainbow (Helix Mode).
- MODE 5: Coloured Bubbles. (random)
- MODE 6: Reading Lamp (Just White).
Step 1: ANY COLOUR WE WANT.
WS2812B includes 3 super bright LEDs (Red, Green, and Blue) and a compact driver circuit (WS2811) that only requires one data input to control the state, brightness, and color of the 3 LEDs.
In my opinion, this is the coolest type of LED. You can control the brightness and the color of each LED individually, which allows you to produce amazing and complex effects in a simple way.
These LEDs have a IC built right into the LED. This allows a communication via a one-wire interface. This means that you can control lots of LEDs using just one digital pin of your Arduino.
Step 2: Short Clip of Lamp in Action.
Step 3: Materials and Tools Used.
Materials:
- Clear Acrylic Cylinder Tube.
- Clear Acrylic sheet.
- Wooden Cylinder block.
- WS2812B LEDs (18 Leds).
- Arduino Pro Mini.
- Capacitor 1000uf 16v.
- 2x 10kohm potentiometer
- Epoxy Glue.
- Foam sheet.
- Masking Tape.
- Wires.
- Vinyls.
- Old USB Cable.
- Wood Wax.
Tools:
- Rotary Hand Tool.
- Hand Drill.
- Soldering Iron
- Wire stripper
- Hot glue Gun
- Hole Saw
- Clamps
- Laser Cutter (optional)
Step 4: The Design.
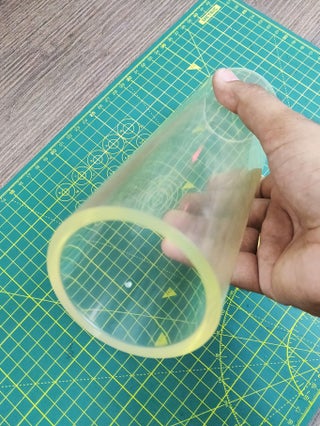
The LEDs are glued inside the wooden cylinder and a acrylic cylinder above the LEDs.
The Acrylic cylinder dimensions are: 240mm Height x 70mm outer diameter. The thickness is about 5mm.
The wooden Block dimensions are: 70mm Height x 90mm outer daimeter and thickness is 12mm.
Step 5: Laser-cutting the Designs.
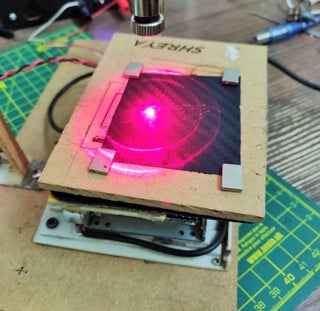
I’ve Laser cut the stencil designs which I wanted to etched on the Cylinder using my Homemade CNC Laser cutter on Vinyls stickers. And afterwards I stick the stencils stickers on the cylinder in an uneven pattern by keeping in mind that not to overdo it, otherwise it won’t look clean.
Step 6: Engraving the Design on the Acrylic.
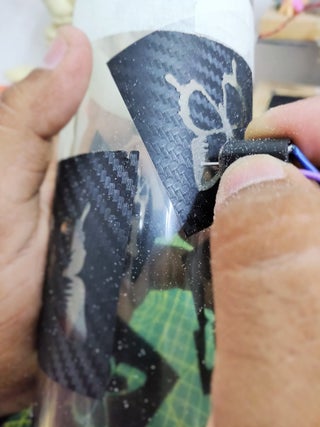
Now the pattern is design to be transferred to the acrylic cylinder.
Using small Rotary hand tool with abrasive tip, I engraved the design onto the cylinder. The stencil will work as a boundary for the design.
Step 7: The Finished Acrylic Tube.
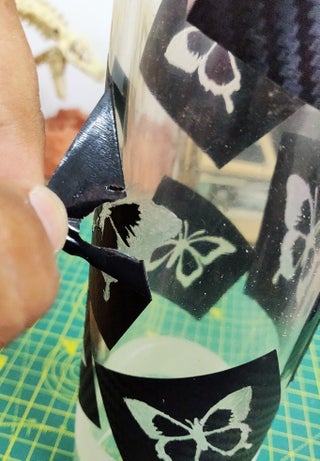
After Engraving, I removed the stencils from the tube and cleaned the whole tube, without scratching it.
Step 8: The Electronic.
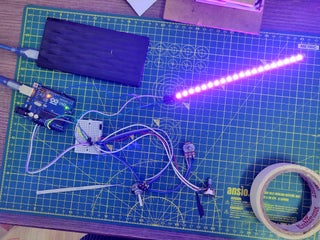
MATERIALS:
- Arduino Pro Mini
- 18x WS2812B Leds
- 2x 10k ohm Potentiometers
- Wires
- USB to TTL converter (for programming the arduino)
- Old USB cable
I’ve used 18 WS1812B RGB-LEDs . It uses only 5 or 6 watt and providing 8 different modes that are controlled by a Arduino pro mini 328 5V/16MHz board. The potentiometers are used to switch between the modes and control speed, color or brightness of the several modes.
CONNECTIONS;
All leds +5V and GROUND common with Arduino.
Arduino Data pin 4 to Din of first WS2812B Led and Dout of first Led to Din of second Led and so on.
Potentiometer 1 and Potentiometers 2 to A0 and A1 of arduino.
“Install the Fast_LED library to Arduino IDE” Here
Source: DIY ACRYLIC INDIGO BUTTERFLY LAMP.
- How many different modes does the lamp provide?
The lamp provides 6 different modes including single color, rainbow running, chasing, helix, colored bubbles, and reading lamp. - Can I change the acrylic cylinder design?
Yes, the single base can be used with many interchangeable acrylic cylinders that have different designs and patterns. - What is the purpose of the cotton at the bottom of the tube?
The cotton at the bottom creates a colored cloud effect which is satisfying to watch. - How are the speed and brightness controlled?
Speed and brightness are controlled by the second knob (potentiometer). - Does each LED require a separate data pin on the Arduino?
No, you can control lots of LEDs using just one digital pin of your Arduino because they communicate via a one-wire interface. - What library should be installed for the Arduino IDE?
You need to install the Fast_LED library to the Arduino IDE. - Which pins connect the potentiometers to the Arduino?
Potentiometer 1 connects to A0 and Potentiometer 2 connects to A1 of the Arduino. - How is the mode changed on the lamp?
The mode is changed by turning the first knob.