Summary of Distinguish Walking and Running Using Machine Learning
This article guides readers through building a DIY wearable pedometer using machine learning to distinguish between walking and running. The project involves designing an electronics circuit with an Arduino and ADXL345 accelerometer, collecting data via an SD card, and developing an algorithm to analyze movement patterns.
Parts used in the DIY Pedometer Project:
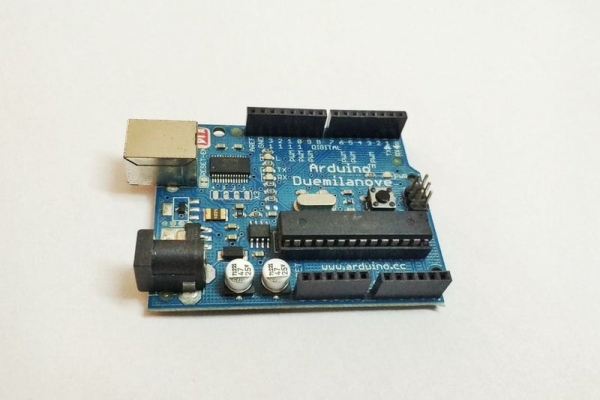
- Arduino duemilanove/uno (or Arduino Nano)
- Accelerometer ADXL345 breakout board
- Micro SD card (1 GB)
- Micro SD card reader module with level conversion chip
- Male berg strips
- General purpose circuit board
- 4 AA battery holder
- 4 AA batteries (or 5V Lipo battery)
- Single core wires
- USB A to B cable
- Styrofoam for packing
- Tape for packing
Electronic market is full of devices called pedometer and fitness tracker. They counts the number of steps you have taken, distance you have covered, whether you are walking or running and bunch of other stuff. Ever wondered, how these devices perform such measurements.
I decided to make one on my own and share the knowledge of making it with guys. In this instructable we will develop accelerometer data accumulator and an algorithm, intelligent enough to identify whether you are walking or running.
I decided to go with machine learning. Machine learning is a sub-field of computer science which explores the study and construction of algorithms that can learn from data, and the derived algorithm is then used to make predictions on data. I am going to walk you through them step by step and believe me these things are easy to learn.
Lets get started.
Step 1: Plan
We need to develop an algorithm to identify walking and running. Machine learning approach says we need data to develop this algorithm. Which data?
Data that we will be using to develop this algorithm is accelerometer data. What are these accelerometers? . These are electronic devices which can measure proper acceleration. Proper acceleration is not the same as coordinate acceleration which is “rate of change of velocity”. For example, an accelerometer at rest on the surface of the Earth will measure an acceleration g=9.81m/s2 straight upwards. By contrast, accelerometers in free fall (falling towards the center of the Earth at the rate of about 9.81m/s2) will measure zero.
We will proceed as follows.
- Design of electronics to accumulate data.
- Collecting accelerometer data(detail of accelerometer, in following steps).
- Develop algorithm.
- Test algorithm.
Step 2: Design of Electronics to Accumulate Data (step 1): Intro
First thing to consider in design of data accumulator is that, it should be a wearable device with data storing capability. Next, Where are we going to wear this wearable device?. Making wearable small enough to were on wrist is expensive, so I decided to make a wearable small and light enough to wear on ankle.I think this is a cost effective decision. Also accelerometer readings near ankle compared to wrist, will make our algorithm design easy.
Step 3: Design of Electronics to Accumulate Data (step 2): Things Needed
Following is the list of things we will need to design data accumulator device.
- Arduino duemilanove/uno (This is what I used, I suggest you use Arduino Nano),
- Accelerometer ADXL345 breakout board,
- Micro SD card (1 GB will do),
- Micro SD card reader module with level conversion chip,
- Few Male berg strip,
- General purpose circuit board,
- 4 AA battery holder,
- 4 AA batteries (This is what I used, I suggest you use smaller 5V Lipo battery),
- Few small single core wires,
- USB A to B cable (connecting arduino to PC),
- Styrofoam for packing and
- Tape for packing.
Following is the list of software we will need.
- Arduino IDE (freeware) and
- GNU Octave (freeware)
If you have doubt regarding any component, just look at the Images or the video(its a “timed” video with starting point, where I discuss the required electronics component).
Step 4: Design of Electronics to Accumulate Data (step 3): Putting Things Together
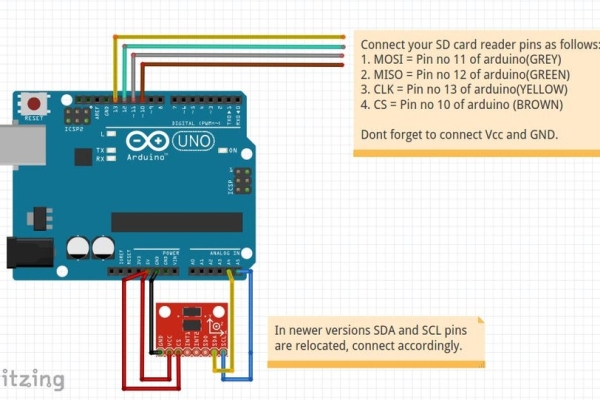
In this step we will put all parts together. Connect as per the fritzing sketch image attached. Following is the description of the same.
For ADXL345 breakout board.
- Connect SDA and SCL pins of breakout board to pin A4 and A5 on Arduino duomilenove/UNO.( Note:- if board that you are using has I2C pins of arduino board some where else, connect I2C pins of breakout board there. )
- Connect CS pin of breakout board to 5V pin of Arduino.
- Connect Vcc and GND pins of breakout board to 5V and GND pins of Arduino.
For Micro SD card reader board.
- Connect MOSI pin of SD card reader to pin no 11 of arduino duomilenove/UNO.
- Connect MISO pin of SD card reader to pin no 12 of arduino duomilanove/UNO.
- Connect SCK pin of SD card reader to pin no 13 of arduino duomilanove/UNO.
- Connect CS pin of SD card reader to pin no 10 of arduino duomilanove/UNO.
- Connect Vcc and GND pins of SD card reader to pin 5V and GND pins of arduino duomilanove/UNO.
NOTE:- If you are using any other arduino board connect according to schematic of your arduino board.
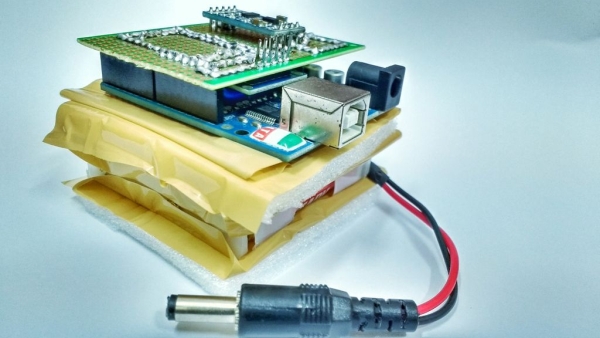
I have attached images of my data accumulator device.
If still in doubt just look at attached video.
Step 5: Design of Electronics to Accumulate Data (step 4):Codeing
Now as hardware is ready, lets code.
I have attached data accumulation code, this code stores reading of 3 axis accelerometer ADXL345 in an SD card every 1 sec for 1 minute. I know this is way below the rate at which we will collect training data, this is just a test code. If you want you can change the rate by editing the ‘delay’ statement at the end of loop() code and change the duration of logging by changing ‘measurements_to_take’ variable at the beginning of the code.
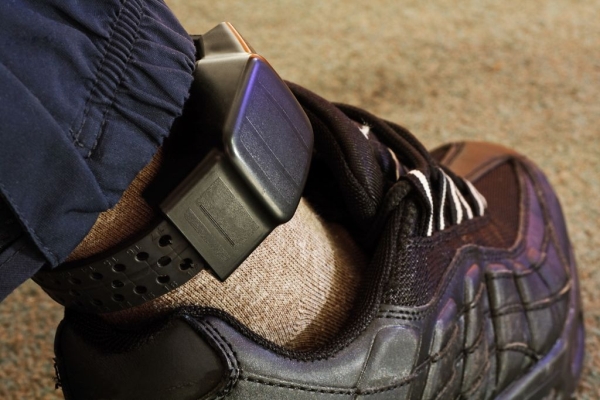
Step 6: Collecting Accelerometer Data (step 1): Wearing the Accumulator
In this step we will place our data collecting device near ankle and collect the data. Small amount of preparation is needed to make sure that you don’t hurt your self from edges of battery holder, sharp projections from arduino or breakout board.
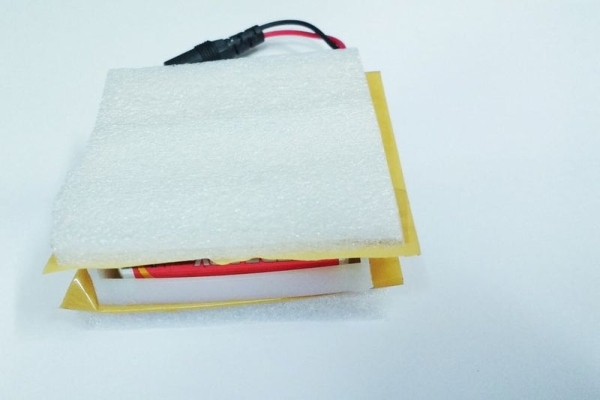
To avoid getting hurt, I stuffed some Styrofoam between my ankle and battery holder as you can see in attached images. For stacking up electronics and making sure that there is no short between them, I again used Styrofoam. I advice wearing sock while collecting data.
Finally I wrapped up everything together with a tape as shown in images and stuck it to my ankle. Please note down the orientation of your accelerometer, so that each time you remove and stick it again accelerometer orientation remains the same. I mean we can develop an algorithm that takes care of random orientation but for beginning I suggest keeping the orientation fixed.
PS: I know this is not the way to pack a thing, but box that I ordered could not accommodate this assembly, hence this tape method.
Read more: Distinguish Walking and Running Using Machine Learning
-
Why did the author choose to wear the device on the ankle instead of the wrist?
Wearing it on the wrist is expensive, while the ankle is cost-effective and makes algorithm design easier due to better accelerometer readings. -
What software is required to complete this project?
The project requires Arduino IDE for coding and GNU Octave for data analysis. -
How should the SDA and SCL pins of the ADXL345 be connected?
Connect the SDA and SCL pins of the breakout board to pin A4 and A5 on the Arduino board. -
What is the function of proper acceleration measured by the accelerometer?
Proper acceleration measures the physical force acting on the device, such as gravity at rest or zero during free fall. -
How long does the test code store accelerometer data per run?
The provided test code stores three-axis accelerometer readings every 1 second for a duration of 1 minute. -
Why is it important to keep the accelerometer orientation fixed?
Keeping the orientation fixed simplifies the initial algorithm development, although future versions could handle random orientations. -
What material was used to prevent injury from sharp edges during data collection?
Styrofoam was stuffed between the ankle and the battery holder to avoid getting hurt from sharp projections.