Summary of Creating a DIY device for monitoring power consumption using ESP32
This article explains building a DIY smart power consumption meter using an ESP32, ZMPT101B voltage sensor, ACS712 current sensor, a Hi-Link 5V SMPS, and a 0.96" I2C OLED. It details wiring, sensor principles, Arduino/ESP32 libraries, calibration, code structure, display functions, and 3D-printed enclosure assembly to monitor real-time voltage, current, instantaneous power, and cumulative energy.
Parts used in the Smart Power Consumption Meter:
- ESP32 WROOM 32D Module
- HI LINK 5V 3W SMPS
- 0.96” 128X64 I2C OLED Display
- ZMPT101B Voltage Sensor
- ACS712 20A Current Sensor
- 220V AC 3 Pin Socket MALE
- 220V AC 3 Pin Socket FEMALE
- 3D Printed Casing (two-part STL)
Electrical appliances, such as smartphones chargers and room heaters, play a crucial role in our everyday routines. This includes larger devices like air conditioners and washing machines. With the ongoing worldwide energy crisis, it is essential to understand the electricity usage of these devices. Although our monthly electricity bills give us a broad view of our total energy usage, they do not give detailed information about the current power consumption of specific devices. Detecting both voltage and current draw from our appliances is crucial for accurately measuring and monitoring power usage.
Commercial energy monitoring devices are widely accessible in the market for this intention, however, they frequently have a high cost and lack the practical learning and fun experience of a do-it-yourself method.
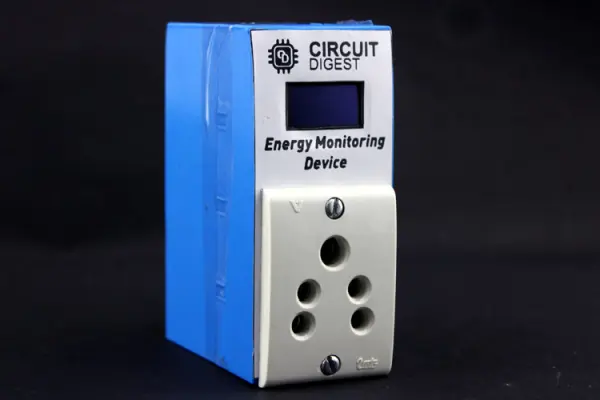
This article will discuss how to make a simple device for tracking energy usage. This project aims to accomplish this objective by utilizing an ESP32 and easily available sensors.
Materials needed to construct a Smart Power Consumption Meter
- ESP32 WROOM 32D Module
- HI LINK 5V 3W SMPS
- 0.96” 128X64 I2C LED
- ZMPT101B Voltage Sensor
- ACS712 Current Sensor
- 220V AC 3 Pin Socket MALE
- 220V AC 3 Pin Socket FEMALE
- 3D Printed Casing
The functioning principle of the Smart Power Consumption Meter
Our main goal in starting the project is to send voltage and current data to the ESP32 microcontroller. The data collected from the sensors will be processed by the ESP32 and sent to the OLED Display for the user to see energy usage. Furthermore, we will also include a HI-Link 5V SMPS Module to supply power to these components by efficiently converting 220V AC to 5V DC.
ZMPT101B Voltage Sensor
The ZMPT101B is a sensor that acts as a voltage transformer, reducing the voltage proportionately and offering an analog output to the user. It offers an isolation voltage of 4000V and a safe operating voltage of 1000V.
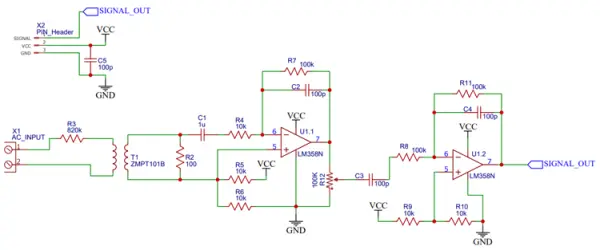
Upon examining the schematic, it becomes apparent that the ZMPT Transformer’s output is directed to an LM358N Low Power Dual Op-Amp IC, which serves to amplify the voltage peaks.
ACS712 20A Current Sensor
The ACS712 is a chip created for detecting current by using Hall effect sensors. It includes a Hall effect IC that detects changes in the magnetic field while current passes through, transforming these changes into a voltage that is proportional to the current. Then, the user is provided with this voltage output. After analyzing the Sensor Module schematic, it becomes evident that the IC comes with almost all the essential components built into it, needing just a few passive components to function.
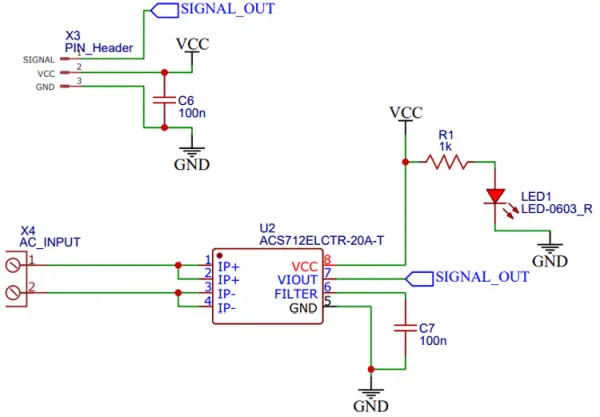
Among the three available variants of the IC (5A, 20A, 30A), we opted for the 20A version. This choice aligns with our current measurement needs, offering a balance between capacity and resolution that suits our purposes well.
Diagram for Connecting the Power Consumption Monitoring Device
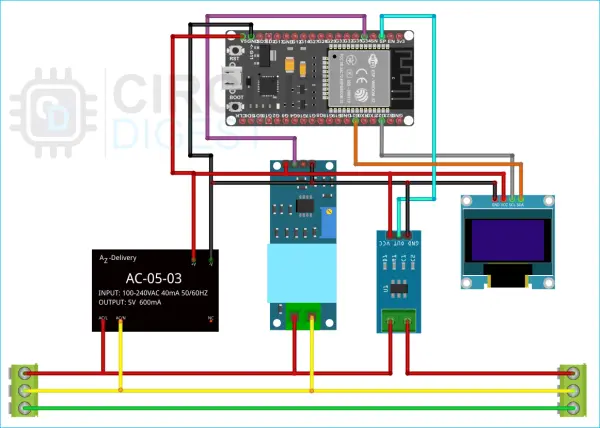
The diagram illustrates the parallel connection of the Hi-link SMPS and the input terminal of the voltage sensor (ZMPT101B) to the AC Live and AC Neutral, with the current sensor (ACS712) forming a series connection with the live AC wire
The OLED display is linked through the ESP32’s I2C pins, while the Voltage and Current sensors are attached to Pin 34 and Pin 36 (VP), respectively. These pins have the capability to perform analog-to-digital conversion using the 12-BIT ADC integrated into the ESP32
All the components receive power from the 5V output of the Hi-Link module through the Vo+ and Vo- terminals
Programming code for the Power Consumption Monitoring Device
Installing Required Libraries
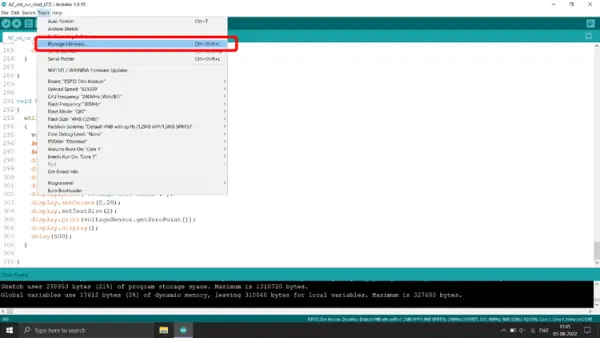
We initiate the process by installing the Adafruit GFX and Adafruit SSD 1306 Library. You can conveniently access the library manager within the Arduino IDE by navigating to the tools menu
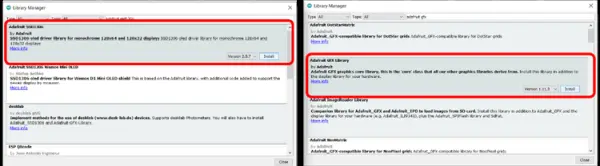
We locate Adafruit GFX and Adafruit SSD1306 and proceed to install them with a simple click on the “Install” button.
Next, we need to install the libraries for the ZMPT101B and ACS712 current sensor modules. These libraries share a similar codebase, and while you can find the original libraries [here], we’ve made slight modifications to adapt them to the new microcontroller and ensure compatibility with the ESP32’s 12-bit 3.3V ADC.
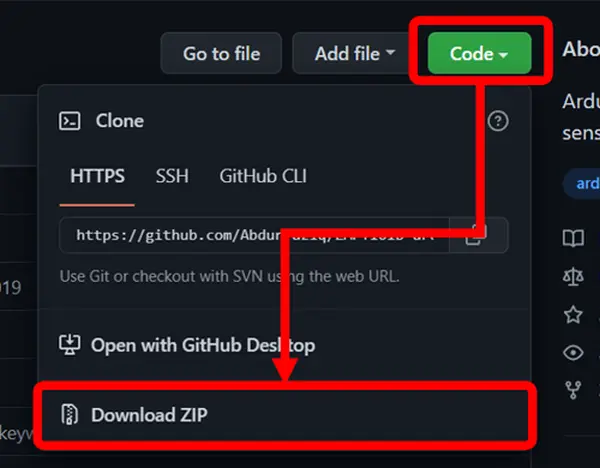
The installation procedure for both libraries follows the same steps. Just visit the respective libraries’ GitHub repository and click on the “Download ZIP” button located under the dropdown menu of the “Code” button.
After the ZIP file has been downloaded, open the Arduino IDE and navigate to Sketch >> Include Library >> Add ZIP Library.
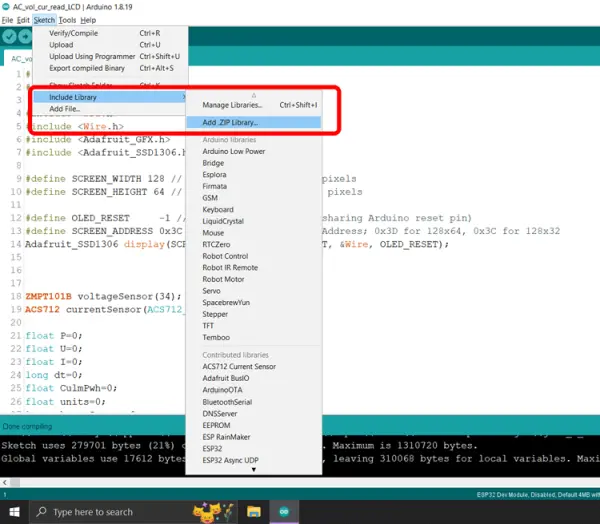
Find the downloaded ZIP file for the library and then click on it to open.
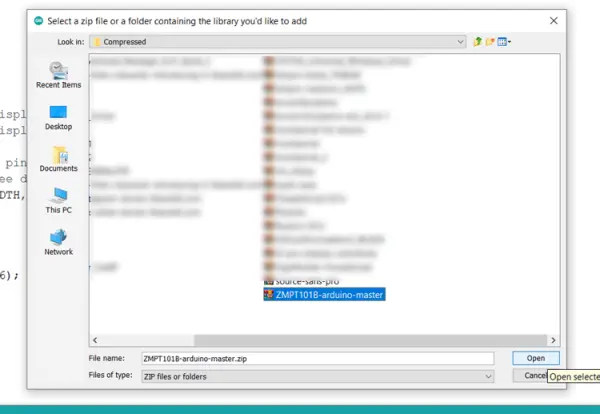
The Arduino IDE will proceed to install the library. You can apply the same procedure for both libraries.
Once these libraries are successfully installed, we can readily include them at the start of our code.
#include "ZMPT101B.h"
#include "ACS712.h"
#include <SPI.h>
#include <Wire.h>
#include <Adafruit_GFX.h>
#include <Adafruit_SSD1306.h>
The Wire and SPI libraries come pre-installed in the IDE and are essential for the operation of the I2C bus, which is crucial for the OLED Display’s functionality.
Initialization Commands
Now, we proceed to initialize objects for both the current and voltage sensors as follows:
ZMPT101B voltageSensor(34);
ACS712 currentSensor(ACS712_20A, 36);
Furthermore, we initiate our OLED display using the subsequent lines of code
#define SCREEN_WIDTH 128 // OLED display width, in pixels
#define SCREEN_HEIGHT 64 // OLED display height, in pixels
#define OLED_RESET     -1 // Reset pin # (or -1 if sharing Arduino reset pin)
#define SCREEN_ADDRESS 0x3C ///< See datasheet for Address; 0x3D for 128x64, 0x3C for 128x32
Adafruit_SSD1306 display(SCREEN_WIDTH, SCREEN_HEIGHT, &Wire, OLED_RESET);
Subsequently, we declare and initialize several global variables that will prove essential in our code as we progress.
float P=0;
float U=0;
float I=0;
long dt=0;
float CulmPwh=0;
float units=0;
long changeScreen=0;
float lastSample=0;
unsigned long lasttime=0;
long ScreenSelect = 0;
Void Setup Code
In the initialization code, we set up the zero point and sensitivity parameters for our sensors and also start the display.
Please be aware: The sensitivity value in the code should stay the same, but it might be needed to make changes to the zero point. To make this adjustment, uncomment each line of code identified as “Calibration Commands” individually, ensuring that there is no current or voltage on the module. The code will show a zero point on the screen, allowing you to modify the zero point value in the code.
Both the Current and Voltage Sensors must undergo the calibration process separately.
void setup()
{
  Serial.begin(9600);
  delay(100);
  voltageSensor.setSensitivity(0.0025);
  voltageSensor.setZeroPoint(2621);
  currentSensor.setZeroPoint(2943);
  currentSensor.setSensitivity(0.15);
  if(!display.begin(SSD1306_SWITCHCAPVCC, SCREEN_ADDRESS)) {
    Serial.println(F("SSD1306 allocation failed"));
    for(;;); }
  // Clear the buffer
  display.clearDisplay();
  display.display();
  //Caliberation Commands Need To Be Run On First Upload.
  //CalibCurrent();
  //CalibVoltage();
}
Void Loop Code
In the setup code, we set the zero point and sensitivity parameters for our sensors, starting the display.
Please be aware: The sensitivity value in the code should stay the same, but the zero point may need to be adjusted. In order to make this adjustment, remove the comments from the code lines identified as “Calibration Commands” individually, ensuring that there is no current or voltage on the module. The code will show a 0 point on the screen, allowing you to adjust the zero point value in the code.
Both the Current and Voltage Sensors must be calibrated separately.
.
void loop()
{
  // To measure voltage/current we need to know the frequency of voltage/current
  // By default 50Hz is used, but you can specify desired frequency
  // as first argument to getVoltageAC and getCurrentAC() method, if necessary
  U = voltageSensor.getVoltageAC();
    if(U<55)
      {
        U=0;
        CulmPwh=0;
       }
  I = currentSensor.getCurrentAC();
  dt = micros()- lastSample;
    if(I<0.15)
      {
        I=0;
        CulmPwh=0;
      }
  // To calculate the power we need voltage multiplied by current
  P = U * I;
  CulmPwh = CulmPwh + P*(dt/3600);///uWh
  units= CulmPwh/1000;
  if(millis()-changeScreen>5000)
    {
      ScreenSelect+=1;
      changeScreen=millis();
    }
  if(millis()-lasttime>500)
    {
      if((ScreenSelect%4)==0)
      { displayVoltCurrent(); }//Volts and Current
      else if( (ScreenSelect%4)==1)
      { displayInstPower();   }//Instantaenous Power
      else if( (ScreenSelect%4)==2)
      { displayEnergy();      } //Energy
      else if( (ScreenSelect%4)==3)
      { displayUnits();       } //Units
    }
  lastSample=micros();
}
User Defined Functions
Reviewing the provided code, it becomes evident that we have employed functions such as:
CalibCurrent();

CalibVoltage();
displayVoltCurrent();
displayInstPower();
displayEnergy();
displayUnits();
displayCenter(String,Position);
We did not use the library’s built-in functions for these functions; instead, we created them ourselves. Their goal is to aid in transmitting data to the OLED Module and to keep code organization intact. These specialized functions can be positioned after the void loop() function.
void displayVoltCurrent()
{
  display.clearDisplay();
  display.setTextColor(WHITE);
  display.setTextSize(1);
  display.setCursor(0,0);
void displayVoltCurrent()
{
  display.clearDisplay();
  display.setTextColor(WHITE);
  display.setTextSize(3);
  displayCenter(String(U)+"V",3);
  display.setTextSize(3);
  displayCenter(String(I)+"A",33);
  display.display();
  lasttime=millis();
}
void displayInstPower()
{
  display.clearDisplay();
  display.setTextColor(WHITE);
  display.setTextSize(2);
  display.setCursor(0,0);
  displayCenter("Power",3);
  display.setTextSize(3);
     if(P>1000)
      {
        displayCenter(String(P/1000)+"kW",30);
      }
    else
      {
        displayCenter(String(P)+"W",30);
      }
  display.display();
  lasttime=millis();
}
void displayEnergy()
{
  display.clearDisplay();
  display.setTextColor(WHITE);
   if(CulmPwh>1000000000)
     {
        display.setTextSize(2);
        displayCenter("Energy kWh",3);
        display.setTextSize(3);
        displayCenter(String(CulmPwh/1000000000),30);
     }
   else if(CulmPwh<1000000000 && CulmPwh>1000000)
     {
        display.setTextSize(2);
        displayCenter("Energy Wh",3);
        display.setTextSize(3);
        displayCenter(String(CulmPwh/1000000),30);
     }
   else if(CulmPwh<1000000 && CulmPwh>1000)
     {
        display.setTextSize(2)
        displayCenter("Energy mWh",3);
        display.setTextSize(3);
        displayCenter(String(CulmPwh/1000),30);
     }
   else
     {
        display.setTextSize(2);
        displayCenter("Energy uWh",3);
        display.setTextSize(3);
        displayCenter(String(CulmPwh),30);
     }
  display.display();
  lasttime=millis();
 }
void displayUnits()
{
  display.clearDisplay();
  display.setTextColor(WHITE);
    if(units>1000000)
      {
        display.setTextSize(2);
        displayCenter("Units",3);
        display.setTextSize(3);
        displayCenter(String(units/1000000),30);
      }
    else if(units<1000000 && units>1000)
      {
        display.setTextSize(2);
        displayCenter("MilliUnits",3);
        display.setTextSize(3);
        displayCenter(String(units/1000),30);
      }
  else
      {
        display.setTextSize(2);
        displayCenter("MicroUnits",3);
        display.setTextSize(3);
        displayCenter(String(units),30);
      }
  display.display();
  lasttime=millis();
 }
void CalibCurrent()
{
  while(1)
  {
    currentSensor.calibrate();
    Serial.print("Zero Point Current :");
    Serial.println(currentSensor.getZeroPoint());
    display.clearDisplay();
    display.setTextColor(WHITE);
    display.setTextSize(1);
    display.setCursor(0,0);
    display.print("Current Zero Point :");
    display.setCursor(0,20);
    display.setTextSize(2);
    display.print(currentSensor.getZeroPoint());
    display.display();
    delay(500);
  }
}
void CalibVoltage()
{
  while(1)
  {
    voltageSensor.calibrate();
    Serial.print("Zero Point Voltage :");
    Serial.println(voltageSensor.getZeroPoint());
    display.clearDisplay();
    display.setTextColor(WHITE);
    display.setTextSize(1);
    display.setCursor(0,0);
    display.print("Voltage Zero Point :");
    display.setCursor(0,20);
    display.setTextSize(2);
    display.print(voltageSensor.getZeroPoint());
    display.display();
    delay(500);
  }
}
void displayCenter(String text, int line)
{
  int16_t x1;
  int16_t y1;
  uint16_t width;
  uint16_t height;
  display.getTextBounds(text, 0, 0, &x1, &y1, &width, &height);
  // display on horizontal center
  display.setCursor((SCREEN_WIDTH - width) / 2, line);
  display.println(text); // text to display
  display.display();
}
Assembly of the Energy Monitoring System
Once the code is uploaded to the ESP32, you can start building the project by printing a 3D enclosure for the system. The enclosure’s STL files have been shared, comprising two parts to be connected post assembly.
Kindly adhere to the specified steps to properly arrange all the parts for a tidy and stable installation. Taking precautions such as utilizing heat shrink tubing and insulation tape is recommended to ensure adequate insulation and prevent possible short circuits.

Code
#include "ZMPT101B.h"
#include "ACS712.h"

#include <SPI.h>
#include <Wire.h>
#include <Adafruit_GFX.h>
#include <Adafruit_SSD1306.h>

#define SCREEN_WIDTH 128 // OLED display width, in pixels
#define SCREEN_HEIGHT 64 // OLED display height, in pixels

#define OLED_RESET     -1 // Reset pin # (or -1 if sharing Arduino reset pin)
#define SCREEN_ADDRESS 0x3C ///< See datasheet for Address; 0x3D for 128x64, 0x3C for 128x32
Adafruit_SSD1306 display(SCREEN_WIDTH, SCREEN_HEIGHT, &Wire, OLED_RESET);


ZMPT101B voltageSensor(34);
ACS712 currentSensor(ACS712_20A, 36);

float P=0;
float U=0;
float I=0;
long dt=0;
float CulmPwh=0;
float units=0;
long changeScreen=0;
float lastSample=0;

unsigned long lasttime=0;
long ScreenSelect = 0;


void setup()
{
  Serial.begin(9600);

  delay(100);
  voltageSensor.setSensitivity(0.0025);
  voltageSensor.setZeroPoint(2621);

  currentSensor.setZeroPoint(2943);
  currentSensor.setSensitivity(0.15);

  if(!display.begin(SSD1306_SWITCHCAPVCC, SCREEN_ADDRESS)) {
    Serial.println(F("SSD1306 allocation failed"));
    for(;;); }

  // Clear the buffer
  display.clearDisplay();
  display.display();

  //Caliberation Commands Need To Be Run On First Upload.
  //CalibCurrent();
  //CalibVoltage();

}


void loop()
{
  // To measure voltage/current we need to know the frequency of voltage/current
  // By default 50Hz is used, but you can specify desired frequency
  // as first argument to getVoltageAC and getCurrentAC() method, if necessary

  U = voltageSensor.getVoltageAC();
    if(U<55)
      {
        U=0;
        CulmPwh=0;
       }

  I = currentSensor.getCurrentAC();
  dt = micros()- lastSample;

    if(I<0.15)
      {
        I=0;
        CulmPwh=0;
      }

  // To calculate the power we need voltage multiplied by current
  P = U * I;

  CulmPwh = CulmPwh + P*(dt/3600);///uWh
  units= CulmPwh/1000;

  if(millis()-changeScreen>5000)
    {
      ScreenSelect+=1;
      changeScreen=millis();
    }

  if(millis()-lasttime>500)
    {
      if((ScreenSelect%4)==0)
      { displayVoltCurrent(); }//Volts and Current

      else if( (ScreenSelect%4)==1)
      { displayInstPower();   }//Instantaenous Power

      else if( (ScreenSelect%4)==2)
      { displayEnergy();      } //Energy

      else if( (ScreenSelect%4)==3)
      { displayUnits();       } //Units
    }
  lastSample=micros();
}

void displayVoltCurrent()
{
  display.clearDisplay();
  display.setTextColor(WHITE);

  display.setTextSize(3);
  displayCenter(String(U)+"V",3);

  display.setTextSize(3);
  displayCenter(String(I)+"A",33);
  display.display();
  lasttime=millis();

}

void displayInstPower()
{
  display.clearDisplay();
  display.setTextColor(WHITE);
  display.setTextSize(2);
  display.setCursor(0,0);
  displayCenter("Power",3);
  display.setTextSize(3);

     if(P>1000)
      {
        displayCenter(String(P/1000)+"kW",30);
      }
    else
      {
        displayCenter(String(P)+"W",30);
      }

  display.display();
  lasttime=millis();
}

void displayEnergy()
{
  display.clearDisplay();
  display.setTextColor(WHITE);

   if(CulmPwh>1000000000)
     {
        display.setTextSize(2);
        displayCenter("Energy kWh",3);
        display.setTextSize(3);
        displayCenter(String(CulmPwh/1000000000),30);
     }
   else if(CulmPwh<1000000000 && CulmPwh>1000000)
     {
        display.setTextSize(2);
        displayCenter("Energy Wh",3);
        display.setTextSize(3);
        displayCenter(String(CulmPwh/1000000),30);
     }
   else if(CulmPwh<1000000 && CulmPwh>1000)
     {
        display.setTextSize(2);
        displayCenter("Energy mWh",3);
        display.setTextSize(3);
        displayCenter(String(CulmPwh/1000),30);
     }
   else
     {
        display.setTextSize(2);
        displayCenter("Energy uWh",3);
        display.setTextSize(3);
        displayCenter(String(CulmPwh),30);
     }
  display.display();
  lasttime=millis();
 }

void displayUnits()
{
  display.clearDisplay();
  display.setTextColor(WHITE);

    if(units>1000000)
      {
        display.setTextSize(2);
        displayCenter("Units",3);
        display.setTextSize(3);
        displayCenter(String(units/1000000),30);
      }
    else if(units<1000000 && units>1000)
      {
        display.setTextSize(2);
        displayCenter("MilliUnits",3);
        display.setTextSize(3);
        displayCenter(String(units/1000),30);
      }
  else
      {
        display.setTextSize(2);
        displayCenter("MicroUnits",3);
        display.setTextSize(3);
        displayCenter(String(units),30);
      }
  display.display();
  lasttime=millis();
 }

void CalibCurrent()
{
  while(1)
  {
    currentSensor.calibrate();
    Serial.print("Zero Point Current :");
    Serial.println(currentSensor.getZeroPoint());
    display.clearDisplay();
    display.setTextColor(WHITE);
    display.setTextSize(1);
    display.setCursor(0,0);
    display.print("Current Zero Point :");
    display.setCursor(0,20);
    display.setTextSize(2);
    display.print(currentSensor.getZeroPoint());
    display.display();
    delay(500);
  }

}

void CalibVoltage()
{
  while(1)
  {
    voltageSensor.calibrate();
    Serial.print("Zero Point Voltage :");
    Serial.println(voltageSensor.getZeroPoint());
    display.clearDisplay();
    display.setTextColor(WHITE);
    display.setTextSize(1);
    display.setCursor(0,0);
    display.print("Voltage Zero Point :");
    display.setCursor(0,20);
    display.setTextSize(2);
    display.print(voltageSensor.getZeroPoint());
    display.display();
    delay(500);
  }

}

void displayCenter(String text, int line)
{
  int16_t x1;
  int16_t y1;
  uint16_t width;
  uint16_t height;

  display.getTextBounds(text, 0, 0, &x1, &y1, &width, &height);
  // display on horizontal center
  display.setCursor((SCREEN_WIDTH - width) / 2, line);
  display.println(text); // text to display
  display.display();
}
- What microcontroller is used in the project?
The project uses an ESP32 WROOM 32D Module. - How is the AC mains voltage measured?
The ZMPT101B voltage sensor is used to step down and provide an analog voltage output, amplified by an LM358N in the module schematic. - How is current measured in this design?
Current is measured using an ACS712 Hall effect current sensor (20A variant in this project). - How are the sensors connected to the ESP32?
The voltage sensor output connects to analog pin 34 and the current sensor to analog pin 36 (VP) on the ESP32. - What powers the ESP32 and peripherals?
A Hi-Link 5V 3W SMPS converts 220V AC to 5V DC to power the components via Vo+ and Vo- terminals. - Which display library is required?
The Adafruit GFX and Adafruit SSD1306 libraries are used for the OLED display. - Is sensor calibration necessary?
Yes. Both voltage and current sensors require calibration of zero point values using the provided CalibVoltage and CalibCurrent routines. - How does the device compute power and energy?
Instantaneous power P is calculated as U * I, cumulative energy CulmPwh is accumulated by adding P*(dt/3600) per sample, and units are derived from CulmPwh/1000. - What display screens are shown on the OLED?
The OLED cycles through Volts and Current, Instantaneous Power, Energy, and Units screens.