Summary of Control a Relay with Arduino
This tutorial explains how to control a relay with an Arduino board to switch a 12V fan on and off using a push button. The circuit uses a transistor to drive the relay, which is powered by an external 7–12V supply rather than the USB port due to current limitations. Pressing the button toggles pin 2 to HIGH, activating the transistor and subsequently the relay to power the load.
Parts used in the Arduino Relay Control Project:
- Arduino Board
- 1K Resistor
- 10K Resistor
- BC547 Transistor
- 6V or 12V Relay
- 1N4007 Diode
- 12V Fan
- Push Button
- External Power Supply (7 to 12 volts)
In this quick Arduino tutorial I will explain how you can control a relay using the Arduino Board, one 1K and one 10K resistors, 1 BC547 transistor, one 6V or 12V relay, one 1N4007 diode and a 12V fan. When the button is pressed the fan will turn ON and will remain in this state until the button is pressed again.
Arduino Control Relay Schematic
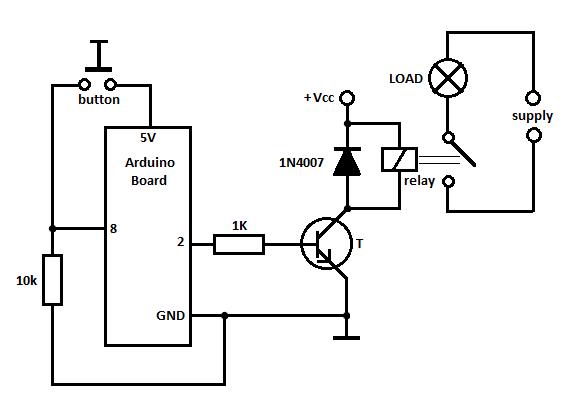
How does the circuit works
When the button is pressed the Arduino board will put pin 2 in HIGH state, meaning 5V on pin 2. This voltage is used to drive the transistor that will switch ON the relay and the load (in our case the fan) will be powered from the main power supply.
You cannot use the 5V from the USB to power up the transistor and the LOAD because the USB port usually delivers only 100mA, and this is not enough to switch the relay and the LOAD. That is why you must use an external power supply (Vcc) that is between 7 to 12 volts to power up the Arduino board and the transistor + relay. The load uses its own power supply, for instance if you use a light bulb then you might connect it to the 110/220V mains or any other power source.
For more detail: Control a Relay with Arduino
- How does pressing the button affect the circuit?
Pressing the button puts pin 2 in a HIGH state, driving the transistor to switch ON the relay and power the load. - Can I use the 5V from the USB to power the transistor and load?
No, you cannot because the USB port usually delivers only 100mA, which is not enough to switch the relay and the load. - What voltage range should the external power supply be?
The external power supply must be between 7 to 12 volts to power up the Arduino board and the transistor plus relay. - Where does the load get its power from?
The load uses its own separate power supply, such as connecting a light bulb to the 110/220V mains or any other power source. - What happens to the fan when the button is pressed again?
The fan will turn OFF if it was previously ON, as the button toggles the state until pressed again. - Which Arduino pin is used to control the transistor?
Pin 2 is used to put the HIGH state that drives the transistor. - Why is an external power supply necessary for this project?
An external supply is needed because the USB port lacks sufficient current capacity to handle the relay and load simultaneously.