In this proposed system we going to construct a basic DC motored robot which we are going to control with android app easily available on google play store named bluecontrol.
With Basic mobility of robot like forward, Reverse, left, right we try to implement four more functions like light turn on and off, horn (Buzzer) turn on and off and so on. What we need
1) Bluetooth Module HC 05:
A core element of our project which work on ISM band 2.4 Ghz on the standard of IEEE 802.15.1 used to exchanging data over short distances bla bla bla ……guys forgot about this we don’t need to go in detail about this for more details please follow datasheets So this module is 6 pin we are using only 4 namely VCC, GND, TX, RX. Connections are given in circuit Diagram make it as it is or you have another option in Arduino making use of Software Serial if Serial TX RX are busy. After all connection and powering the circuit don’t forgot to connect your HC 05 using Android App Bluecontrol with device.
 First try to read Serial content coming on RX pin of Arduino after pressing any key of blue app according to that ASCII value we can modify our basic program to do so please make use of serial read program already available in Arduino IDE.
2) Motor Driver L293D:
To control two DC motors we required only one chip of L293D . Connections are simple do same as given in Circuit Diagram.
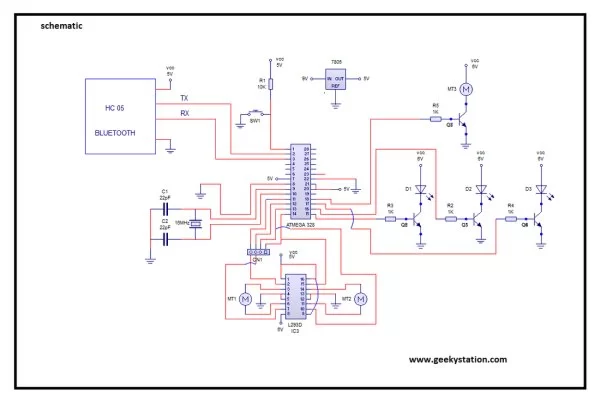
We also connect Four motors with same connection tow motors at each side. For more details follow datasheets.
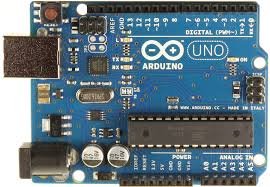
3) Microcontroller:
Here we are using Arduino UNO R3 but guys u have an option of making your own breakout board using Atmega 328, 168, 8 According to your application but don’t forgot to burn bootloader without that u never gona burn any code from Arduino board (To burn bootloader in blank chip please follow our link HOW TO BURN BOOTLOADER IN ATMEGA 328) next for connections refer circuit diagram.
That’s it guys our basic preparation is almost ready connect other miscellaneous components as guided in schematic.
// www.geekystation.com
// bluetooth control robot
// program:-
int M1 = 5;
int M2 = 6;
int M3 = 7;
int M4 = 8;
int LED = 13;
int pin1 = 9;
int pin2 = 10;
int pin3 = 11;
int pin4 = 12;
int incomingByte = 0;
void setup(){
Serial.begin(9600);
pinMode(LED, OUTPUT);
pinMode(M1, OUTPUT);
pinMode(M2, OUTPUT);
pinMode(M3, OUTPUT);
pinMode(M4, OUTPUT);
pinMode(pin1, OUTPUT);
pinMode(pin2, OUTPUT);
pinMode(pin3, OUTPUT);
pinMode(pin4, OUTPUT);
delay(500);
}
void loop(){
// check for serial data
if (Serial.available() > 0)
{
incomingByte = Serial.read();
digitalWrite(LED, HIGH);
// say what you got:
Serial.print("I received: ");
Serial.println(incomingByte);
// delay 10 milliseconds to allow serial update time
delay(10);
if (incomingByte == 85){
digitalWrite(M1, HIGH);
digitalWrite(M2, LOW);
digitalWrite(M3, HIGH);
digitalWrite(M4, LOW);
Serial.println("FWD");
delay(100);
}
else if (incomingByte == 76)
{
digitalWrite(M1, HIGH);
digitalWrite(M2, LOW);
digitalWrite(M3, LOW);
digitalWrite(M4, LOW);
Serial.println("LEFT");
delay(100);
}
else if (incomingByte == 82){
digitalWrite(M1, LOW);
digitalWrite(M2, LOW);
digitalWrite(M3, HIGH);
digitalWrite(M4, LOW);
Serial.println("RIGHT");
delay(100);
}
else if (incomingByte == 68)
{
digitalWrite(M1, LOW);
digitalWrite(M2, HIGH);
digitalWrite(M3, LOW);
digitalWrite(M4, HIGH);
Serial.println("REVERSE")
; delay(100);
}
else if (incomingByte == 67)
{
digitalWrite(M1, LOW);
digitalWrite(M2, LOW);
digitalWrite(M3, LOW);
digitalWrite(M4, LOW);
Serial.println("STOP");
delay(100);
}
else if (incomingByte == 97)
{
digitalWrite(pin1, HIGH);
Serial.println("LED ON");
delay(100);
}
else if (incomingByte == 99)
{
digitalWrite(pin1, LOW);
Serial.println("LED OFF");
delay(100);
}

else if (incomingByte == 98)

{digitalWrite(pin2, HIGH);
Serial.println("LED2 ON");
delay(100);
}
else if (incomingByte == 100)
{
digitalWrite(pin2, LOW);
Serial.println("LED2 OFF");
delay(100);
}
else if (incomingByte == 101)
{
digitalWrite(pin3, HIGH);
Serial.println("LED3 ON");
delay(100);
}
else if (incomingByte == 102)
{
digitalWrite(pin3, LOW);
Serial.println("LED3 OFF");
delay(100);
}
else if (incomingByte == 103)
{digitalWrite(pin4, HIGH);
Serial.println("FAN ON");
delay(100);}
else if (incomingByte == 104)
{
digitalWrite(pin4, LOW);
Serial.println("FAN OFF");
delay(100);}}}
For more detail: Construct A Bluetooth Controlled Robot Using Arduino