
Summary of Color Instrument
This article details a DIY "Color Instrument" project combining Arduino and 3D printing to teach children about the physics of colors and sound, specifically explaining why pink does not exist in the natural light spectrum. The device uses a color sensor to detect wavelengths and triggers sounds via a speaker, serving as an educational tool to demonstrate how human brains perceive complementary colors like pink when red and purple light are reflected simultaneously.
Parts used in the Color Instrument:
- Arduino Nano v3 with USB cable
- Colour sensor TCS3200/TCS230 (22.4mm x 31.6mm version)
- SG90 servo
- Mini on/off rocker switch
- 9V battery clip
- 8Ω speaker
- Wires
- Screw (M3 x 20mm)
- Cable ties
- PLA for 3D printing
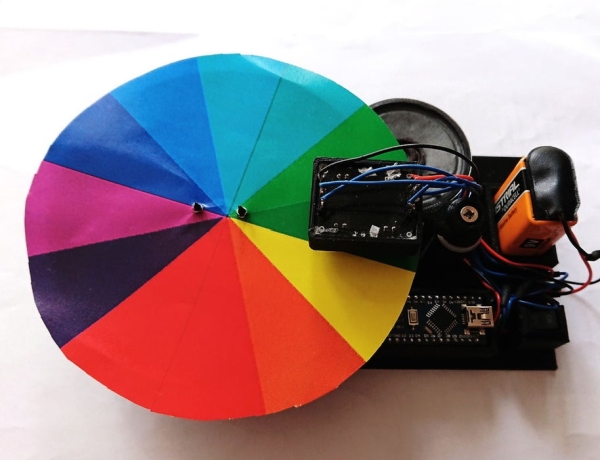
This a simple Arduino/3D printing project about colors and sounds. I made this device or as I call it ‘color instrument’ for activity for kids. It’s fun and it’s a good conversation starter about physics of colors and sound. The most interesting fact about colors, in my opinion of course, is that pink color doesn’t exists in physics.
I know, I know, you all thinking it’s a lie, but next time you look at the rainbow try to find pink color! Basically white light is made of all the colors you can see in the rainbow from red to purple. Each color has a specific wavelength, and you can assign that wavelength to every color in spectrum except pink. On the image below (white light spectrum / rainbow) you can see purple, indigo and violet but there is definitely no pink. That’s crazy! Right?
Supplies:
Step 1: Pink Color

To explain that phenomena we have to learn about complementary colors. Complementary colors are pairs of colors which, when combined or mixed, cancel each other out by producing grey scale colors.
Almost every color in spectrum has its own complementary color, for example for red it’s light blue and for blue it’s yellow. For some reason green color is different. It’s not fully understood why but human brain basically invented new color – pink – which is a complimentary color to green. My theory is that nature likes symmetry and human brain created pink to maintain color – complimentary color symmetry.
OK, but why we see pink if it’s a complimentary color to green? Why we see colors at all?
We see colors of reflected wavelength. Let’s take banana, we see it as yellow because almost all visible spectrum is absorbed expect yellow light (570nm – 580nm). However this is a simple case when one wavelength is reflected. What if certain object reflects two or more wavelengths?
In that case human brain come up with the system to not to get confused. If object reflects red and green for example human brain interprets that as color in between them, which is yellow. If it’s purple and green than we will see blue and so on. Of course in case of more wavelengths it’s slightly more complex, but the principle is the same.
There is one specific case when human brain do something weird, something different. If the object reflects red and purple technically we should see green, but human brain decides to see complimentary color to green instead – pink, color invented by our brains.
Step 2: Supplies
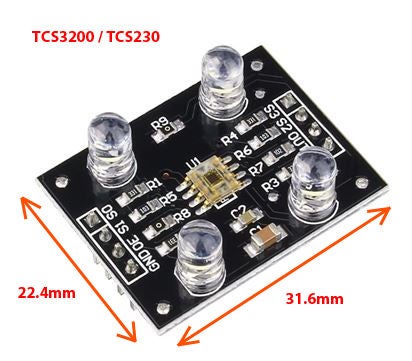
Parts:
– Arduino Nano v3 with USB cable
– Colour sensor TCS3200/TCS230 (22.4mm x 31.6mm version)
– SG90 servo
– Mini on/off rocker switch
– 9V battery clip
– 8Ω speaker
– Wires
– Screw (M3 x 20mm)
– Cable ties
– PLA for 3D printing
Tools:
– Solder and soldering iron
– Philips screwdriver
– Wire cutters
– 3D printer
– Stanley knife
Software:
– Arduino IDE [https://www.arduino.cc/en/Main/Software]
– Cura or any other slicer for 3D printing [https://ultimaker.com/en/products/ultimaker-cura-software]
Step 3: 3D Design and 3D Printing
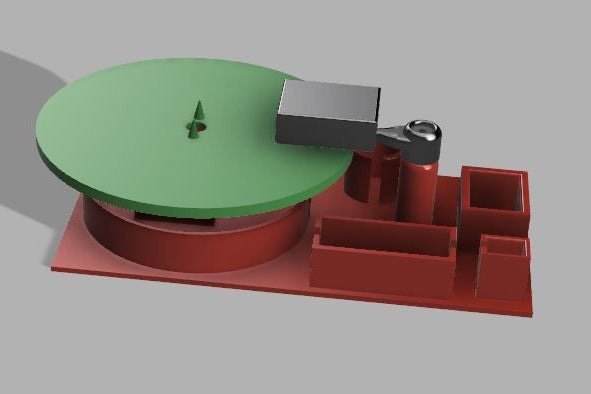
I used Fusion 360 to design the device case. The model comes in 4 parts: main body, disc, color sensor case and color sensor arm. It took about 5 hours to make this model and after test print I only made few small adjustments.
I would recommend to use Cura for slicing model, but if you have your favorite slicing software that works well there is no reason not to use it. I printed model in PLA, no brim or raft (except for the small sensor arm) and 20% infill is more than enough. It takes about 4 hours to print main body with 0.26mm layer resolution and another 2 hours to print rest of the parts with 0.2mm layer resolution, but that depends on the speed of your printer of course.
Read more: Color Instrument
-
Why does the author claim pink does not exist in physics?
Pink is not found in the natural rainbow or white light spectrum because it is a color invented by the human brain to maintain symmetry with green. -
How does the human brain create the perception of pink?
The brain interprets the reflection of red and purple wavelengths as pink, which is the complementary color to green, rather than seeing green. -
What software is required to program the Arduino for this project?
You must use the Arduino IDE to write and upload the code for the device. -
Which tools are needed to assemble the electronic components?
You need solder and a soldering iron, a Philips screwdriver, and wire cutters for assembly. -
What material is recommended for 3D printing the device case?
The author recommends using PLA filament for printing the model parts. -
What infill percentage is sufficient for the 3D printed parts?
An infill of 20% is more than enough for the structural integrity of the printed model. -
How many distinct parts make up the 3D designed case?
The model consists of four parts: main body, disc, color sensor case, and color sensor arm. -
Can I use different slicing software instead of Cura?
Yes, you can use any slicer that works well, though Cura is recommended.
