INTRODUCTION
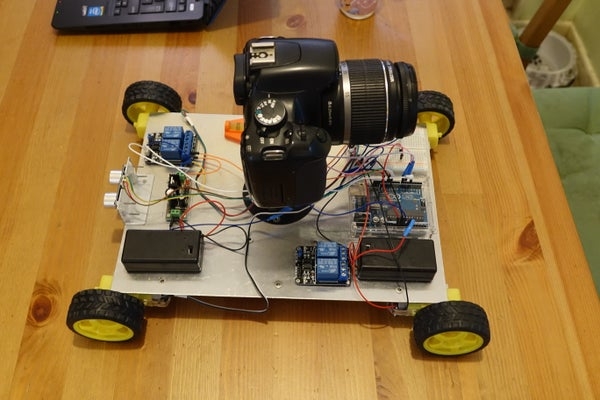
Hi. I’ve built this little device for my HNC project back in the old days (2015). Because I like photography, and my task was to make something using microcontrollers. I’ve made this little device using Arduino UNO, as this was an ideal board for this job (and cheapest). There were quite a few similar projects where peoples used a stepper motor and rails supported on the frame, but such a solution wouldn’t work for me. I wanted something more portable and without distance limitations.
Step 1: BORING BIT (Theory)
WHAT IS TIME LAPSE?
When I made COD, not many smartphones had time-lapse function, and if they did, it wasn’t the best tool. Therefore, only someone who had some interest in photography knew what the time lapse is. So, for those who still don’t know, here’s a quick explanation:
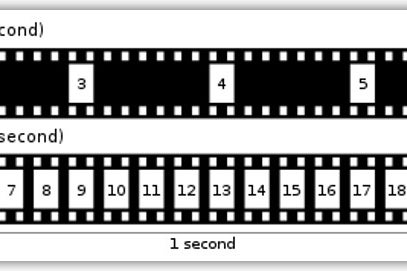
Time Lapse is a photography technique that makes a video from a sequence of photographs. Using this method, we can motion of very slow-moving objects (e.g. stars), or simply make a “fast-forward” movie effect. Looking at the attached example diagram, a camera is set to take 6 pictures (frames) per second. All these images are later displayed on the projector (screen), which is showing 24 pictures per second. To make a one minute video we need 1440 still images (24 fps * 60 sec.). If the camera shoots 6 photos per second it’ll take 4 minutes to collect enough pictures (1440/6 =240 sec.). Therefore, the result motion video will show everything 4 times faster.
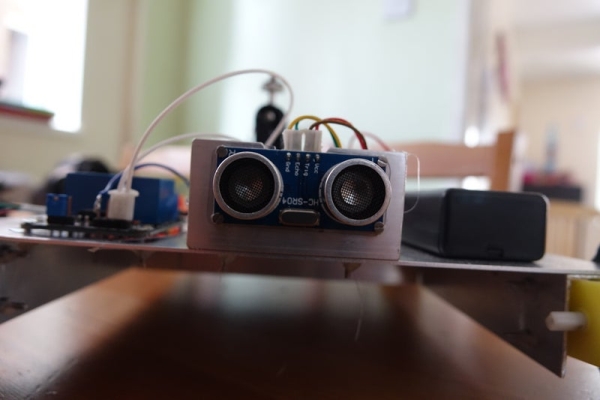
To stop COD from moving “to infinity and beyond“, I’ve added ultrasonic proximity sensor (more details to follow) at one of its sides.
WHAT IS ULTRASONIC SENSOR AND HOW IT WORKS?
This sensor can send a “ping” at a given moment, and receive the “ping” bouncing back from the object at another given moment (check picture). A “ping” is nothing but a soundwave that is inaudible for the human ear, and hence the name “ultrasonic”.
THE END (of the boring part).
Step 2: COMPONENTS
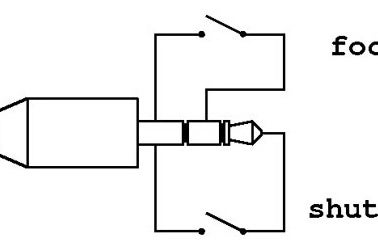
A little box diagram showing how COD’s “limbs” communicate with each other. Two separate battery packs, one for Arduino and all devices connected to it, another one for DC motors. The camera used in this project was a Canon 450d, therefore, the trigger jack wiring diagram is for this model.
Here’s a complete list of components and prices (from 5 years ago):
* Arduino Uno – £9.59
* Breadboard + cables – £5.99
* DC motors & wheels (x4) (15rpm at 5V) – £4
* Camera Mount – £4.17
* 2.5 mm Jack – £1.09
* Spirit level – £1.49
* Relay – £1.50
* Proximity Sensor (HC-SR04) – £1.57
* 9V Battery Holder (x2) – £1.46
* 9V Rechargable Batteries (x2) – £6.96
* Voltage Regulator (L7806) – £2.82
* Uno Perspex Case – £1.48
* Screws & Nuts – £7.23
* Aluminium Base Plate – £5.95
* “L” Aluminium Profile – £5.78
* Second Camera Mount – £6.25
TOTAL= £77.33
Step 3: CIRCUIT & PROGRAMMING
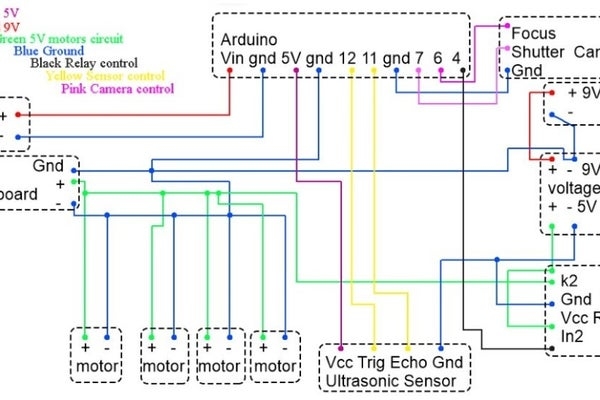
Here’s the picture of my circuit with all connections marked accordingly to the terminals on each device. I’ve used a separate 9V battery packs for motors to increase the distance that COD can travel per charge.
The second picture represents the sequence that I wanted my robot to work:
1 – take a picture
2 – move
3 – wait.
Step 3 is necessary to stop any unwanted vibrations. I’ve tried to use the PWM (Pulse Width Modulation) for the soft stop and start of the motors, but I couldn’t get time between each frame short enough, therefore I’ve decided to add little delay into the program, and change camera mount into a stiffer one (more about that in next step).
Step 4: ASSEMBLY
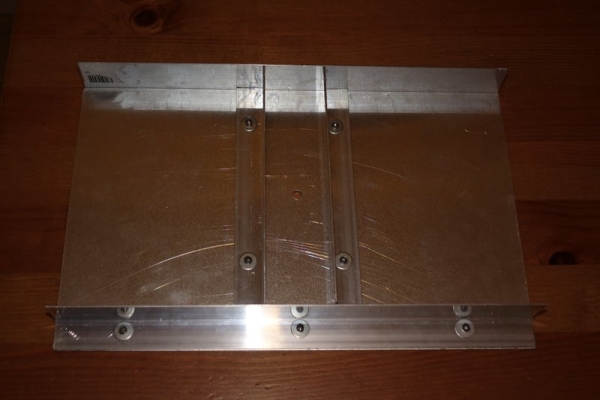
I’ve used the aluminum plate 300x200x1mm, 30x30mm aluminium “L” profile, and rivets to make the base. All components are attached with small M2 screws, very small M2 nuts, and super small M2 washers. My advice: “Don’t drop these flat on the table”. It’s not funny when you try to pick it up dozens of times, and when you got it, you can’t even feel you’ve got it, so you keep on trying :). I’ve mounted an ultrasonic sensor on a little piece of the “L” bracket so it’s facing towards the COD’s moving direction. To stop nuts from undoing itself due to the vibrations, I’ve put some hot glue over it. Spirit level is there to check how uneven my kitchen table and/or floor is.
Step 5: ISSUE #1
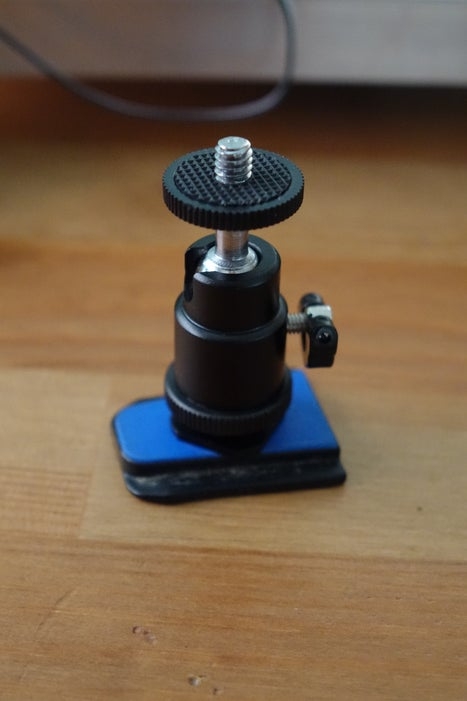
Originally, I wanted to use camera mount that I’ve had from my gorilla tripod (the one with blue base). Unfortunately, the screw wasn’t strong enough to lock the flexible joint securely in position during COD’d movements, and gradually after every step, camera was going lower. It was very hard to notice, but after 50-60 cycles, difference was visible while checking images. To overcome this issue #1, I had to convince my finance department (wife) to increase the budget by £6.25. After long and very hard negotiations, extra money was spent on a new, stronger camera mount, as shown on picture 2.
Step 6: ISSUE #2
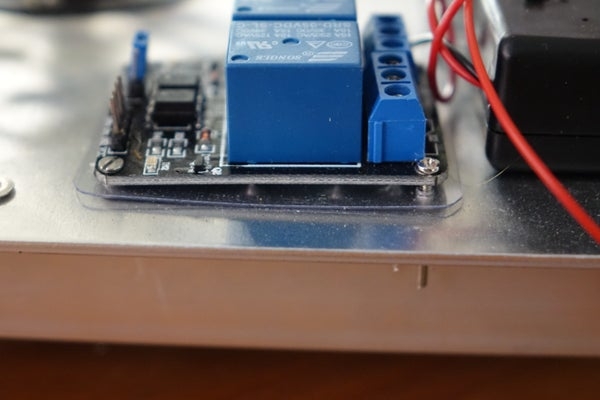
When running my program, I’ve noticed that sometimes, movement time was 2-3 times longer than the one I’ve set. It turns that one (or more) of the electronics components was sending some unwanted signals through the base plate. I’ve insulated every device with a 0.5mm plastic film, and that solved this mystery.
Step 7: TESTING THE “BRAKE”
There are two very similar ways to set COD to stop X distance from the obstacle. As I mentioned earlier, ultrasonic sensor sends a signal out (t1) which bounces of the object and comes back to the sensor (t2).
Calculations:
delta(t) – this is the value that Arduino will read from the sensor
1) Calculation using “Speed of Sound”
The approximate speed of sound in dry air at 20 deg.C is equal to:
c = 343.5 m/s
To set stopping distance in cm or mm this needs to be converted into cm:
c = 343.5 *(1/1000)=0.03435 cm/us
Therefore the distance D= [delta(t)/2] * c
If, for example, sensor received a signal back after 500 us, then:
delta(t) = 500us
D = [500/2] * 0.03435 = 8.6 cm – if the sensor detects something at this range it’ll stop the program
2) Other way is by using the “Pace of sound”, and this is the one I’ve used in my program.
Pace of Sound = 1/Speed of Sound = 1/0.03435 = 29.1 cm/us
Again, let’s change that into distance:
D = [delta(t)/2] / Pace of Sound
Using the same example:
D=(500/2) / 29.1 = 8.6 cm
As you can see from the program screenshot and the picture taken, COD was set to stop if the sensor detects something that’s closer than 5 cm, and it stopped exactly 5 cm from the log. The accuracy of this particular sensor is +/- 3 mm.
FINAL STOP ISSUE
On the picture attached to this step, if a distance is less than 5, I’ve set the program to wait for one day (24 hrs). For the unknown reason every time when I was trying to terminate the program when COD came to close to the obstacle, it never worked, it always carries on. With time running out before my college presentation, I’ve set the delay for a day, which did the trick. Remember: Never leave your COD unattended!!!
Source: COD (Camera on Deck) – Motion Time Lapse