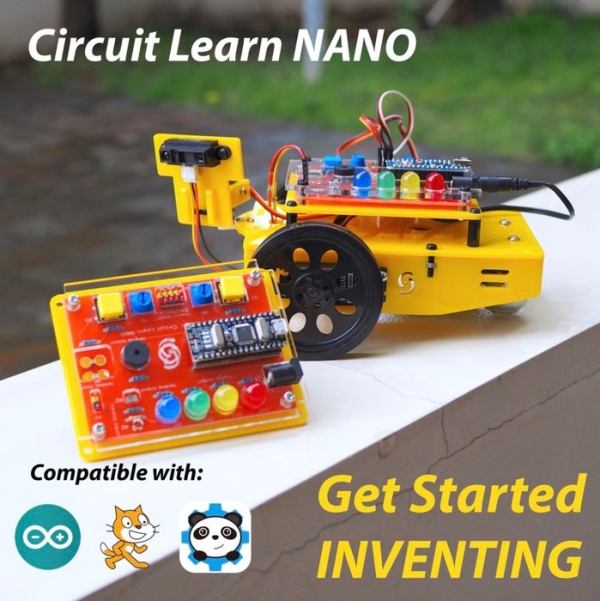
Summary of Circuit Learn NANO: One PCB. Easy to Learn. Infinite Posibilities.
The Samytronix Circuit Learn - NANO is a simplified Arduino-based learning platform designed to help beginners master electronics and programming without soldering or breadboarding for every project. It supports block-based Scratch programming while allowing flexibility to add components like sensors and motors, streamlining the debugging process and reducing initial frustration for new hobbyists.
Parts used in the Samytronix Circuit Learn - NANO:
- 1x Arduino Nano
- 1x 10mm LED pack (red, yellow, green, blue)
- 1x 12mm Buzzer
- 1x Photoresistor
- 1x Thermistor
- 2x Trimpot
- 2x 12mm push-button
- 1x DC Jack
- 1 set male header
- 1 set female header
- 4x 220 Ohm 1/4W Resistor
- 4x 10k Ohm 1/4W Resistor
- 1x 100 Ohm 1/4W Resistor
- 1x 100k Ohm 1/4W Resistor
- Battery holder with DC connector (4x AA recommended) [Optional]
- Up to 4x Servo [Optional]
- 2x Cable with alligator clip [Optional]
- Sharp infrared distance sensor [Optional]
Starting out in the world of electronics and robotics can be quite daunting at first. There are many things to learn at the beginning (circuit design, soldering, programming, choosing the right electronic components, etc) and when things go wrong there are many variables to keep track of (wrong wiring connections, damaged electronic components, or error in the code) so it is really hard for beginners to debug. A lot of people ended up having a lot of books and buying many modules, then eventually lost interest after encountering multiple problems and getting stuck.
Digital programming made simple with the Samytronix Circuit Learn – NANO!
Starting 2019 I will label my projects Samytronix.
The Samytronix Circuit Learn – NANO is a learning platform that is powered by an Arduino Nano. With Samytronix Circuit Learn – NANO, we can learn the necessary basic concepts that are needed to get started to dive deeper in the world of electronics and programming with just a single board. It simplifies the learning experience of Arduino programming by eliminating the need of soldering or using a breadboard and rewiring the circuit every time you want to start a new project. Better yet, Samytronix Circuit Learn – NANO designed to be compatible with the famous block-line programming language, Scratch, so you can learn programming concepts quicker and easier while still having the flexibility to add more components like a continuity tester, servo-motors, and a distance sensor.
Step 1: The PCB Design
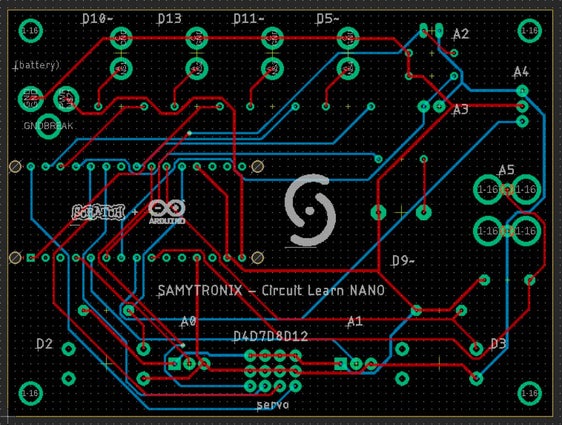
The PCB itself is designed by me using EAGLE. If you are interested to learn more about designing your own circuit board you can head over to Circuit Board Design Class by randofo. If you just want to download the design and order it to a PCB manufacturer you can download the files in the next step.
If you want to modify my design for your own purposes please feel free to do so!
Step 2: Ordering the PCB
To order the PCB you need to download the gerber files (.gbr). These are the files you will be providing to the manufacturer. Once you have downloaded all the files, you can send them to a PCB manufacturer. There are many PCB manufacturers out there, one of the most recommended PCB manufacturer is PCBWay.
Step 3: Gather the Electronic Components and Solder Them
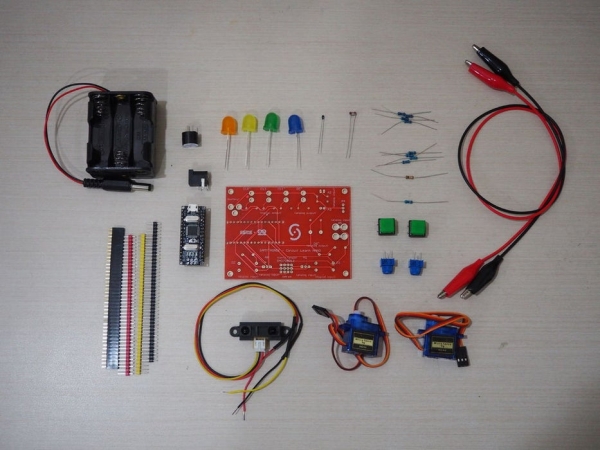
Most of the electronic components used are quite common and can be found on your local electronics shop. However, in case you can’t find all the components you can get them online from amazon, ebay, etc.
- 1x Arduino Nano
- 1x 10mm LED pack (red, yellow, green, blue)
- 1x 12mm Buzzer
- 1x Photoresistor
- 1x Thermistor
- 2x Trimpot
- 2x 12mm push-button
- 1x DC Jack
- 1 set male header
- 1 set female header
- Resistor:
- 4x 220 Ohm 1/4W
- 4x 10k Ohm 1/4W
- 1x 100 Ohm 1/4W
- 1x 100k Ohm 1/4W
Optional extension:
- Battery holder with DC connector (4x AA recommended)
- Up to 4x Servo
- 2x Cable with alligator clip
- Sharp infrared distance sensor
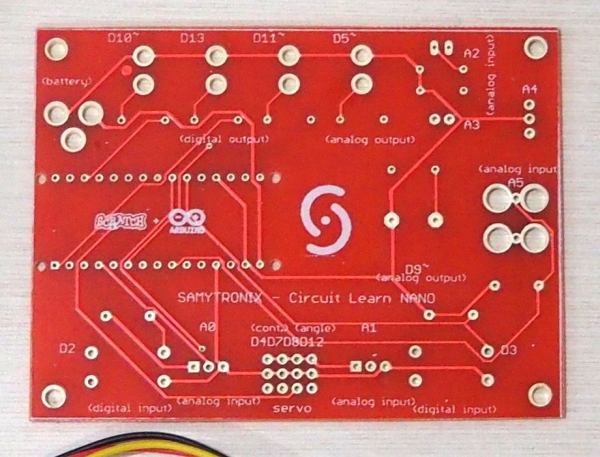
Once you have collected all the electronic components it is time to solder them to the PCB you have ordered.
- I recommend soldering the resistors first as they are the most low profile component. (Solder the resistor based on the value I put in the photos)
- Snip the resistor’s leg on the other side of the PCB
- Solder the other parts as shown in the photos (you can check the cathode/anode position in the notes in the photos)
Source: Circuit Learn NANO: One PCB. Easy to Learn. Infinite Posibilities.
-
What is the main purpose of the Samytronix Circuit Learn - NANO?
It is a learning platform powered by an Arduino Nano designed to simplify the learning experience of electronics and programming by eliminating the need for soldering or using a breadboard. -
Can I use this board with block-line programming languages?
Yes, it is designed to be compatible with the famous block-line programming language called Scratch. -
How do I order the printed circuit board for this project?
You need to download the gerber files (.gbr) and send them to a PCB manufacturer such as PCBWay. -
Which electronic component should I solder first?
The author recommends soldering the resistors first because they are the most low-profile component. -
Where can I find the design files for the PCB?
The design was created using EAGLE software, and the files can be downloaded from the provided step-by-step instructions. -
Does the board support adding external sensors and motors?
Yes, you can add more components like a continuity tester, servo-motors, and a distance sensor. -
What power source is recommended for the optional battery extension?
A battery holder with a DC connector using 4x AA batteries is recommended. -
Can I modify the PCB design for my own purposes?
Yes, you are free to modify the design if you wish to use it for your own projects.