I am an Electronics engineer by profession and a guitarist by hobby. I wanted to make a guitar which can itself show the beginner guitarist how to play the chords by displaying it on the fret board.

So I decided to modify my acoustic guitar to make it a smart guitar which can display chords using small leds embedded on its fret board and controlled through an Arduino mega and a bluetooth module. Voice commands can be sent over a smartphone app to the the hardware on the guitar.
So I am writing my first instructable on this smart guitar so that you can also make one for yourself.
Cheers!!
Step 1: Part List
1. Acoustic Guitar
2.Arduino Mega and a usb cable for programming.(Mega because it has more than 60 digital/analog out pins so that we could use them for lighting up leds on our fret board.)
3.Bluetooth module, HC 05 (uart communication)
4.Connecting wires
5.Smd Leds (we used white)
6.330 ohm resistors
7.Dremel tool for carving strips on fret board
8.Clear Resin/adhesive like Araldite.
9.Power bank for powering up the hardware
10.Soldering iron for soldering components on pcb.
11. Cu Clad board for making pcb.
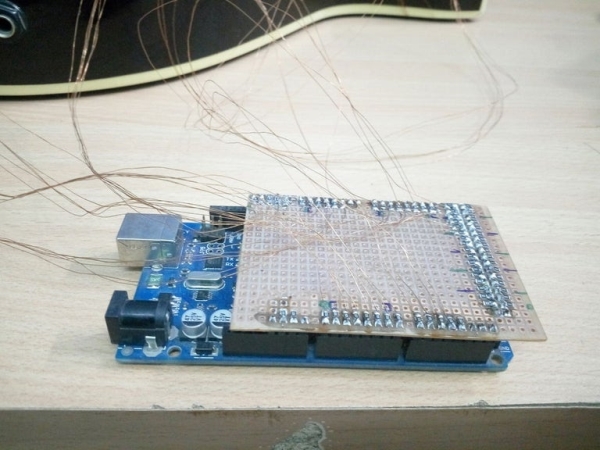
Step 2: PCBs of Our Hardware
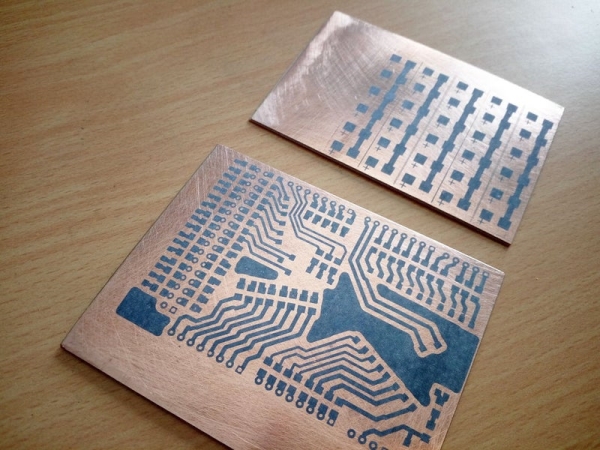
In this section I have not explained how I made PCBs because it will take the interest away, I may cover it in upcoming instructables,but just I mentioned what we needed.
Our whole setup comprises of two types of circuit boards:
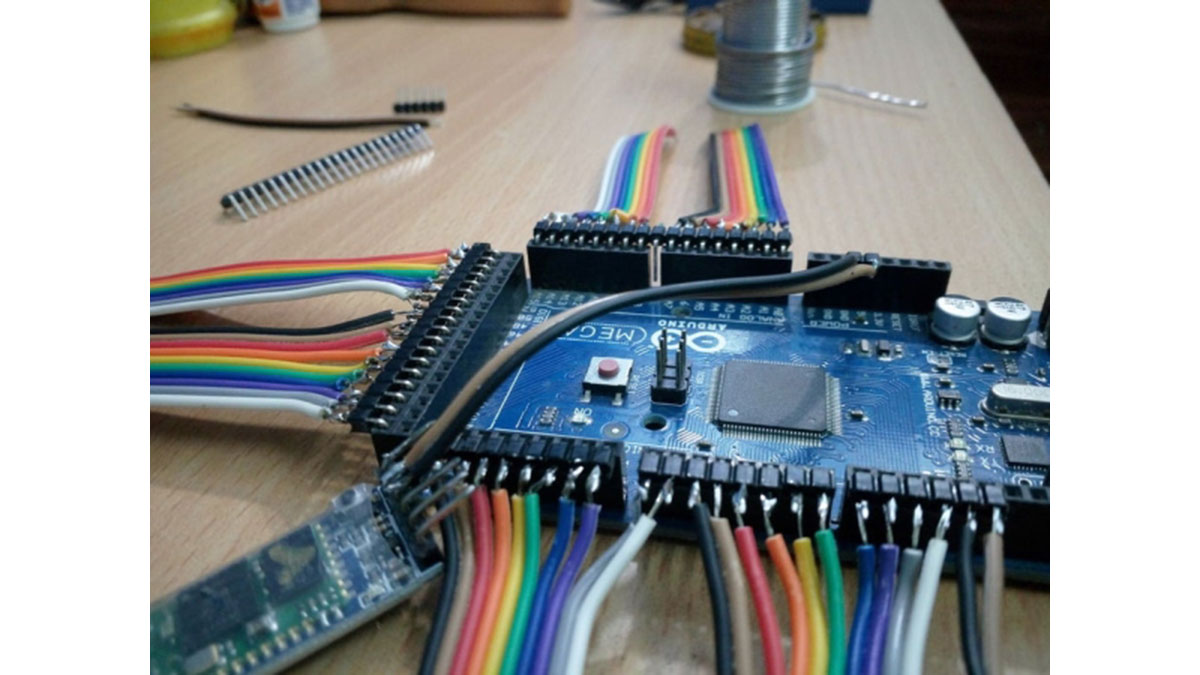
1. Hardware Controller PCB: This is a shield to the arduino mega board where all the thin connecting wires from all the leds will meetup and 330 ohm resistors will be mounted on.
We will solder some male headers to clap it on the Mega board.
2. Led display Strip PCB: These are thin PCB strips on which smd LEDs will be mounted and each set of 6 Leds board will be placed on each fret of the guitar.
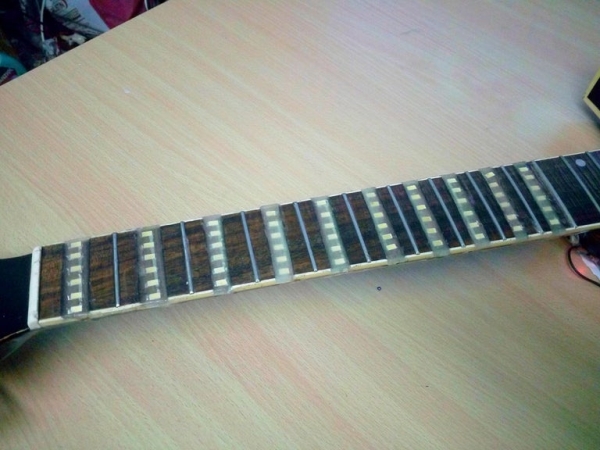
Step 3: Wood Work on Guitar’s Fret Board
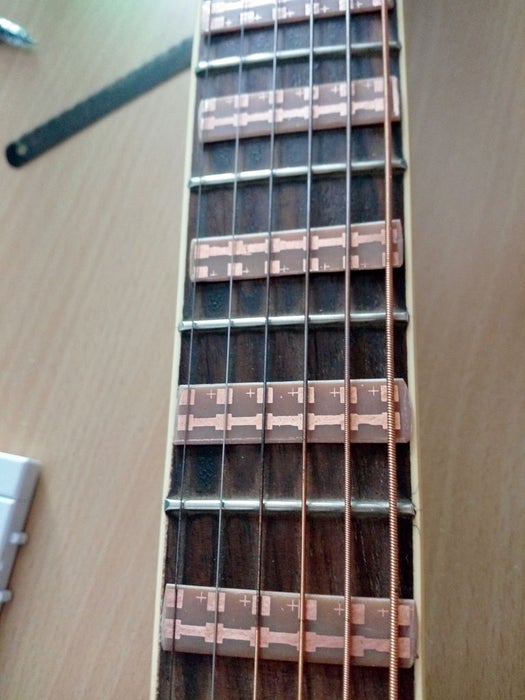
In this step, we will measure the width of each PCB led strip and then using a dremel rotary tool, we make small slots on each frets to fit the led pcb.
Note: We used very thin pcb/copper clad board for this purpose so that we need not to trim the fret board deep.
In the pictures you can easily see hoe simple it is to do that. Just careful not to dig deep as there lies a truss rod beneath the fret board.
Step 4: Soldering Part 1
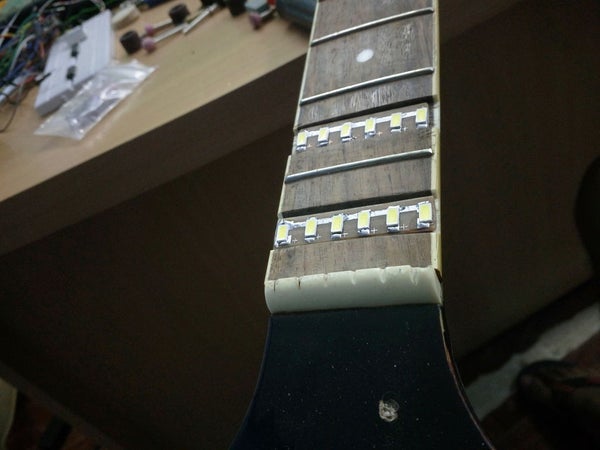
Now solder the smd leds on the thin pcb strips, taking proper care of + and – terminals of the leds. Then solder thin copper wires (total 7 numbers ,6 for leds (+) and 1 for common(-)).
These wires will be drawn from bottom of fret board and hence will be invisible. These all wires will then go to the main shield PCB and then will be soldered.
Step 5: Applying Clear Resin
After placing all the Led strips pcbs on the slots made on fret board and connecting wires to every leds, now its time to seal the board by applying a clear resin/adhesive (I used Araldite) to make the surface smooth.
When the whole process is done you will not feel any Leds and it feels exactly same as a new guitar.
Step 6: Soldering Part 2
In this part we will solder the thin enameled copper wires coming out of each leds to the shield board pcb.
We caneither make mark on each wire so that our programming would be easier as we will be knowing which led goes to what Pin number on the Arduino mega board.
But, if that is difficult, no worries. We can also randomly connect the wires to any of the digital pins of mega board shield and then using a test code we can determine later, which led is assigned to which digital/analog oin.
We will also solder the HC-05 bluetooth module to the Uart pins/serial pins of the Mega shield so that the hardware could be connected to our smartphone using some android application.
Connection of Bluetooth Module ……………………..> Arduino Mega
Tx…………………………………………………………………> Rx
Rx…………………………………………………………………> Tx
Vcc……………………………………………………………….> +5v
Gnd……………………………………………………………….>Gnd
Connection of Leds(10 frets= 60 leds)………………………………………..> Arduino Mega
(1,2,3………60) …………………………………………………………………………>Pin(2,3,4….62)
Step 7: Beautifying the Fret Board
After completing the modification on my acoustic guitar, now its time to make it look better.
For this purpose, I have used black sticking vinyl paper with laser cut holes for displaying every led.
You could see the images how neat it looks after the vinyl paper is pasted over.
Source: Chord Displaying Smart Guitar