Brewing beer has become a worldwide phenomenon. Beer and wine is being crafted in ordinary kitchens in every corner of the world. One phrase that you may hear from your fellow homebrewer is “From Grain to Glass”, which refers to the process of making beer from raw ingredients.

There are several different ways of making beer. The more advanced way of creating beer, called “all grain” brewing, refers to the “From Grain to Glass”. Malted grain is steeped (or “mashed” as it is referred to commonly) with hot water inside a vessel such as a cooler or pot. During this “steep” (or “mash”), enzymes in the grain convert the starches in the grain of choice into sugars, which subsequently dissolve into the water. After the conversion process is complete, the sweet water (or “wort” as it is officially referred to) is drawn off and boiled with hops prior to being fermented with different strains of yeast.
After brewing beer using a 40qt cooler and a turkey fryer stock pot on a propane burner stand, I found myself longing for a more sophisticated and efficient way to brew beer. I kept asking myself: How could I brew beer in the warmth of my kitchen during cold winter months or on late evening brews after a long day at the office?
My research led me down an endless rabbit hole, of which I have yet to find an end to. The result of several years of research has led me to write this article on Instructables. The outcome of my research was a custom built electric brewing system that resembles a sous vide cooker. If you find yourself interested in building a brewing system or sous vide cooker, you found yourself in the right spot.
I have broken up this Instructable into three parts:
- The Muscle – the brewing system itself;
- The Hearth – a Bluetooth enabled Arduino Uno controller; and
- The Brain – a custom Universal Windows Platform App (UWP), created in C#.net, which runs on a Lumia 635 Windows 10 smartphone (or any other device).
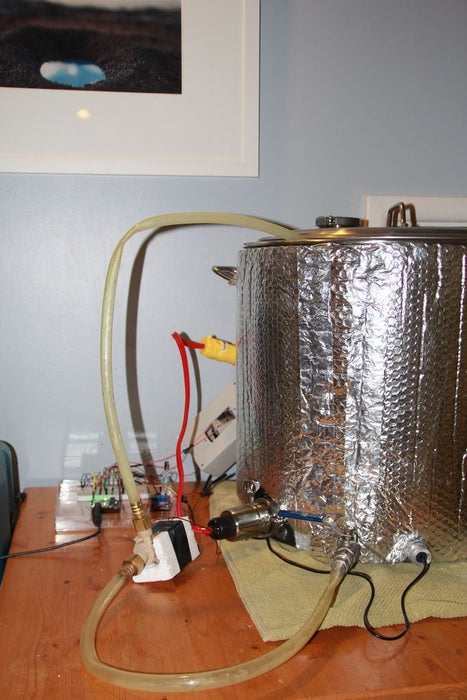
The above sections will illustrate how I created a stainless steel behemoth of a brewing pot using a single vessel brewing philosophy (also known as “brew-in-a-bag”). The brewing system is powered by an Arduino control board that regulates the temperature of whatever might be in the pot to a degree using internal temperature probes and a solid state relay controlled electric heating element. I will outline how I progressed from an initial concept idea to a fully functioning layout on a breadboard to soldering a custom circuit board on a piece of perf board (a PCB with copper lined holes that can be soldered).
The final part of the brewing system and the future basis for endless development is my custom app called BrewLogic, which can be run on any windows 10 machine. This app speaks to the Arduino controller via Bluetooth and can be run on any Windows 10 device equipped with Bluetooth. Although Windows 10 is readily available, I have also created a generic Windows Presentation Foundation (WPF) application.
Step 1: Brewing System Type
Before I get too much into the process of assembly of my brewing system, I’ll touch briefly on the why I chose this particular layout. When looking at brewing systems, you are generally faced with a decision as to how you want to brew beer. The main systems that will spark lengthy debates are
- 3 vessel HERMS (Heat Exchange Recirculating Mash System)
- 3 vessel RIMS (Recirculating Infusion Mash System); and
- 1 vessel BIAB (Brew-in-a-Bag)
In principle, all systems produce equally amazing beer. The only reason one might choose HERMS over RIMS over BIAB is personal preference.
HERMS and RIMS use pumps and heating elements to maintain a constant temperature in the mash. Liquid wort is recirculated and heated to maintain the temperature. In a HERMS system, the wort is pumped inside a copper or stainless steel coil that is indirectly heated by a water bath. In a RIMS system, the wort is pumped across a heating element to control the temperature. Both systems have Pros and Cons that are worth considering when choosing what system is best for you. A good starting point for some more research can be found at the below link
https://beerandbrewing.com/rims-herms/
Compared to HERMS and RIMS, BIAB uses a different setup. A single vessel is used to do the entire brewing process from mashing to boiling. During the mash, the grain is held in a strainer bag or stainless steel basket. The water is heated inside the pot using an electric heating element. Recirculation can be provided with a pump but is not required. After the mash is complete, the grain can be lifted out of the pot prior to boiling.
Some great information on BIAB can be found at the below link
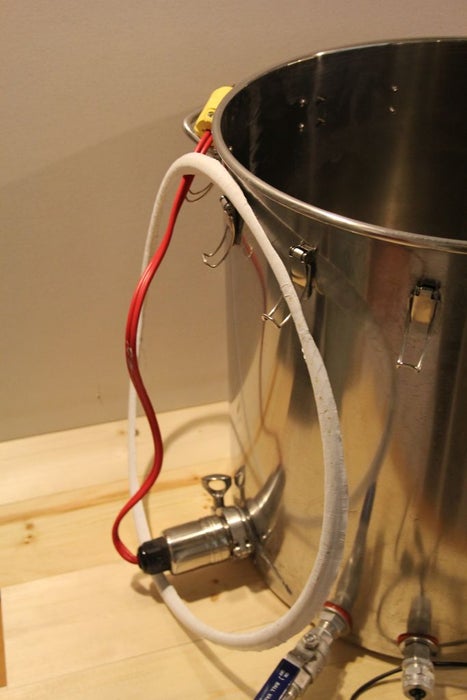
For my system, I chose BIAB as it was cheaper due to less equipment needed, more versatile and took up less space in my house. It utilizes a 20 gallon/80qt stainless steel stock pot with a 2000W 110v stainless steel heating element. For the BIAB setup, I use a polyester mesh (with a mesh size similar to a mosquito screen) that lines a stainless-steel strainer basket that came with the pot. The system I built also utilizes some of the HERMS/RIMS features by recirculating the mash constantly using a small 12v solar pump.
With this system, I can brew anywhere from 5 to 15 gallon worth of beer at a time. However, for anything larger than 10 gallons, you will be happier using a large 5500W heating element instead of my meager 2000W.
Step 2: Materials Needed
I will list the parts I used to create my brewing pot, you can use this list in your own quest of creating a brewing system or replicate my system. I will present the good, the bad, and “I wish I would have done that differently” I will go into details on sensors and electronics in the following sections. I am not affiliated with any of the links given below. I added them as a good starting point for your own research.
This is by no means a be-all-end-all list and you may notice a few additional items in the picture that aren’t listed (such as the tri-clamp port on the lid). I added these things for future expansion plans. Use the below list to design your dream system to suit you the best.
- Brewing Pot – Concord 20 gal/80 qt stainless steel stockpot with lid and Basket https://www.ebay.ca/sch/i.html?_odkw=stainless+st…
- Outlet – ½” NPT Stainless Steel Weldless Ball Valve (Stainless Steel) – https://www.morebeer.com/products/weldless-ball-va…
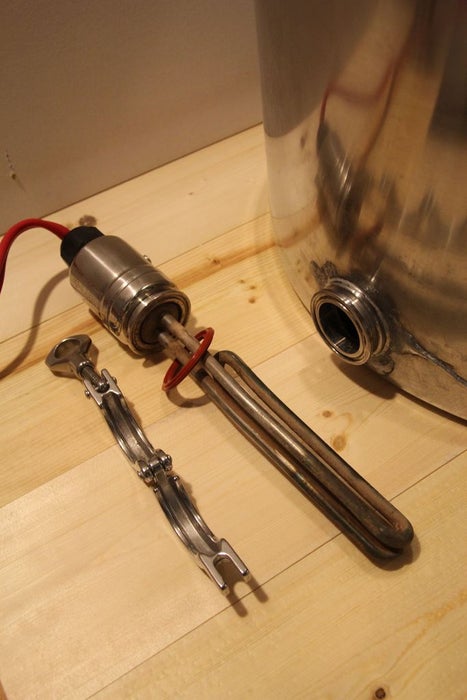
- Heating Element –Stainless Steel Heating Element with Tri-Clamp Enclosure. Please choose a heating element that is suited for your home electrical system. Please always use a GFCI and properly rated wire size and breaker system. I will not be responsible for any damage caused by using the wrong type of heating element. – https://www.brewhardware.com/category_s/1902.htm; https://www.brewhardware.com/product_p/etc.htm
- A 1.5” or 2” Tri-Clamp Radius Face Solder Flange – https://www.brewhardware.com/product_p/tc15rsf.htm
- Silver solder and stay bright flux – https://www.brewhardware.com/product_p/silversolde…
- ½” NPT Stainless Steel Thermowell (various sizes depending on your system) – https://www.ebay.ca/sch/i.html?_from=R40&_trksid=p…
- ½” NPT Strain Relief (for the thermowell) – http://www.elecdirect.com/cord-grips-strain-relief…
- Heat sink thermal compound (to increase the temperature transfer rate for your temperature sensor) – https://www.ebay.ca/sch/i.html?_odkw=thermal+compo…
- Tri-Clamp Clover and Gasket – https://www.ebay.ca/sch/i.html?_from=R40&_trksid=p…
- Stainless Steel Spring Loaded Toggle Latch – https://www.ebay.ca/itm/2-10pcs-Stainless-Steel-Sp…
- 12v food grade solar pump for recirculation – https://www.ebay.ca/itm/12V-Solar-Hot-Water-Pump-C…
- cardboard
- Teflon tape
Tools needed
- Hole Saw or step bit (I hear a step bit is the better option) – https://www.canadiantire.ca/en/pdp/mastercraft-hol…
- Butane Torch
- Sandpaper
- Rivet Gun
- Stainless steel rivets
- Metal Rasp/File – https://www.homedepot.com/c/files_and_rasps_101_H…
- Some old rags
- Pliers
- Screwdriver
Step 3:
Step 4: Health and Safety
Having worked with industry for the past decade, health and safety have been drilled into my mind. Everyone wants to go home in one piece every day and spend time with your family and friends. Please make sure you take your time and are comfortable following any of the below steps.
Some of the tasks that you are going to perform when building a system like this involve some hazards you should be aware of. Please wear gloves and glasses when dealing with sharp edges. Also be mindful of the fire hazard and hazardous fumes during soldering. It is best to do this outdoors.
One important thing to note: be careful what type of glove you are wearing, you do not want to wear a synthetic glove when soldering. The glove will melt and burn you.
Please be smart and safe especially when dealing with fire and mains electricity. Your life is more important than brewing beer in a shiny pot!
Step 5: Putting It All Together
Once you end up with all the items you require, you can start enjoying the part of putting it all together. Since this process is based on an idea in your head, make sure to take your time and draw things out with pen and paper. Measure twice and cut once is not just a saying.
The first step I did after I received my pot was to scratch my head and ask myself, should I have bought a smaller pot? The dimension of my pot is 19 inches wide and 19 inches high. For all intents and purposes, you generally want a tall and narrow pot rather than a wide and short pot.
After I received all the parts, I grabbed a good metal drill bit to prepare pilot holes of where I wanted my pieces to eventually end up. The element needed to be as close to the bottom as possible to allow enough room for the basket and also to allow for the smallest amount of liquid in the pot.
I used olive oil in the area that I was going to drill and kept a spray bottle nearby. You will want to drill fast and with lots of pressure. Drill a few seconds then cool the pot with water. After I had a good enough depression I used a bi-metal hole saw to cut an appropriate size hole in the pot. Use a high speed and lots of pressure with the hole saw and use the depression you drilled earlier as a guide for your hole saw. Again, drill a few seconds, then cool everything down with water including the saw. This will help with the cut and the life of your tools.
In order to decide the correct size check the source of your parts. In the case of parts obtained from www.BrewHarware.com, proper dimensions are included in the description of the part. This will guide you to determine the proper size of the hole you will need. that you should be drilling for your fittings. If you are unsure, stick on the smaller end of things and get an accurate measurement of whatever you want to install.
After drilling the holes you need with either a hole saw or a step bit, you should take some sandpaper and a metal file/rasp to deburr the opening you just cut. This will make soldering easier and you won’t cut your self down the road when you are using your new brewing system.
After I cut all the holes, I installed the ball valve and thermowell first. These two fittings were no weld and simply need to be fed through the hole and secured with a nut and O-Ring. Generally, these fittings have one welded portion, a thread, an O-Ring, and a nut. The O-Ring should be placed on the outside of the pot between the pot and the welded portion of the fitting. If you were to place the O-Ring between the nut and the inside of the pot, you might have liquid find its way through the thread.
I won’t go into much detail on soldering stainless steel. If you have ever soldered plumbing in your house (with copper pipe), you should be ok. If you have not, you may want to consider practicing on some old pipe first before you attempt to solder your pot. If you look at my pictures you may notice that I should have practiced a bit more.
For a proper explanation and demonstration, I highly recommend you check out the below video by the owner of www.BrewHardware.com. I am not affiliated with his site in any way but have used his parts and tutorials to build my pot. I can highly recommend it to anyone else. His tutorial could fill an entire instructable on its own.
Once you are done soldering, you can get yourself “Bar Keepers Friend” Cleaner. This will help take off old flux and make your pot nice and shiny without the need for polishing equipment. After you have successfully installed all your fittings and soldered on your tri-clamp ferrule (and hopefully used less solder than I did), you are ready to install a heating element. Again, I will refer you to the owner of www.BrewHardware.com. He does a terrific job explaining the proper installation of a heating element and the enclosure he sells.
Long story short, your 120v mains power (in North America) will have three wires. Make sure your wire size and break are appropriately sized for the amount of power the heating element is going to use. If you use a 2000w heating element at 120v, you are looking at approximately 16 amps of power. You should be using a 20 amp breaker and a thick gauge wire to handle that load. Ask your friendly neighborhood electrician to help you out if you don’t know. Don’t set your house on fire while brewing.
To install your heating element, take the black and white wire and connect it to your heating element. The bare uninsulated wire is used as ground and is connected to the enclosure.
If you followed these steps and assembled everything to suit your needs, you have a barebones system that you can use to brew beer with. If you choose to simply plug your element in, you can heat your water and make delicious beer. If like me you’d like to kick back with a cool beverage in your hand and let the computer do the work for you, keep on reading. Now the fun part of my build starts.
Step 6: Sealing Your Pot
I designed my pot to be used as a fermentation vessel as well. In order to properly ferment beer without problems such as infections, I needed to create a seal. Searching the world wide web, I came across a custom Teflon seal. Simply cut out a cardboard ring and wrap it with Teflon tape. Make sure to overlay each lap with the tape by half. I could have used different materials but I had some Teflon tape laying around the house.
In order to keep your lid closed, you can use the spring loaded clamps (linked in the materials section) and attach them to your pot. You will need rivets that fit through your particular clamps and are made of stainless steel (because why not). Find a suitable metal drill for the rivets and start marking out the locations for your clamps. In my case, I placed the lid on the pot without the seal and placed the clamps where I thought they would work best. I spaced them out evenly.
After spacing them out, I started to drill each one individually. I used tape to hold the clamps in place and used the holes as a guide for my drill. Similar to cutting the holes for your element and valves, use high speed and pressure and cool down the drill bit and area with oil and water. after you drilled the two holes, use some sandpaper or the drill bit to de-burr the hole. Insert your rivet into the hole and secure it with the rivet gun. This will form a secure hold. you can use a small Dremel tool to cut off the rivet on the inside if they are too long. You can get different lengths of rivets, in my case they ended up being longer than I expected. I used a cut off wheel and a Dremel to trim them. Make sure to wear safety glasses when doing this, you don’t want metal shards in your eye.
Step 7: Brewing Controller Parts
The brewing controller uses a few simple off the shelf components to control the brewing system. Below you will find the parts that I used to create my controller. Again, you can use this list as a guide for your own system.
- Arduino Uno (or clone) – https://www.ebay.ca/sch/i.html?_from=R40&_trksid=m…
- 25DA Solid State Relay – https://www.ebay.ca/sch/i.html?_odkw=da25+ssr&_osa…
- Note: Regarding these solid state relays, they come from China and you buy them sight unseen. There are counterfeit versions of this solid state relay out there that are produced with quality parts and quality workmanship; however, they are actually not rated for what they are advertised. There is a good instructable that goes into this in more detail.https://www.instructables.com/id/The-inner-working… Long story short, if you buy any of these relays, it is a good idea to buy one that is rated for a higher current that you think and to order a backup just in case.
- 2 channel 12v Relay with 5v Input – https://www.ebay.ca/sch/i.html?_odkw=ssr+25DA&_osa…
- HC-05 Bluetooth – https://www.ebay.ca/sch/i.html?_odkw=hc05&_osacat=…
- Fan-Heatsink combo – https://www.ebay.ca/itm/AOpen-Heatsink-and-40mm-Fa…
- Jumper cables – https://www.ebay.ca/sch/i.html?_odkw=jumper+cables…
- Breadboard – https://www.ebay.ca/sch/i.html?_odkw=jumper+cables…
- Perfboard – https://www.ebay.ca/sch/i.html?_odkw=breadboard&_o…
- Waterproof DS18B20 Temperature Sensor – https://www.ebay.ca/sch/i.html?_odkw=perfboard&_os…
- Resistors – https://www.ebay.ca/sch/i.html?_odkw=waterproof+ds…
- Female PCB Mount USB Jack – https://www.ebay.ca/sch/i.html?_odkw=resistors&_os…
- DC Jack – https://www.ebay.ca/sch/i.html?_odkw=female+usb+pc…
- Female to Male USB cable – https://www.ebay.ca/itm/USB-3-0-Extension-Cable-Ma…
- CPU heatsink compound – https://www.ebay.ca/sch/i.html?_from=R40&_trksid=m…
- Shrink wrap – https://www.ebay.ca/sch/i.html?_odkw=shrink+wrap&_…
- 12v AC-DC 2amp Centre positive wall adapter
- You can find these for cheap at any second-hand store. Look for the label and make sure it is center positive, which means the positive lead is located in the middle of the connector. You can check the picture section to see what it should look like.
You may have noticed, I did not include a link for an enclosure in the above list. The housing that I use for my controller is unique in the sense that I salvaged it from an old power bank that no longer worked. Ever since getting into the world of Arduino, I have become fascinated with all sorts of electronics. I am constantly on the lookout for new things to take apart and learn how they work. I would highly recommend checking your local second-hand stores or even recycling depots for all sorts of electronics. You can find some great components for all sorts of projects.
In my case, I was able to open the old power bank, determine that the battery no longer charged properly and recycled it. I salvaged the main PCB of the unit and learned how to de-solder components. I was able to re-use a push button and the USB connector. All the other passive components are now sitting in a bag until I learn how to use them. I can highly recommend a video on youtube by GreatScott that goes into great detail on what you should salvage and how to go about de-soldering it.
Source: Brew|LOGIC – Bluetooth Enabled Arduino Brewing Controller