Summary of Cheap 2-Way Bluetooth Connection Between Arduino and PC
This guide details a low-cost project establishing bidirectional serial communication between an Arduino microcontroller and a PC using a Bluetooth HC-05 transceiver. The author explains hardware setup, including soldering connections and voltage regulation, alongside software configuration for data transmission and reception. Two Arduino sketches are provided: one to send sensor-like data (a counter) to a PC terminal, and another to receive commands from the PC to toggle an LED. This setup enables applications like remote control of motors or monitoring sensors wirelessly within a 30-foot range.
Parts used in the Cheap 2-Way Bluetooth Connection Between Arduino and PC:
- Arduino Uno (R2) or clone
- Bluetooth serial transceiver module (HC-05 with BlueCore4 chipset)
- Bluetooth USB dongle for PC
- 1.2K Ohm resistors
- 2.2K Ohm resistors
- Breadboard
- Jumper wires
- 9V battery power source
- PC supporting Arduino IDE
- Tera Term Pro terminal emulator
INTRODUCTION
In the guide, I will explain how I managed to send data back and forth between a PC and Arduino via a cheap Bluetooth HC-05 transceiver, which can be found for less than $10 on ebay with the breakout board. The version I have used in this project does not have a breakout board so it’s little cheaper but more difficult to solder. I strongly recommend buying the module with the breakout board. This Bluetooth transceiver basically acts as a generic serial COM port.
The PC to Arduino Bluetooth serial connection can be useful in many applications such as controlling servos, motors, and writing to LCDs. The Arduino to PC connection can be useful in applications where the Arduino reads sensors then pass their values via serial Bluetooth to a PC for processing. The distance for this transceiver is about 30 feet or so but it really depends on many other variables. This is ideal for indoors projects.
The only downside of this cheap Bluetooth transceiver is the absence of headers which means you have to solder at least 4 wires. Then there’s the absence of power LED as well as no TX/RX LEDs. I did not consider these features a necessity but some of you might want to pay more and get an enhanced version of this transceiver with all of these features.
The Bluetooth serial module I bought has the following specs:
— Default COM setting: 9600, N, 8,1
— Default Password/pairing code: 1234.
— Supports the AT command to modify the baud rate, device name, passkey, master/slave, etc.
— Supports baud rates 2400 -1382400.
— Based on the CSR Bluetooth chip BC417143
— Bluetooth specification v2.0 + EDR
— Power supply: +3.3VDC 50mA
— Frequency: 2.4GHz ISM band
— Modulation: GFSK(Gaussian Frequency Shift Keying)
— Emission power: ≤4dBm, Class 2
— Sensitivity: ≤-84dBm at 0.1% BER
— Speed: Asynchronous: 2.1Mbps(Max) / 160 kbps, Synchronous: 1Mbps/1Mbps
— Security: Authentication and encryption
— Size: 26.9mm x 13mm x 2.2 mm.
— Working temperature: -20 ~ +75 Centigrade
— Dimension: 26.9mm x 13mm x 2.2 mm
CREDITS
During my research, I have benefited from many projects on this and related topics. I have listed them in the references section.
RELATED PROJECTS
1) In a previous project, I used a Pololu Wixel and an Arduino to control a robot remotely from a PC terminal. Here, I will show similar data exchange functionality but without the robot.
2) I also hacked the RF system of cheap wireless car toy and used the Arduino to transmit signals.
 Bluetooth HC-05-1.pdf
Step 2: Load the Arduino test sketches
NOTE: When uploading sketches from the Arduino IDE to the Arduino microcontroller, make sure your Bluetooth transceiver TX pin/wire is not connected to the Arduino’s RX pin (pin 0) . Else, this may prevent your PC from sending sketches to the Arduino microcontroller.
Check the video to see how these demo sketches work.
I have two Arduino test sketches. The first one is a “send test.” The Arduino microcontroller sends numbers to the PC over serial Bluetooth. So if you have a terminal emulator running on your PC, such as Tera Term, you will see a list of numbers rolling down your emulator’s screen.
I have done almost no error trapping in my code to keep the code clear and simple. I trust the developers will add it per their requirement.
The second Arduino test sketch is a “get test.” If you type 1 on your keyboard, from the terminal emulator application such as Tera Term, the Arduino’s pin 13 LED will turn on. If you click 0 on your keyboard, the LED will turn off.
//////////////////////////////////////////////////////////////////////////////////
// REMIXED BY: TECHBITAR (HAZIM BITAR)
// LICENSE: PUBLIC DOMAIN
// DATE: MAY 2, 2012
// CONTACT: techbitar at gmail dot com

int counter =0;

void setup() {
Serial.begin(9600);
delay(50);
}

void loop() {
counter++;
Serial.print("Arduino counter: ");
Serial.println(counter);
delay(500); // wait half a sec
}

//////////////////////////////////////////////////////////////////////////////////

// REMIXED BY: TECHBITAR (HAZIM BITAR)
// LICENSE: PUBLIC DOMAIN
// DATE: MAY 2, 2012
// CONTACT: techbitar at gmail dot com

char INBYTE;
int  LED = 13; // LED on pin 13

void setup() {
Serial.begin(9600);
pinMode(LED, OUTPUT);
}

void loop() {
Serial.println("Press 1 to turn Arduino pin 13 LED ON or 0 to turn it OFF:");
while (!Serial.available());   // stay here so long as COM port is empty
INBYTE = Serial.read();        // read next available byte
if( INBYTE == '0' ) digitalWrite(LED, LOW);  // if it's a 0 (zero) tun LED off
if( INBYTE == '1' ) digitalWrite(LED, HIGH); // if it's a 1 (one) turn LED on
delay(50);
}
The parts list
HARDWARE
— Arduino Uno (R2) or clone.
— Bluetooth serial transceiver connected to Arduino. I got one from Ebay with the BlueCore4 chipset. Search Ebay for Wireless Bluetooth Transceiver Module RS232 / TTL.
— Bluetooth USB dongle to be connected to PC. I used an old MSI pc2pc Bluetooth as well as a Bollionton Bluetooth USB dongles and both worked fine.
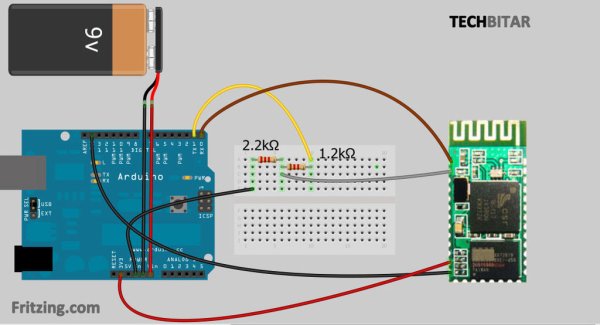
— The 1.2K Ohms & 2.2K Ohms resistors will be used as voltage dividers to drop the Arduino’s 5V to about 3.3V. You can substitute these with 10K Ohms & 20K Ohms resistors. If you know how to calculate voltage dividers, feel free to use other values for your resistors.
— Breadboard and jumper wires.
— Power source. I used a 9V battery.
— Any PC that supports Arduino IDE will be needed to program the Arduino microcontroller.
— Most PCs and smartphone w/Bluetooth and a terminal emulator can be used to control the Arduino.
SOFTWARE
— Windows 7 64-bit. But this should work on other platforms supported by the Arduino IDE.
— Arduino IDE 1.0
— Tera Term Pro terminal emulator but other similar emulators should work.
— Tera Term by the original author of the software
For more detail: Cheap 2-Way Bluetooth Connection Between Arduino and PC
- How can I connect the PC to the Arduino via Bluetooth?
You can use a cheap Bluetooth HC-05 transceiver which acts as a generic serial COM port to send data back and forth. - What is the default pairing code for the Bluetooth module?
The default password or pairing code is 1234. - Can I modify the baud rate settings of the transceiver?
Yes, the module supports AT commands to modify the baud rate, device name, passkey, and master/slave status. - Why should I avoid connecting the TX pin during sketch uploads?
Connecting the Bluetooth transceiver TX pin to the Arduino RX pin may prevent the PC from sending sketches to the microcontroller. - What components are needed to drop the Arduino's 5V output to 3.3V?
You need resistors acting as voltage dividers, such as 1.2K Ohms and 2.2K Ohms, or alternatives like 10K Ohms and 20K Ohms. - Which software tools are recommended for this project?
The project uses Arduino IDE 1.0 and Tera Term Pro terminal emulator on Windows 7 64-bit. - What is the approximate wireless range of this transceiver?
The distance is about 30 feet, though it depends on various variables. - How do I turn on the Arduino LED using the PC?
Type 1 on your keyboard in the terminal emulator application to turn the LED on, or type 0 to turn it off. - Does the module have built-in headers or LEDs?
No, this specific cheap version lacks headers and power/TX/RX LEDs, requiring you to solder at least four wires manually.