Summary of Carduino- A simple Arduino robotics platform with its own library
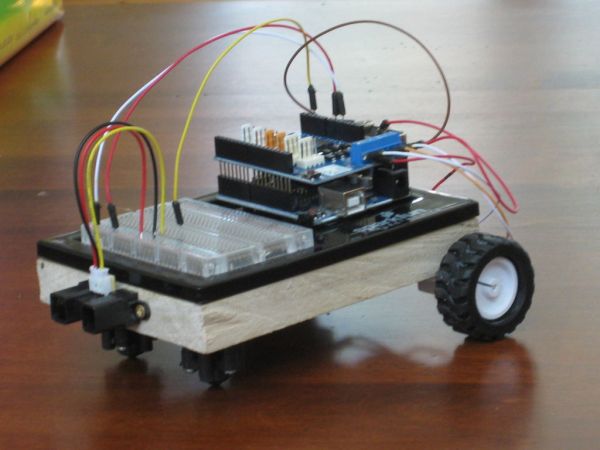
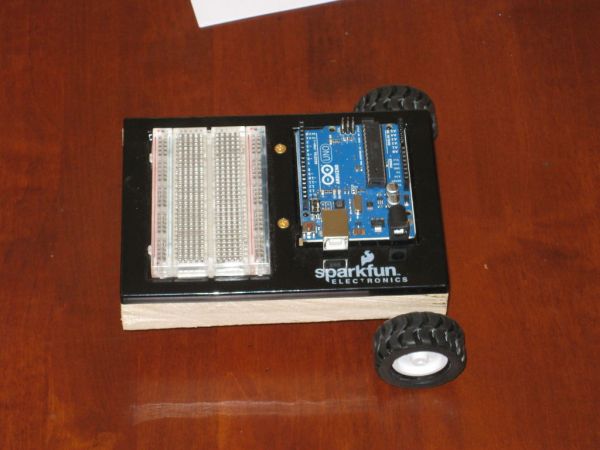
This project describes Carduino, an Arduino-based autonomous robotics platform with a custom library that simplifies motor and sensor control. The standard build uses two rear motors, front omni-wheels, a Sharp distance sensor, and onboard breadboard space. The guide covers parts, chassis assembly, mounting, and library usage with example projects, aiming at beginners and costing about $30–$100 depending on parts on hand.
Parts used in the Carduino:
- Arduino Uno
- Breadboard
- Arduino and breadboard holder
- Sharp long range proximity sensor
- Micro metal gear motors (2)
- Pair of 49x19mm wheels
- Pair of motor mounting brackets
- Pair of omni-wheels
- Arduino motor shield
- 15x10.75cm piece of wood (chassis)
- #4 x 3/4" wood screws (12)
- 9V battery
- Wire
This is, as the title says, an Arduino-based robotics platform, with its own library. The “standard” model comes with two back motors, two omni-wheels in the front, and a distance sensor mounted on the front. It also has breadboard space on top for adding whatever you want. It is intended to be autonomous, but one can make it remote controlled if they really want to. This instructable will teach how to build it, how to use the library, and it will include some sample projects too.
What is the library?
The library will make controlling your Carduino a little easier. This project is intended for those with little programming experience, and just want to get started with simple robotics. You don’t even need to know how to use a motor shield to use it. It’s as simple as saying “turn right for 1 second” or “go forward for 3 seconds, and then speed up.” The library also contains example code to help you get started.
What exactly is in the library?
Step 13 contains all the important information regarding the library, and all example projects.
Why would you ever want a wooden chassis, and is it fine if I build mine differently?
Of course you can build yours differently! The library will work almost no matter what you do, so you can change the design to whatever you’d like. The only reason why I used a wooden chassis was because it was the only material for this I had, so you can feel free to use whatever else you’d like.
What can this robot do?
It can do just about anything. Even just with the parts on the standard model, there is infinite possibilities. With Arduino and the Carduino library, programming it is incredibly easy, and it can do anything you can imagine. The extra breadboard space allows you to add a variety of sensors, to make it do just what you want.
How much does it cost?
Roughly one hundred dollars, if you’re starting out with nothing. I had almost all the parts before I started, so the price was only about thirty dollars for me. Most all of the parts are very common, and you should have many of them.
Here is a terrible video of it in action:
(due to some issues with the distance sensor, I could not get object-avoidance in the video, but, I assure you, it works)
Step 1: Supplies
1 Arduino Uno http://www.sparkfun.com/products/11021
1 Breadboard http://www.sparkfun.com/products/9567
1 Arduino and breadboard holder http://www.sparkfun.com/products/10059
1 Sharp long range proximity sensor http://www.sparkfun.com/products/8958
2 Micro metal gear motors http://www.sparkfun.com/products/8910
1 Pair of 49x19mm wheels http://www.sparkfun.com/products/8899
1 Pair of motor mounting brackets http://www.sparkfun.com/products/8896
1 Pair of omni-wheels http://www.sparkfun.com/products/320
1 Arduino motor shield http://www.amazon.com/gp/product/B007BHKRVW/ref=oh_details_o00_s00_i00
1 15×10.75cm piece of wood (check size with the Arduino and breadboard holder)
12 #4 x 3/4″ Wood screws
1 9v battery
Some Wire
Step 2: Set up various things
Cut wood to correct size
Make Omni-wheels (instructions came with them)
Attach wheels to motors
Insert Arduino and breadboard into the holder.
Step 3: Mount Omni-wheels
Position both of them 0.5″ from the front, and 0.5″ from either side. Mark holes for mounting, then drill them. Use your #4 x 3/4″ wood screws to mount them.
For more detail: Carduino- A simple Arduino robotics platform with its own library
- What is the Carduino library?
The library simplifies controlling the Carduino, letting you issue simple commands like turn right for 1 second and includes example code. - What does the standard Carduino model include?
Two back motors, two front omni-wheels, a front-mounted distance sensor, Arduino with breadboard space, and a motor shield. - Is the Carduino intended to be autonomous?
Yes, it is intended to be autonomous, though it can be made remote controlled if desired. - Can I change the chassis material or design?
Yes, the library will work with different designs and materials; wood was used only because it was available. - What can the robot do with the standard parts?
With Arduino and the Carduino library it can perform many behaviors and be extended with additional sensors on the breadboard space. - How much does the Carduino cost to build?
Roughly one hundred dollars if starting from scratch; about thirty dollars if many parts are already owned. - Where are library details and examples located?
Step 13 of the instructable contains all important information about the library and example projects. - What preparatory steps are needed before assembly?
Cut the wood to size, make omni-wheels, attach wheels to motors, and insert Arduino and breadboard into the holder. - How are the omni-wheels mounted?
Position them 0.5 inch from the front and 0.5 inch from either side, mark and drill mounting holes, then use #4 x 3/4 inch wood screws to mount.