Summary of Building a Portal Turret with motion controlled audio and lighting
This article details the step-by-step construction of a life-size, talking Portal Turret. The creator scaled down the original 58-inch game model to 36 inches for practicality, using MDF and styrofoam to build master molds. These masters were coated with Apoxie Sculpt and Bondo, then sanded smooth before creating two-part silicone rubber molds with hard shells. The final components were cast using Smooth-Cast 300 plastic, with hollow sections for the body and arms to reduce weight, while legs remained solid for strength.
Parts used in the Life Size Talking Portal Turret:
- MDF (medium density fiberboard)
- wood glue
- styrofoam
- Apoxie Sculpt
- bondo
- primer
- wax
- Foam core
- acorn nuts
- oil based clay
- Smooth-on Rebound 25 silicone rubber
- Thi-Vex II silicone thickener
- Smooth-on Plasti-Paste
- Mold release agent
- Smoothcast 300
- Plastic cups
- mixer sticks
- solid block of wood
For those that are unfamiliar with Portal, It is a fantastic puzzle game made by a studio called Valve that requires you to use two portals to solve all kinds of different puzzles. It is really a fantastic game. The turret for which this instructable is about is one of only two characters you interact with in the entire game, the other being GLaDOS. The central AI of the complex. The Turrets are so adorably deadly that I had to have one of my own. Since nobody makes them I had to build one myself. A little bit more work but definitely worth the effort. Lets get started.
Materials and Tools used are broken down for each section.

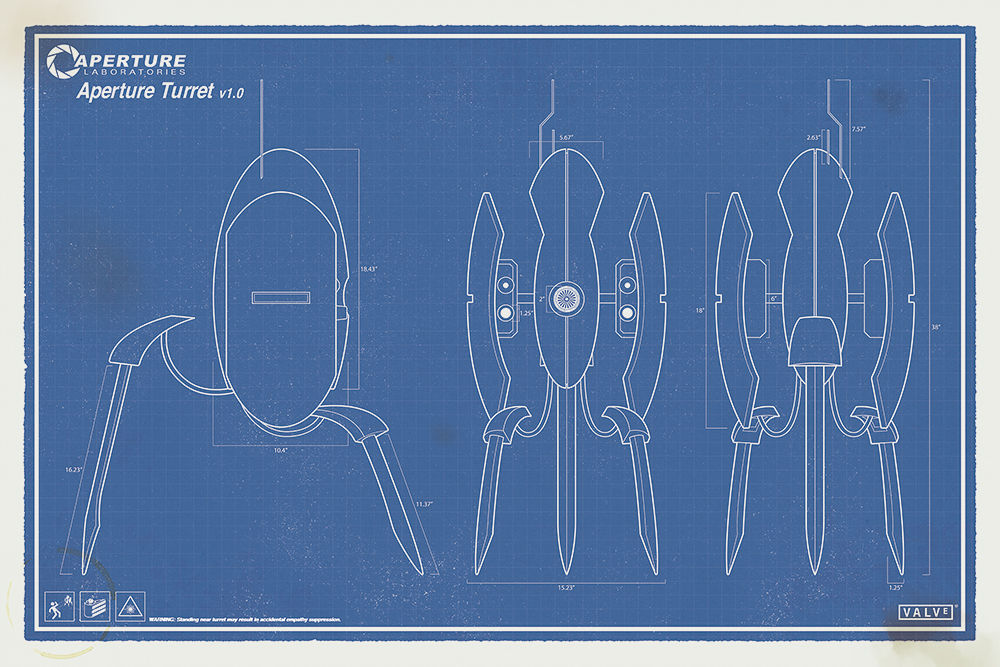
Step 1: To Scale Blueprints
I had a friend of mine, Tyler Garrison, who is a wiz with Illustrator whip me up a set of blueprints with a height of 38 inches to the top of the antennas. I then printed them out to scale and pulled all the measurements I would need from them as I worked through the project. My friend did an outstanding job adding in little extra details like the Aperture logo and other details on the blueprints. These blueprints will also make a great poster to hang on the wall with the finished project.
Step 2: Making the Masters – Body
With the size decided, The first step was building the framework for the body. My personal material of choice is MDF (medium density fiberboard) which can be picked up at any hardware store in 2×4 foot and 4×8 foot sheets. This stuff is great because it has no grain and can be cut and sanded smooth with relative ease. The dimensions for this were pulled straight from the blueprints and after an afternoons worth of work, I had skeleton frame work that looked like the body of a turret.
The next step was to fill in the gaps with styrofoam. I cut down and shaped the roughly 10 pieces to fit into there respective slots leaving about 1/8 inch for the material it would be covered with. The styrofoam was then covered with one of my favorite materials. Apoxie Sculpt If you have never used this stuff, I highly recommend it. It is a 2 part epoxy clay. You mix equal parts A and B and have about 2-3 hours of working time. You work it just like clay, even using water to smooth it out. After 24 hours it is hard as a rock and can be sanded or carved. I covered all of the curved surfaces of the body with an 1/8 sheet of clay and waited 24 hours for it to dry.
A day or 2 later after the clay was fully cured, I sanded the surface as smooth as I could get it with my hand sander. The secret when trying to get a very smooth surface is patience. I spent many many hours sanding and refining to get the surface curves just right.
Next up on the body was many many coats of primer with lots of sanding between each coat and spot putty to fill in any low spots that popped up. Slowly working my way to finer and finer grit sandpaper, I ended up with a glassy smooth finish. The final coat was wet sanding with 1000 grit and then the surface received a coat of wax. Any wax will do. I used turtle wax.
Body ready for its mold.
Materials used for this stage
MDF (medium density fiberboard)
wood glue
styrofoam
Apoxie Sculpt
bondo
primer
wax
Tools used for this stage
Band saw
belt sander
hand sander
Step 3: Making the Masters – Arm and Legs
The inside of the arm was formed by creating a template of the arc and using it to form the Bondo while it was still malleable. The hold for the gun box was cut out with a Dremel.
The entire arm then went through the same process as the body, and was primed and sanded until it was glassy smooth and ready for molding.
The same general techniques were used for the remaining parts. The 4 leg pieces started as blocks of wood and were shaped appropriately the a belt sander and hand sander. I found carving these straight from wood was a much faster technique than starting from foam, coating them in resin, and refining the shapes.
I only made one long leg piece to be cast 3 times, with the front two legs cut to the shorter length. I also made a single gun box to be cast twice.
That covers all the main pieces I will need to make a full turret. By the time I had finished the body, arms, legs and gun box, I lost count of the number of cans of primer I had gone through. It was seriously a lot of primer.
By this point my garage now has a nice thick layer of dust on absolutely everything! I’m really looking forward to having to clean it all up at the end of this project.
Materials used for this stage
MDF (medium density fiberboard)
styrofoam
Apoxie Sculpt
bondo
primer
wax
Tools used for this stage
Band saw
belt sander
hand sander
Step 4: Making the Molds – Body
http://www.reynoldsam.com/
They are a great resource with a ton of great information on how to use their products. I spent a ton of time on there website going through all of the different materials and learning as much as I could. I was also fortunate enough to have one of their brick and mortar stores right here in town where I live. Their staff was also really helpful in helping me with any remaining questions I had.
Due to the size that these molds will need to be, I’ll be using the hard shell mold technique. This technique consists of an inner silicone liner covered with a hard exterior shell to help it maintain the proper shape. There are a bunch of resources online for different techniques, if you interested in casting and mold making you should definitely check them out. I decided to go with Smooth-On Rebound 25 rubber for the molds with a Plasti-Paste shell. Both of these are available at Reynolds in smaller trial sizes as well as a 1 gallon size.
Since this mold will be split into two pieces, the first step was to create the division line for the first half of the mold. It actually worked out really nicely that a piece of foam core perfectly fits into the center groove of the body that exists as part of the design. After adding some registration keys, you can use anything really, I used acorn nuts, and a clay dam around the perimeter, its time for rubber. The clay damn will stop the rubber from just running right off the side of the foam core.
The silicone comes in two parts that you mix equal volumes of to activate. It was applied in layers to build up the proper thickness. A thin initial coat was applied over the whole surface to make sure there weren’t any air bubbles in the mold. After this coat started to set, I applied a thicker second coat. After this coat started to set I added in registration keys for the hard shell mold. This will ensure that the rubber always fits properly into the hard shell and that there isn’t any distortion of the shape. For the third and final coat of silicone, I added a few drops of Thi-Vex II silicone thickener to thicken up the rubber allowing me to apply a thicker coat. The thickener stops the rubber from flowing down and settling in the low spots.
After the rubber had fully cured which takes about 6 hours, The next step was to apply the hard shell. The first thing to do was to move the clay damn out about 1 inch to make room for a hard shell rim. The Plasti-Paste works similarly to the rubber. It comes in two parts that need to be mixed together. The Plasti-Paste is applied in a single step. There is no need to do layers like the silicone. After a few hours this is fully cured.
Time to do the other half of the mold. After removing the foam core, the second half is pretty much the same as the first so I’m not going to bother repeating the steps. Once the two half were made, The last thing I did was to drill holes around the edge. There are for bolts to close up the mold and make it easier to cast pieces.
Materials used for this stage
Foam core
acorn nuts
oil based clay
Smooth-on Rebound 25 silicone rubber
Thi-Vex II silicone thickener
Smooth-on Plati-Paste
Mold release agent
Step 5: Making the Molds – Arm Panel and Gun Box
Since the gun box is square the mold for this will be really simple to make. I first made an MDF box about 1/4 inch bigger then the gun box and molded the outside of the gun box. After this set, I flipped it over and poured rubber into the back of the gun box to create an inner mold. By doing this I can cast a thin walled box so I still have room for the electronics that need to go inside it.
The last image shows where I cut out the holes necessary for the various electronic components to be installed.
Materials used for this stage
Foam core
Acorn nuts
oil based clay
Smooth-on Rebound 25 silicone rubber
Thi-Vex II silicone thickener
Smooth-on Plati-Paste
Mold release agent
Step 6: Making the Molds – Legs
These are poured in halves like the body to create two pieces for each mold. After cutting the foam core down to shape to make a box around each piece, I decided where I wanted the seam from the mold to be and used the oil based clay to set up the first half of the mold. You can see the clay under the long leg piece. Then its as simple as just pouring in the rubber until it covers the entire surface. Once its cured, you flip it over, remove the clay and pour the other half. It is important to use a mold release agent to prevent the two halves of the mold from sticking together. I forgot to do this on one piece and had to cut the thing back apart with an exact o blade.
The holes you see in the picture of the open molds are spots for the connection point with the body and legs. From here on out, all the pieces that are created will be part of the final turret which is pretty exciting! Its time to start casting pieces.
Materials used for this stage
Foamcore
oil based clay
Smooth-on Rebound 25 silicone rubber
Mold release agent
Step 7: Casting: Body and Arms and Legs
I decided to use Smooth-Cast 300 to cast all the pieces. My original plan was to use this ultra white plastic as the final surface of the turret, with only some clear coat added for extra shine. After some test casts I determined that wasn’t really going to work for a few reasons. More on that later. With weight being such an important issue, all pieces relating to the body will be hollow, and all leg pieces solid for extra strength and support. I’ll talk about the body and arm first.
My goal with the hollow pieces was to create a shell that is roughly 1/8″ thick. After doing a few tests with different ways to achieve this, I decided to slush cast each part of the mold separately and then merge the 2 halves to create a final cast. This helped to guarantee that there weren’t any spots that were too thin.
By doing it this way I can add a little extra plastic wherever it might be needed. I built up the thickness in layer for each half of the mold. I made sure to not let the plastic fully cure between each coat so the layers would stick together. The inner surfaces are not the prettiest thing to look at but it gets the job done. The arm and the body are both done in this way.
There is a step that isn’t pictured but is really important. Before I merged the two halves of the body, I embedded a solid block of wood in the bottom rear of the main body that got sealed in place with more liquid plastic. This way there is a nice solid block that I will be able to drill into to attach the legs. The rear seam was also reinforced with a much thicker layer of plastic for structural support.
The two halves of the body and arm molds were then closed up and the bolts were tightened on the molds. Through a small hole in the middle of each piece I poured a few more cups of liquid plastic and spun each piece along the seam to marry the two halves together. I now have a solid hollow cast for the body and arms.
Its definitely a little more work to do it this way, but the final pulls are lightweight and durable!
The legs were much quicker to cast since they are solid. No slush casting required. I just filled up the molds, let the plastic cure and then removed the finished pieces. In all there were 11 pieces that got cast for a single turret. On to painting.
Materials used for this stage
Smoothcast 300
Plastic cups
mixer sticks
For more detail: Building a Portal Turret with motion controlled audio and lighting
- What is the height of the turret built in this project?
The creator decided on a height of about 36 inches. - How can I keep the turret as light as possible?
Create molds and cast hollow pieces for the body and arm panels while keeping leg pieces solid. - What material was chosen for the framework of the body?
MDF (medium density fiberboard) was used because it has no grain and is easy to cut and sand. - Does the Apoxie Sculpt require special curing time?
Yes, it requires 24 hours to dry fully after application before sanding or carving. - What technique was used for making the large body molds?
The hard shell mold technique using an inner silicone liner covered with a hard exterior shell was used. - Why were the leg pieces cast differently than the body?
Legs were cast solid for extra strength and support, whereas body parts were cast hollow to save weight. - How was the thickness of the hollow body shell ensured?
The creator slush cast each half of the mold separately and merged them to guarantee consistent thickness. - Can you use any type of wax for the finish?
Any wax will do; the author specifically used turtle wax. - What material was used to create the gun box mold?
An MDF box slightly larger than the gun box was used to mold the outside, followed by pouring rubber inside. - How many pieces were cast in total for a single turret?
In all, there were 11 pieces that got cast for a single turret.