Summary of Build a Tank Volume Reader in Under $30 Using ESP32
This article guides users in building a DIY IoT tank volume monitor using an ESP32, ultrasonic, and environmental sensors. It details the hardware setup, wiring connections, and Arduino IDE programming to transmit data to Ubidots. The system measures fluid levels via distance, calculates volume using cylindrical formulas, and tracks temperature and humidity, offering an affordable solution for home brewing or small-scale industrial monitoring.
Parts used in the Tank Volume Reader:
- ESP32
- Ultrasonic Sensor HC-SR04
- DHT11 Sensor
- Plastic protection case
- Jumper Wires
- Micro USB cable
- Arduino IDE 1.8.2 or higher
- Ubidots account or STEM License
The Internet of Things has brought a lot of formerly complex device applications into the homes of many craft brewers and wine makers. Applications with level sensors have been used for decades in large refineries, water treatment plants, and chemical plants. With sensor prices falling, now both industrial and DIY can monitor the volume of any tank, barrel, or canister.
The sensors available on the open market can sense most anything and are classified accordingly. Sensor used for measuring humidity are termed humidity sensor, pressure called pressure sensor, distance are called position sensors,and so on. In a similar fashion, the sensor used for measurement of fluid levels is called a level sensor.
The level sensors are used to measure the level of the free-flowing substances. Such substances include liquids like water, oil, slurries, etc as well as solids in granular/powder form (solids which can flow). These substances tend to get settle in the container tanks due to gravity and maintain their level in rest state. In this guide you will learn how to build your own home-made level, temperature, and humidity sensor. Also included are instructions for you newly collected data to be utilized via Ubidots, an application enablement platform.
Step 1: Requirements
- ESP32
- Ultrasonic Sensor – HC-SR04
- DHT11 Sensor
- Plastic protection case
- Jumper Wires
- Micro USB cable
- Arduino IDE 1.8.2or higher
- Ubidots account – or – STEM License
Step 2: Wiring and Casing
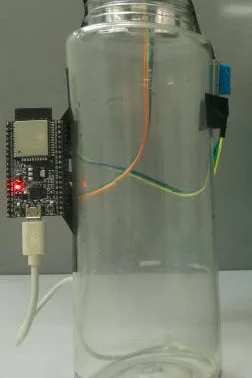
The sensor HC-SR04 (Ultrasonic Sensor) works with 5V logic. Please, follow the tables and diagram to make the correct connections between the ESP32 and the ultrasonic sensor, also between the ESP32 and the DHT11 sensor (Temperature and Humidity Sensor).
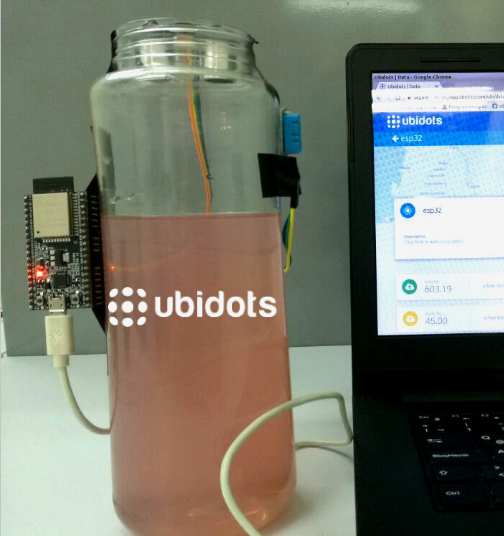
I built a small prototype with a scale-sized tank to shows the functions of the sensor, but a final prototype with it case should look like the one above.
As you can see the ultrasonic sensor should be at the top of the tank, so with it we’re going to be able to measure the distance between the up part of the tank and the endpoint of the substance Then, place the temperature and humidity sensors to monitor environment.
Step 3: To Program Your Connected Device, Connect With the Arduino IDE
Before beginning with the ESP32, setup your board with the Arduino IDE. If you are not familiar with a board setup, please reference the article below and follow step-by-step until you’ve compiled the board:
Once your board is compiled, install the libraries required to run the sensors: “PubSubClient” and “DHT:”
- Go to Sketch/Program -> Include Library -> Library Manager and install the PubSubClient library. To simply find the correct library, search PubSubClient within the search bar.
2. Go to the library repository to download the DHT library. To download the library click the green button called “Clone or download” and select “Download ZIP“.
3. Now, back in the Arduino IDE, click on Sketch -> Include Library -> Add .ZIP Library
4. Select the .ZIP file of DHT and then “Accept” or “Choose”
5. Close the Arduino IDE and open it again. The restart is required; please do not skip this step.
Now it is time to start coding 🙂 Copy the code below and paste into the Arduino IDE.
Please go to the following link to find the code.
Next, assign the parameters: Wi-Fi name and password, plus your unique Ubidots TOKEN. If you don’t know how locate your Ubidots TOKEN, please reference this article below.
Once you’ve pasted your code and assigned the appropriate wifi, verify in the Arduino IDE. To verify, in the top left corner of our Arduino IDE you will see the below icons. Choose the Check Mark icon to verify any code. Once verified, you will receive a “Done compiling” message in the Arduino IDE.
Next, upload the code into your ESP32. Choose the right-arrow icon beside the check mark icon to upload. Once uploaded, you’ll receive a “Done uploading” message in the Arduino IDE.
With this, you’re sensor is now sending the data to the Ubidots Could!
Step 4: Management of the Data in Ubidots
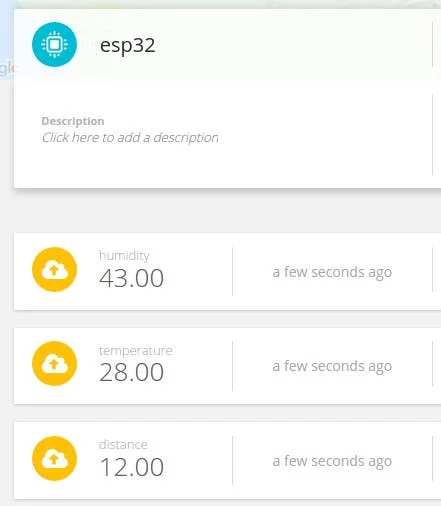
If your device is correctly connected you will see a new device created within your device section in your Ubidots application. The name of the device will be “esp32“, also inside the device you will see the variables distance, humidity, and temperature:
If you desire to change you device and variable names to a more friendly one, please reference this article:
Next, to calculate the volume of free-flowing substances in the tank, we need to create a derived variable to calculate a volume value.
The Derived Variable let us build operations using the default variables, so in this case we are going to apply the volume formula with the characteristic of a cylindrical tank where:
- Pi = The ratio of a circle’s circumference to its diameter (constant)
- r = The radius of the tank
- h = The height of the tank
Click on “Addvariable” and select “Derived“. As you can see at the new window you have to attach the formula in the field.
Once you’ve attached the formula with the characteristics of your tank, select the variable “distance.”
With your formula entered, you’re volume will begin reading in your Ubidots application.
Step 5: Results
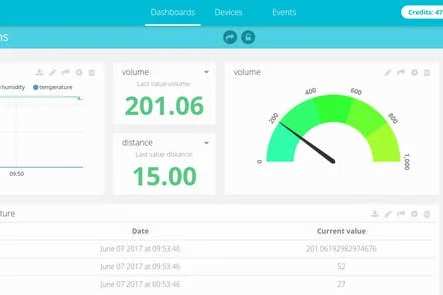
Now your sensor is ready to start working! Above you can see the function of the level sensor at different volumes.
To learn more about Ubidots widgets and events, check out these video tutorials.
Source: Build a Tank Volume Reader in Under $30 Using ESP32
- What substances can this level sensor measure?
The sensor measures free-flowing substances including liquids like water and oil as well as solids in granular or powder form. - How do you connect the DHT library in Arduino IDE?
You must download the ZIP file from the repository, then go to Sketch Include Library Add .ZIP Library to install it. - Does the ultrasonic sensor require 5V logic?
Yes, the HC-SR04 ultrasonic sensor works with 5V logic. - Can you calculate tank volume without a derived variable?
No, you must create a derived variable in Ubidots to apply the volume formula using the distance measurement. - What libraries are required to run the sensors?
The required libraries are PubSubClient and DHT. - Why is restarting the Arduino IDE necessary after installing libraries?
A restart is required after adding the DHT ZIP library to ensure it is recognized correctly. - How is the volume of a cylindrical tank calculated?
The calculation uses the radius of the tank and the height derived from the distance measurement multiplied by Pi. - What variables appear in the Ubidots device section?
The default variables displayed are distance, humidity, and temperature.