Since you lacked the USB interface in your own Arduino board, it becomes necessary to use a homemade/ready-made USB to Serial Converter Module as an efficient and economical solution. Inexpensive and easy-to-use USB to Serial Converter modules are now widely available, such as one shown here. With the help of this little module you can program your own arduino through a simple interfacing as described.
Usually, one USB interface connection, and six output connections (DTR, RXI, TXO, 5V, CTS, GND) are available in the module. You need only 5 connections for our Arduino, so just leave the CTS terminal and connect the rest to the Arduino as shown in this table.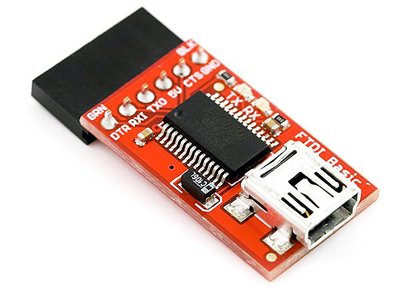 If you want to make your own USB to Serial Converter Module, then refer this tried & tested circuit diagram of the USB to Serial Converter (FTDI) module. Good skill in SMD soldering is a prerequisite!
Got it? Now you have a little Arduino board using an Atmega328P (pre-loaded with Arduino bootloader) as its brain. Further, you can upload your sketch from the Arduino IDE to the Arduino board with the help of an FTDI module.
Since you have an AVR USBasp programmer in hand,is it possible to upload bootloader and/or program code to Arduino using the same USB asp programmer, instead of the proven methods described earlier? The answer is YES! AVR USBasp is a USB in-circuit programmer and it can use to program most of the Atmel AVR controllers. It simply consist of an ATMega8 and a couple of passive components such as resistors, capacitors, LEDs, etc. The programmer uses a firmware-only USB driver and there is no special USB controller is needed.
Burning Arduino Bootloader with AVR USBasp
Here, I am going to show you the simplest way of burning the Arduino Bootloader firmware into the ATMEGA328P microcontroller chip on Arduino Board. First of all, follow the wiring indicator, just pick your USBasp programmer, and connect it to the Arduino board/ATmega328P chip.
Note that the output socket/connection cable of the USBasp programmer is not compatible with the ICSP connector on Arduino board, so you need to find a way to connect the USBasp interface to the Arduino board/ATmega chip. After connecting the AVR-USBasp programmer from your computer to the Arduino board, open the Arduino IDE and click on Tools menu and under the Programmer sub-menu select USBasp. Then, click on the Burn Bootloader to start burning the bootloader under Tools menu. Arduino IDE will display “Done burning bootloader” after it is done. That’s all!
No USBasp in Tools Menu?
Don’t panic…by default,you can’t find such an option in the Arduino IDE. There is a simple trick that you should use if you want to work with your AVR USBasp programmer. Using the trick you can use your AVR USBasp programmer to program AVR microcontrollers without pre-loaded bootloaders,too! The steps are given below:
- Go to the Drive where you installed your Arduino software (for example C:\Arduino IDE -0022)
- Now open the program folder,go to the preferences.txt file (for example: C:\Arduino IDE-0022\Arduino-0022\lib\preferences), find the sentence upload.using = bootloader, and change it to upload.using = usbasp
- After this modification,save it and close it. Next,open the hardware folder (for example: C:\Arduino IDE-0022\Arduino-0022\hardware\arduino\programmers),open the programmers.txt file and add another two lines below the final line in the text file (see the notepad window):
USBasp.name=USBasp
USBasp.protocol=usbasp
Finally, save and close the text file,then open the arduino IDE as usual,write your program in it and load the sketch (code) to your AVR microcontroller using the AVR USBasp programmer.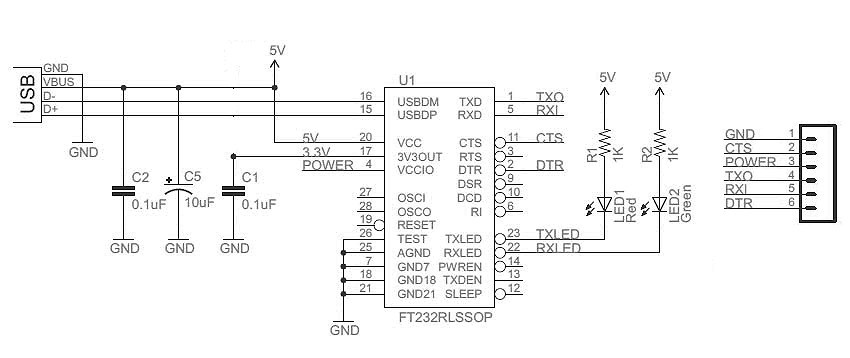
Arduino makes electronics projects easier,and that’s why Arduino is intentionally included in this AVR tutorial series. Next,we are going to start a simple robotic project using an AVR microcontroller. Before that interesting move, I would like to introduce Arduino Builder to you!
Arduino Builder
Arduino Builder is a fully standalone utility for viewing, compiling and uploading Arduino sketch file and compiled ELF or HEX file (usually bootloader) to Arduino board with Arduino serial programming interface, USBasp or Arduino ISP, without the need for Arduino IDE. This can be easily done with no more than 3 steps. When compiling is required (for uploading sketch file), the utility scans the sketch for referenced libraries and build the necessary libraries automatically. Arduino Builder comes in GUI (graphic user interface) version, for normal end users.
For more detail: Bootload an ATmega Microcontroller & Build Your Own Arduino – 2