Summary of BLDC Motor Control with Arduino
This project demonstrates controlling a small brushless DC (BLDC) motor from a computer hard drive using an Arduino microcontroller and Hall-Effect sensors to enable motoring and regenerative braking. It covers salvaging the motor, mounting and calibrating Hall sensors, wiring a three-phase motor driver (L6234), and Arduino programming for commutation and speed control. The project aims to inspire hobbyists with a detailed walkthrough, including hardware setup, sensor alignment, power electronics configuration, and software implementation for efficient BLDC control.
Parts used in the BLDC Motor Control with Arduino Project:
- BLDC motor from a computer hard drive
- Magnet ring from another hard drive
- Hard drive disks (for flywheel)
- Second small motor (DC brushed or small motor)
- Rubber band or belt (for motor coupling)
- Electronic Breadboard
- Solid core wire (22 AWG)
- Arduino Duemilanove microcontroller
- Three 120 kΩ resistors
- Six ~400 Ω resistors
- 100 kΩ linear or rotary potentiometer
- ST Microelectronics L6234 three-phase motor driver IC
- Two 100 µF capacitors
- One 10 nF capacitor
- One 220 nF capacitor
- One 1 µF capacitor
- One 100 µF capacitor
- Three rectifier diodes
- One 2.5 amp fuse and fuse holder
- Three Honeywell SS411A Bipolar Hall-Effect digital position sensors
- Three 1 kΩ resistors
- 12 V hobby-sized lead acid battery
- T8 Torx driver (for hard drive disassembly)
- Digital Multimeter (DMM), preferably with frequency meter
- Oscilloscope (preferably dual channel)
There is a lot of interest these days among hobbyists in controlling brushless DC (BLDC) motors, which have improved performance and better energy efficiency over
traditional DC motors, but are more difficult to use. Many off-the-shelf products exist for this purpose. For example, there are lots of small BLDCs controllers for RC
airplanes that work really well.
For those wanting to delve more deeply into BLDC control there are also many different micro controllers and other electronic hardware intended for industrial users and
these usually have very good documentation. So far, I have not found any comprehensive descriptions of how to do BLDC control with an Arduino microcontroller. Also, if
you are interested in doing regenerative braking, or using a BLDC for power generation, I have not found many products that are suitable for use with small motors or
much information on how to control a 3-phase generator.
This instructable started out as a demonstration project in a class on real-time computing, and which I continued after the class ended. The idea for the project was to
demonstrate a scale model of a hybrid electric vehicle with flywheel energy storage and regenerative braking. The motors used in the project are small BLDCs
scavenged from broken computer hard drives. This instructable describes how to implement BLDC control with one of these motors, an Arduino microcontroller and Hall-
Effect position sensors, in both motoring and regenerative braking modes. Note that having access to an oscilliscope is extremely helpful, if not essential, to doing this
project. If you don’t have access to a scope, I have added some suggestions for how it might be done without one (step 5).
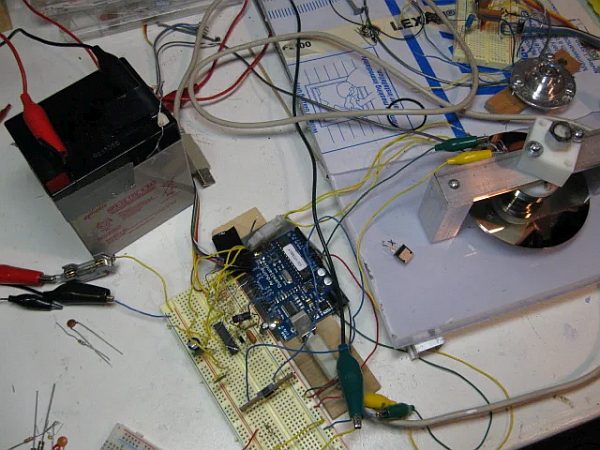
One thing that this project doesn’t have that should be included in any practical motor controller is any safety features, such as overcurrent protection. As it is, the worst
thing that can happen is that you burn out the HD motor. However, it would not be too difficult to implement overcurrent protection with the current hardware, and perhaps
I will do it at some point. If you try controlling a larger motor, please do add overcurrent protection, to protect your motor, and for your own safety.
I would like to try using this controller with a larger motor that can do some “real” work, but I don’t have a suitable motor yet. I noticed an 86W motor for sale on eBay for
around $40.00 that seems like a good candidate. There’s also an RC website called “GoBrushless” that sells kits for putting together your own BLDC. These are not too
expensive and building one is a worthwhile experience. Note that the motors from this web site do not have Hall sensors.
Whew! It was a lot of work to write up this instructable. I hope you find it useful and please post your comments and suggestions.
Step 1: Video
Step 2: Tools and Materials
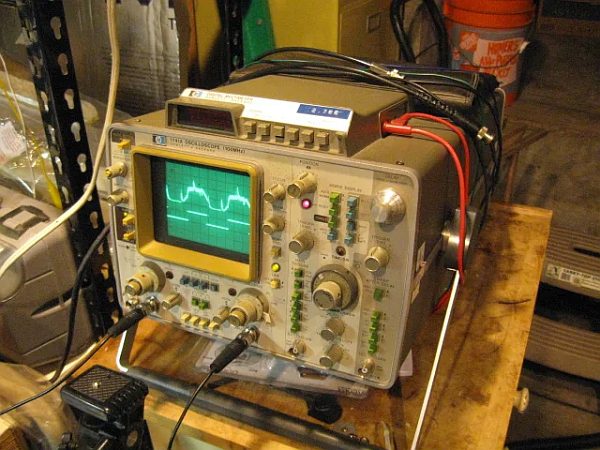
Tools
Digital Multimeter (DMM) – It’s helpful if your DMM has a frequency meter
Oscilloscope (Preferably with at least 2 channels)
T8 Torx driver (you need one of these to open up any hard drive). A good hardware store will have them.
Machine Shop and Rapid Prototype Machine (These were extremely helpful, but with a little ingenuity I think the project can be done without them).
Materials
BLDC motor from a computer hard drive
A magnet ring (half of the motor) from another hard drive.
Several (3-6) of the silver disks from a hard drive
A second small motor (DC brushed OK)
rubber band or (preferably) belt to turn the BLDC with another motor
Electronic Breadboard
solid core wire 22 AWG for breadboard connections
One Arduino Duemilanove microcontroller
Three 120 k ohm resistors
six ~400 ohm resistors
Linear or Rotary Poteniometer 100 k ohm
ST Microelectronics L6234 Three Phase Motor Driver IC
Two 100 uF capacitors
One 10 nF capacitor
One 220 nF capacitor
One 1 uF capacitor
One 100 uF capacitor
Three recifier diodes
one 2.5 amp fuse
one fuse holder
3 Honeywell SS411A Bipolar Hall-Effect Digital Position Sensors
Three 1 K resistors
Note: Mike Anton has designed and is selling a product that will take the place of the power electronics and hall sensors circuits I show in this instructable (it uses back EMF sensing for control). Specifications and purchasing information can be found at these two links: https://www.tindie.com/stores/manton/ http://manton.wikidot.com/open:bldc-motor-driver
12 V hobby sized lead acid battery
Step 3: Understanding BLDC Control
Here is a list of the concepts that I think are the most important for understanding this project:
MOSFET transistor
3-phase half-bridge
6-step commutation of a 3-phase motor
Pulse Width Modulation (PWM)
Hall-Effect Digital Position Sensors
General References
Brushless DC Motor Fundamentals by Microchip
AVR443: Sensor-based control of three phase Brushless DC motor from ATMEL
Brushless DC Motor Control Made Easy from Microchip
3-Phase BLDC Motor Control with Hall Sensors from Freescale
A nice video of a scavenged hard drive motor, but the author appears to be running the motor as a stepper motor, not as a BLDC
More Specific References
Web Page on the L6234 Motor Driver IC, including datasheet, application note, and purchase information.
free samples http://www.st.com/stonline/domains/buy/samples/index.htm
Design of a PM Brushless Motor Drive for Hybrid Electrical Vehicle Application. This is the only paper I have found that describes the commutation sequence for regenerative braking.
This paper, REGENERATIVE BRAKING IN AN ELECTRIC VEHICLE was useful and I borrowed a couple of figures from it, but I think it incorrectly describes how regeneration works.
Step 4: The Motor
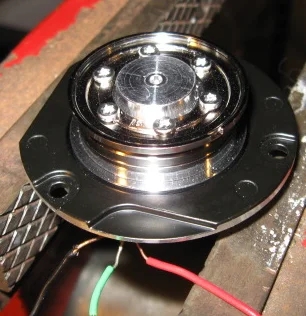
If you don’t want to go to all the trouble of installing and calibrating the hall sensors (steps 5-7), I understand that at least some CD/DVD drive motors have built-in hall sensors.
To provide some rotational inertia on the motors and to give them a bit of a load to work against, I put 5 hard drive disks on the motor, lightly glued together and to the motor with a little superglue (this made the flywheel in my original project).
If you are going to remove the motor from a hard drive, you will need a T8 torx driver to unscrew the casing (often there are one or two screws in the center that are hidden behind a stick-on label) as well as the internal screws that hold the motor in place. You also need to remove the head reader (a voice coil actuator) so that you can remove the memory disks to get to the motor.
Also, you’ll need a second, identical hard drive motor from which you’ll remove the rotor (which has a ring of magnets inside it). To pull the motor apart, I gripped the rotor (top) of the motor in a vise and then pried on the stator (bottom) with two screwdrivers 180 degrees apart. It’s not so easy to grip a motor in a vice tight enough without deforming it. You may want to build a set of wood v-blocks for this purpose.
I drilled and bored a hole in the magnet ring on a lathe so it would fit snugly on top of the motor. If you don’t have access to a lathe, you can fix the inverted rotor to your motor with superglue.
Photos 2 and 3 below show the interior of one of these motors that I pulled apart. Inside the top half there (the rotor) are 8 poles (magnets that are encased in plastic). On the bottom half (the stator) there are 12 slots (windings). Each of the three motor phases has 4 slots that are connected in series.
Some HD motors have three contacts on the bottom, one for each phase, and have an extra one that is the center tap of the motor (where the three phases meet). In this project, there is no need for the center tap, but in sensorless control it can come in handy (I hope to post an instructable about sensorless control one of these days). If your motor has four contacts, you can identify the phases with an ohmeter. The resistance betwee the center tap and a phase is half of the resistance between any two phases.
Most literature on BLDC motors concerns those with trapezoidal back EMF waveforms, but hard drive motors seem to have a back EMF that looks sinusoidal (see photo below). As far as I can tell, it works fine to drive a sinusoidal motor with a square wave PWM, although there may be some decrease in the efficiency.
As with all BLDC motors, this one is driven by a three-phase half-bridge of transistors (See 2nd photo below). I used an IC made by ST Microelectronics (L6234) for the bridge, also known as the motor driver. The electrical connections for the L6234 are shown in Step 8. The third photo below shows a schematic of the motor driver and the three motor phases.
In order to make the motor run clockwise, the following order of switching would be done (first letter is the upper transistor, second is the lower):
Step 1 2 3 4 5 6
Clockwise: CB, AB, AC, BC, BA, CA
Counter Clockwise: BC, BA, CA, CB, AB, AC
This 6-step sequence takes 360 “electrical degrees” but, for these motors, only 90 physical degrees. So, the sequence happens four times per motor revolution. It would seem that both of these sequences are identical, but they are not, because, for each step in the 6-step sequence, the current through the phases is in one direction for CW and in the opposite direction for CCW.
You can see this for yourself by applying a voltage from a battery or power supply to any two motor phases. If you apply voltage, the motor will turn a little bit in one direction and then stop. If you could quickly change the voltage on the phases in one of the sequences above, you would be able to rotate the motor manually. The transistors and the microcontroller do all of this switching very rapidly, many hundreds of times per second when the motor is running at high speed.
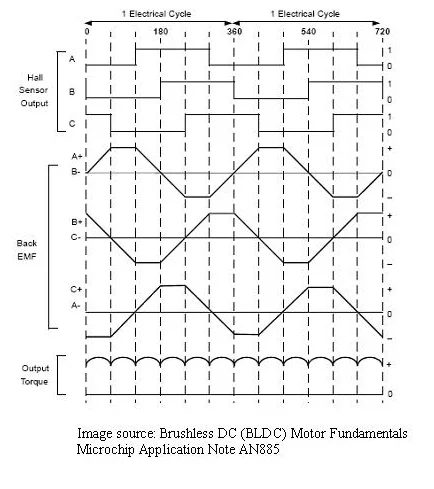
Also, notice that if you apply voltage to two phases, the motor move a little bit and then stops. This is because the torque goes to zero. You can see this in the fourth photo below, which shows the back emf from a pair of motor phases. It’s a sine wave. When the wave crosses the x-axis, the torque provided by that phase is zero. In the six-step BLDC commutation sequence that never happens. The power is switched to another phase combination before the torque on a particular phase goes low.
Step 5: The Hall Sensor Mechanical Setup
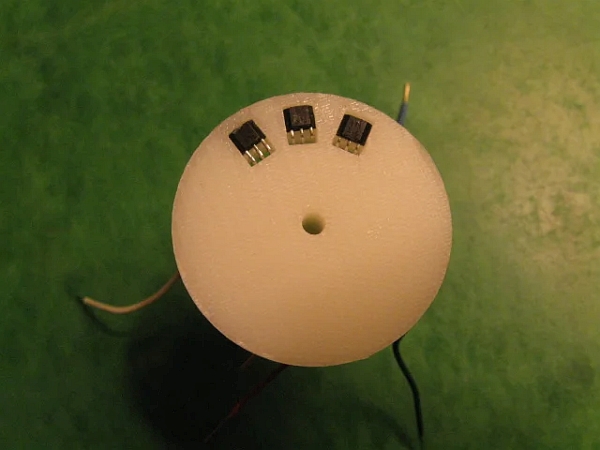
Three hall sensors are used for position detection as the motor rotates, so commutation takes place at just the right instant. I have run my HD motor as fast as 9000 RPM (150 Hz). Since there are24 commutations per rotation, at 9000 RPM the commutations occur every 280 microseconds. The Arduino microcontroller operates at 16 MHz, so each clock cycle is 0.06 microseconds. I don’t know exactly how many clock cycles it takes to perform the commutation, but even if it takes 100, that’s five microseconds per commutation.
The HD motors do not have hall sensors, so it’s necessary to mount them to the exterior of the motor. The sensors need to be fixed relative to the motor rotation and exposed to a series of magnetic poles that change in concert with the rotation of the motor. My solution was to take the magnet ring from an identical motor and mount it, inverted, on top of the motor to be controlled. I then mounted the three Hall sensors just above this magnet ring, exactly 30 degrees apart from each other on the motor axis (120 electrical degrees in the motor rotation).
My hall sensor mount consists of a simple stand made of three aluminum parts that I machined and three plastic parts made on a rapid prototype machine. If you don’t have access to these tools, it shouldn’t be too difficult to find another way to make the stand. Creating a mount for the hall sensors will be more challenging. This is one way that might work:
1. Find an appropriately sized plastic disk to which you can carefully epoxy the Hall sensors.
2. Print out a template on paper that has a circle with the same radius as the magnet ring and three marks 15 degrees apart
3. Glue the template to the disk and then carefully epoxy the Hall sensors in place using the template as a guide.
Step 6: Hall Sensor Circuits
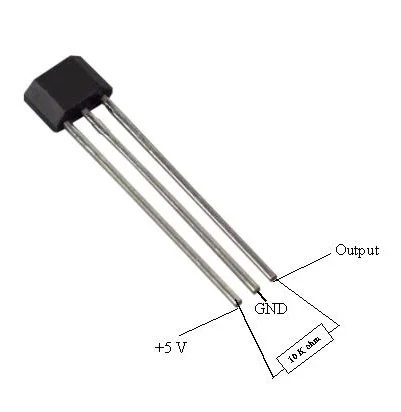
Now that you have the Hall sensors properly mounted on the motor, connect each of them with the circuit shown below and test them out with a DMM or oscilloscope to ensure that the output goes high and low as the motor is rotated. I run these sensors at 5V, using the 5V output of the Arduino.
Step 7: Calibrating the Hall Sensors
The Hall sensors are digital devices that output either high or low (1 or 0) depending on whether they sense a south or north magnetic pole. Because of their arrangement 15 degrees apart and the magnets that rotate beneath them, changing polarity every 45 degrees, the three sensors are never all high or low at the same time. As the motor spins, the sensor output varies in a six-step pattern that is shown in the table below. The sensors must be aligned to the motion of the motor such that one of the three sensors changes exactly at the positions of motor commutation. In this case, the rising edge of the first Hall Sensor (H1) should coincide with the turning on of the combination of phases C(high) and B (low). This corresponds to having transistors 3 and 5 turned on in the bridge circuit.
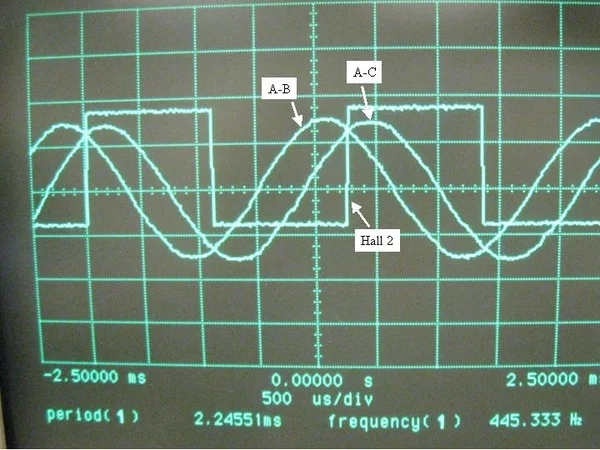
I used an oscilloscope to align the sensors with the magnets. I had to use three channels of the scope to do this. I spun the motor via a belt connected to a second motor and measured the Back EMF between two phase combinations (A and B, A and C), which are the two sine-like waves in the photo below. The signal from one of hall sensor 2 was then viewed on channel 3 of the scope. The Hall sensor mount was turned until the rising edge of the hall sensor was aligned exactly with the point where commutation should take place (See photo below). I now realize that this same calibration can be made with just two channels. If the BEMF of Phase combination B-C were used, then the rising edge of H2 would coincide with the zero crossing of the B-C curve.
The reason that commutation should occur here is to keep the motor torque as high as possible at all times. The Back EMF is proportional to the torque and you will notice that each commutation takes place when the BEMF crosses below the curve of the next phase. So, the actual torque consists of the highest parts of each phase combination.
If you don’t have access to a scope, here is an idea I have for doing the alignment. This is actually an interesting exercise for anyone wanting to get a feel for how the BLDC motor works. If you connect motor phases A (positive) and B (negative) to a power supply and turn on the power, the motor will rotate a tiny bit and then stop. If you then move the negative power lead to phase C and turn the power on, the motor will turn a little further and then stop. The next part of the sequence would be to move the positive lead to phase B and so on. When you do this the motor always stops at a point where the torque is zero, which corresponds on the graph to one of the places where the graphs crosses the x axis. Notice that the zero of the third phase combination corresponds to the commutation location of the first two combinations. Therefore, the zero torque position of the B-C combination is where you want to locate the rising edge of H2. Mark this position with a fine marker or a sharp blade, and then, using a DMM, adjust the Hall sensor mount until the output of H2 goes high exactly on this mark. Even if you are slightly off in this calibration, the motor should work pretty well.
Step 8: The Power Electronics
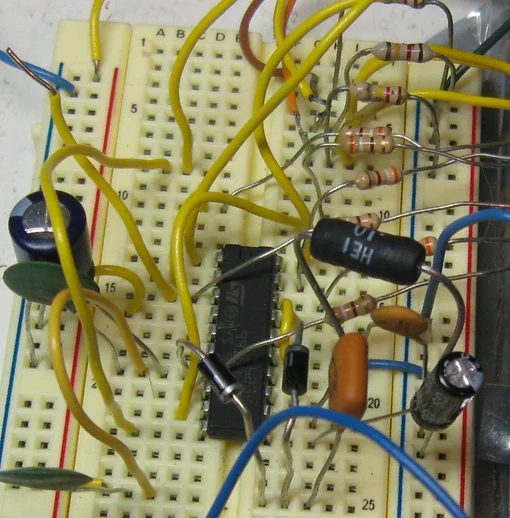
The three motor phases will receive power from the L6234 three phase motor driver. I have found it to be a good product that has stood the test of time. Working with power electronics, there are many ways to accidentally fry your components, and me not being an electrical engineer I don’t always understand exactly what’s going on. In my school project, we also made our own 3-phase half bridge out of 6 MOSFET transistors and six diodes. We used this with another driver, the HIP4086 by Intersil, but we had tons of problems with this set up – we burned out a bunch of transistors and chips.
I run the L6234 (and thus the motor) at 12V.
The L6234 has an unusual set of inputs to control the 6 transistor half bridge. Instead of having one input for each transistor, there is an enable (EN) input for each of the three phases, and then another input (IN) that chooses which transistor in the phase is turned on (upper or lower). For example, to turn on transistors 1 (upper) and 6 (lower), EN1 and EN3 are both high (EN2 low to keep that phase off) and IN1 is high and IN3 is low. This makes the phase combination A-C.
Although the L6234 application notes suggest that the PWM for controlling motor speed be applied to the IN pins, I decided to do it on the EN pins because, at the time, I thought it would be “weird” to have the upper and lower transistors of a phase being turned on alternately. In fact, there appears to be nothing wrong with having the low transistors from two phases turned on at once, because they are at the same potential, so no current will be passed through either of them. With my method, the high phase is alternately enabled and disabled at the PWM frequency, while the low phase is kept on throughout the commutation period.
Below is a diagram of the motor driver, to which I have added the pin connections to the Arduino board. I also add a 2.5 Amp fuse between the positive battery lead and the circuit and a 100 uF Capacitor between power to reduce the ripple in the regenerative current. The diagram is kind of small to see, so consult the documentation for the L6234 for a larger version.
Note: Mike Anton has made a PCB for the L6234, which would (I believe) take the place of this circuit, and save you the work of putting it together. See these links for specifications and purchasing information:
http://manton.wikidot.com/open:bldc-motor-driver
https://www.tindie.com/stores/manton/
Step 9: Regenerative Braking
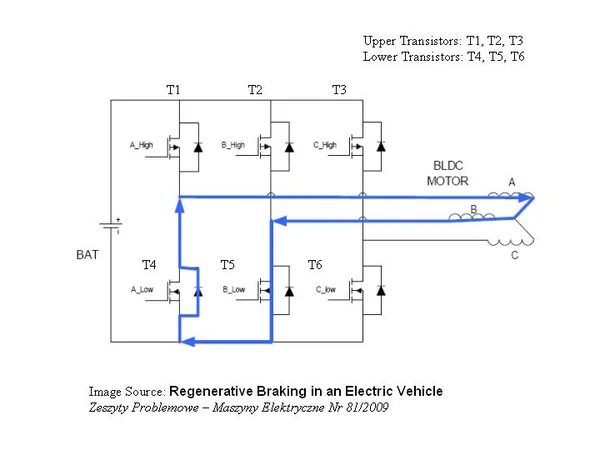
When motoring, the control system sends electric current into the three motor phases in such a way as to maximize torque. In regenerative braking, the control system also maximizes torque, but this time it is negative torque, which causes the motor to slow down, while at the same time sending current back into the battery.
The method of regenerative braking I use comes from a paper by Oakridge National Laboratory, a U.S. govt. lab that does a lot of research on electric motors for cars. The diagrams below are from another paper and help illustrate how it works (However, I believe that the explanation given in this second paper is partially incorrect). Remember that the BEMF voltage in the motor phases goes up and down as the motor rotates. In the diagram, a moment in time is shown where the BEMF is high in Phase B and low in Phase A. In this case, the current has the possibility of flowing from B to A.
What’s essential to the regenerative braking is that the low side transistor is switching rapidly on and off (PWM switching thousands of times per second). While the high side transistor switch is OFF; when the low transistor is ON, the current flows as in the first diagram. In the terminology of power electronics, the circuit acts like a device called a boost converter and energy is stored in the motor phases (Wikipedia has a nice article explaining how a boost converter works). When the low side transistor turns off, this energy is released, but at a higher voltage, and the current momentarily flows through the “flyback ” diodes next to the each transistor and back into the battery. The diodes prevents current from going from the battery to the motor. Meanwhile, the current in this direction (opposite from motoring) interacts with the ring of magnets to create negative torque that slows the motor down. The low side transistor is switched with PWM and the duty of the PWM controls the amount of braking.
When motoring, the commutation of the motor switches from one phase combination to the next at just the right moment to keep the torque as high as possible. The commutation for regenerative braking is very similar in that a certain pattern of switching keeps the motor generating the highest possible amount of negative torque.
If you watch the video in Step 1 you can see that the regenerative braking works, but it doesn’t work all that well. I think the main reason is that the hard drive motor I’m using is a very low torque motor, so it doesn’t generate much BEMF except at the highest speeds. At lower speeds, there is very little, if any, regenerative braking. Also, my system operates at a relatively low voltage (12 V) and, since every path through a flyback diode drops the voltage by a couple of volts, that also reduces the efficiency a lot. I use ordinary rectifier diodes and if I used some special diodes with a lower voltage drop I might get better performance.
Step 10: Connections to the Arduino
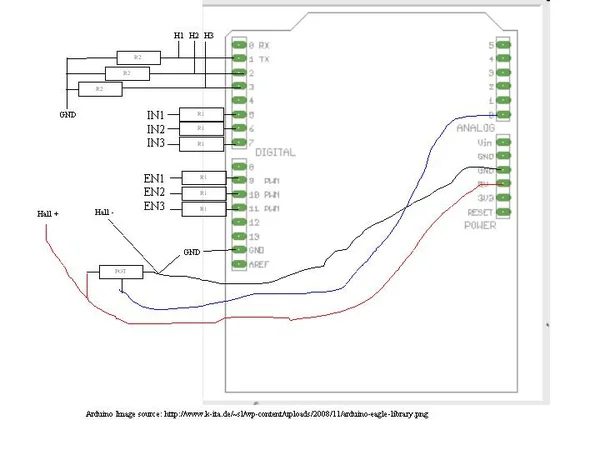
2- Hall 1 digital input – Also 120 K resistor to gnd
3 -Hall 2 digital input – Also 120 K resistor to gnd
4 -Hall 3 digital input – Also 120 K resistor to gnd
5 – IN 1 digital output in series with 400 ohm resistor
6 – IN 2 digital output in series with 400 ohm resistor
7 – IN 3 digital output in series with 400 ohm resistor
9 – EN 1 digital output in series with 400 ohm resistor
10 – EN 2 digital output in series with 400 ohm resistor
11 – EN 3 digital output in series with 400 ohm resistor
100 k ohm potentiometer connected to +5V and gnd on the ends and analog pin 0 in the middle. This potentiometer is used to control motor speed and the amount of braking.
+5V power is also used to run the Hall sensors (see step 5).
Step 11: Control Software for the Arduino
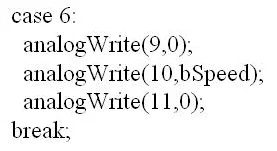
Below is the entire program that I wrote for the Ardjuino, with comments included:
/*
* BLDC_congroller 3.1.1
* by David Glaser
*
* The 3.x series of programs is for the ST L6234 3-Phase Motor Driver IC
*
* Runs a disk drive motor clockwise
* With regenerative braking
* Motor speed and braking is controlled by a single potentiometer
* Motor position is determined with three Hall-Effect sensors
* The Arduino receives outputs from 3 hall sensors (pins 2,3,4)
* and converts their combination to 6 different commutation steps
* PWM outputs on pins 9,10,11, at 32 kHz (corresponding to EN 1,2,3 respectively
* 3 DO on pins 5,6,7 (IN 1,2,3)
* Analog in 0 is connected to a potentiometer to change the PWM duty and change
* between motoring and regenerative braking.
* 0-499: braking
* 500-523: coasting
* 524-1023: motoring
* There are many lines commented out that were used for debugging by
* printing various values to the serial connection.
*/
int HallState1; //Variables for the three hall sensors (3,2,1)
int HallState2;
int HallState3;
int HallVal = 1; //binary value of all 3 hall sensors
int mSpeed = 0; //speed level of the motor
int bSpeed = 0; //braking level
int throttle = 0; //this variable is used with analog in to measure the position of the throttle potentiometer
void setup() {
pinMode(2,INPUT); // Hall 1
pinMode(3,INPUT); // Hall 2
pinMode(4,INPUT); // Hall 3
// Outputs for the L6234 Motor Driver
pinMode(5,OUTPUT); // IN 1
pinMode(6,OUTPUT); // IN 2
pinMode(7,OUTPUT); // IN 3
pinMode(9,OUTPUT); // EN 1
pinMode(10,OUTPUT); // EN 2
pinMode(11,OUTPUT); // EN 3
//Serial.begin(9600); //uncomment this line if you will use the serial connection
// also uncomment Serial.flush command at end of program.
/* Set PWM frequency on pins 9,10, and 11
// this bit of code comes from
http://usethearduino.blogspot.com/2008/11/changing-pwm-frequency-on-arduino.html
*/
// Set PWM for pins 9,10 to 32 kHz
//First clear all three prescaler bits:
int prescalerVal = 0x07; //create a variable called prescalerVal and set it equal to the binary number “00000111” number “00000111” number “00000111”
TCCR1B &= ~prescalerVal; //AND the value in TCCR0B with binary number “11111000”
//Now set the appropriate prescaler bits:
int prescalerVal2 = 1; //set prescalerVal equal to binary number “00000001”
TCCR1B |= prescalerVal2; //OR the value in TCCR0B with binary number “00000001”
// Set PWM for pins 3,11 to 32 kHz (Only pin 11 is used in this program)
//First clear all three prescaler bits:
TCCR2B &= ~prescalerVal; //AND the value in TCCR0B with binary number “11111000”
//Now set the appropriate prescaler bits:
TCCR2B |= prescalerVal2; //OR the value in TCCR0B with binary number “00000001”//First clear all three prescaler bits:
}
//MAIN LOOP OF THE PRGROM
void loop(){
//time = millis();
//prints time since program started
//Serial.println(time);
//Serial.print(“\n”);
throttle = analogRead(0); //value of the throttle potentiometer
mSpeed = map(throttle, 512, 1023, 0, 255); //motoring is mapped to the top half of potentiometer
bSpeed = map(throttle, 0, 511, 255, 0); // regenerative braking on bottom half of pot
//mSpeed = 100; //used for debugging
HallState1 = digitalRead(2); // read input value from Hall 1
HallState2 = digitalRead(3); // read input value from Hall 2
HallState3 = digitalRead(4); // read input value from Hall 3
//digitalWrite(8, HallState1); // LEDs turned on when corresponding sensor is high – originally used for debugging
//digitalWrite(9, HallState2);
//digitalWrite(10, HallState3);
HallVal = (HallState1) + (2*HallState2) + (4*HallState3); //Computes the binary value of the 3 Hall sensors
/*Serial.print(“H 1: “); // used for debugging
Serial.println(HallState1);
Serial.print(“H 2: “);
Serial.println(HallState2);
Serial.print(“H 3: “);
Serial.println(HallState3);
Serial.println(” “);
*/
//Serial.println(mSpeed);
//Serial.println(HallVal);
//Serial.print(“\n”);
// Monitor transistor outputs
//delay(1000);
/*T1 = digitalRead(2);
//T1 = ~T1;
T2 = digitalRead(4);
//T2 = ~T2;
T3 = digitalRead(5);
//T3 = ~T3;
Serial.print(T1);
Serial.print(“\t”);
Serial.print(T2);
Serial.print(“\t”);
Serial.print(T3);
Serial.print(“\n”);
Serial.print(“\n”);
Serial.print(digitalRead(3));
Serial.print(“\t”);
Serial.print(digitalRead(9));
Serial.print(“\t”);
Serial.println(digitalRead(10));
Serial.print(“\n”);
Serial.print(“\n”);
//delay(500);
*/
// Commutation for Motoring
// Each binary number has a case that corresponds to different transistors being turned on
// Bit Math is used to change the values of the output
// For tutorial on bitmath with the Arduino: http://www.arduino.cc/playground/Code/BitMath
// PORTD contains the outputs for the IN pins on the L6234 driver
// that determine whether the upper or lower transistor of each phase is used
// The outputs for the EN pins are controlled by the Arduino command analogWrite, which
// sets the duty of the PWM (0 = OFF, 255 = ON or throttle value that is controlled by the potentiometer).
if (throttle > 511){
switch (HallVal)
{
case 3:
//PORTD = B011xxx00; // Desired Output for pins 0-7 xxx refers to the Hall inputs, which should not be changed
PORTD &= B00011111;
PORTD |= B01100000; //
analogWrite(9,mSpeed); // PWM on Phase A (High side transistor)
analogWrite(10,0); // Phase B off (duty = 0)
analogWrite(11,255); // Phase C on – duty = 100% (Low side transistor)
break;
case 1:
//PORTD = B001xxx00; // Desired Output for pins 0-7
PORTD &= B00011111; //
PORTD |= B00100000; //
analogWrite(9,mSpeed); // PWM on Phase A (High side transistor)
analogWrite(10,255); //Phase B on (Low side transistor)
analogWrite(11,0); //Phase B off (duty = 0)
break;
case 5:
//PORTD = B101xxx00; // Desired Output for pins 0-7
PORTD &= B00011111; //
PORTD |= B10100000;
analogWrite(9,0);
analogWrite(10,255);
analogWrite(11,mSpeed);
break;
case 4:
//PORTD = B100xxx00; // Desired Output for pins 0-7
PORTD &= B00011111;
PORTD |= B10000000; //
analogWrite(9,255);
analogWrite(10,0);
analogWrite(11,mSpeed);
break;
case 6:
//PORTD = B110xxx00; // Desired Output for pins 0-7
PORTD &= B00011111;
PORTD = B11000000; //
analogWrite(9,255);
analogWrite(10,mSpeed);
analogWrite(11,0);
break;
case 2:
//PORTD = B010xxx00; // Desired Output for pins 0-7
PORTD &= B00011111;
PORTD |= B01000000; //
analogWrite(9,0);
analogWrite(10,mSpeed);
analogWrite(11,255);
break;
}
}
// Commutation for Regenerative Braking
// PORTD (Outputs for IN pins on L6234) pins are always low so only the
// lower transistors on each phase are used
// upper transistors are always off during regen. braking.
else{
//PORTD = B000xxx00; // Desired Output for pins 0-7
PORTD &= B00011111;
PORTD |= B00000000; //
switch (HallVal)
{
case 3:
analogWrite(9,bSpeed);
//analogWrite(9,0);
analogWrite(10,0);
analogWrite(11,0);
break;
case 1:
analogWrite(9,bSpeed);
analogWrite(10,0);
analogWrite(11,0);
break;
case 5:
analogWrite(9,0);
analogWrite(10,0);
analogWrite(11,bSpeed);
break;
case 4:
analogWrite(9,0);
analogWrite(10,0);
analogWrite(11,bSpeed);
break;
case 6:
analogWrite(9,0);
analogWrite(10,bSpeed);
analogWrite(11,0);
break;
case 2:
analogWrite(9,0);
analogWrite(10,bSpeed);
analogWrite(11,0);
break;
}
}
//time = millis();
//prints time since program started
//Serial.println(time);
//Serial.print(“\n”);
//Serial.flush(); //uncomment this if you will use serial port for debugging
}
Step 12: An Alternate Hardware-Based Approach to Commutation Logic
It has occurred to me that the operations performed by the Arduino in this project are so simple that it almost seems like a waste to use a microprocessor for this task. In fact, the L6234 application notes recommend a simple programmable logic gate array (GAL16V8 made by Lattice Semiconductor) to do this job. I don’t have any familiarity with programming this type of device, but the IC costs only $2.39 at newark.com, and other similar ICs are also very inexpensive.
Another option is to piece together discreet logic gates. I figured out some relatively simple logic sequences that should work to drive the L6234 IC from the output of the three hall sensors. The
diagram for phase A is shown below as also the truth tables for all three phases (In order to make the logic circuit for phases B and C the “not” gate must be switched to the other side of the “or” . The problem with this approach is there are nearly 20 connections per phase, so it would be quite a bit of work to put it together. Better would be to program this into a programmable logic gate.
Source: BLDC Motor Control with Arduino
