We’re spending the majority of our time on Zoom today, and yet we still keep forgetting to mute/unmute and embarrassing ourselves.
Sure, the Zoom UI is far from perfect, but as makers, we should be solving our own problems ourselves instead of blaming it on tech companies: so here it is, a DIY Bidirectional Zoom Mute Button.
This Zoom mute button not only toggles your mute/video status on Zoom, but is also bidirectional, meaning it syncs with the status on the Zoom app. It will work even if you click the mute button from the app, or the host mutes you, etc.
We see so many of these physical mute buttons on the internet now, but most are either just triggering keyboard shortcuts or crowdfunding on Kickstarter. Here’s one of the very few bidirectional, opensource physical mute buttons.
(Apologies to Windows users: this instructable only supports Mac OS at the moment!)
How it works
Technically, the Zoom Mute Button does the following 2 things:
- Send Zoom shortcut keys to the Zoom Client app to toggle mute/video status
- Scrape the mute/video status from Mac OS and reflect it on to the device LED lights
Most similar devices only do 1, which is a bummer because the device itself does not keep track of the actual status on the Zoom Client app, therefore not able to have any visual indicators for the status. This Zoom Mute Button offers a simple and (almost) no-code solution to that problem by utliizing SwiftBar and AppleScripts to constantly scrape the menu bar items on the Mac OS and keep track of the mute/video status.
Supplies
- 1 x Microcontroller that support HID (e.g. Teensy, Arduino Leonardo/Esplora/Zero/Due, etc.)
- 2x Pushbuttons (I used ones with embedded LEDs)
- 2x LED (if you use pushbuttons without embedded LEDs)
- Cardboards
- Install SwiftBar
- Installing SF Symbols
Step 1: Install SwiftBar

SwiftBar is an app that allows you to add custom menu bar programs on macOS easily through AppleScripts / shell scripts.
Install their latest release from here.
Step 2: Install SF Symbols App

SF Symbols is an official Apple app that allows you to use a bunch of Apple icons on your computer and the apps you create.
Our Zoom Mute Button uses SF Symbols icon in the menu bar, just because it looks nice and consistent. Feel free to use other icons or emojis if you prefer.
Install SF Symbols 2.1 here.
Step 3: Make SwiftBar Application

Open the SwiftBar application.
On the first launch it will ask for the folder where you will save the scripts, so choose where you l like (I chose Documents/Swiftabar).
In that folder, add the following 2 AppleScript files.
zoomMuteState.1s.scpt
#!/usr/bin/osascript

# <bitbar.title>zoomVideoState</bitbar.title>
# <bitbar.version>v1.0</bitbar.version>
# <bitbar.author>daidaidais</bitbar.author>
# <bitbar.author.github>daidaidais</bitbar.author.github>
# <bitbar.desc>Zoom Video State</bitbar.desc>
# <bitbar.dependencies>Applescript</bitbar.dependencies>

# <swiftbar.hideAbout>true</swiftbar.hideAbout>
# <swiftbar.hideRunInTerminal>true</swiftbar.hideRunInTerminal>
# <swiftbar.hideLastUpdated>true</swiftbar.hideLastUpdated>
# <swiftbar.hideDisablePlugin>true</swiftbar.hideDisablePlugin>
# <swiftbar.hideSwiftBar>false</swiftbar.hideSwiftBar>

property btnTitle : "Stop Video"

if application "zoom.us" is running then
	tell application "System Events"
		tell application process "zoom.us"
			if exists (menu bar item "Meeting" of menu bar 1) then
				if exists (menu item btnTitle of menu 1 of menu bar item "Meeting" of menu bar 1) then
					do shell script "if ls /dev/cu.usbmodem* &> /dev/null; then PORTS=$(ls /dev/cu.usbmodem*); echo videoON>$PORTS; fi"
					set returnValue to "? | color=red | symbolize=True"
				else
					do shell script "if ls /dev/cu.usbmodem* &> /dev/null; then PORTS=$(ls /dev/cu.usbmodem*); echo videoOFF>$PORTS; fi"
					set returnValue to "?"
				end if
			else
				set returnValue to ""
			end if
		end tell
	end tell
else
	set returnValue to ""
end if

return returnValue & "| size=16
---
zoomVideoState"<strong>
</strong>
zoomVideoState.1s.scpt
#!/usr/bin/osascript

# <bitbar.title>zoomVideoState</bitbar.title>
# <bitbar.version>v1.0</bitbar.version>
# <bitbar.author>daidaidais</bitbar.author>
# <bitbar.author.github>daidaidais</bitbar.author.github>
# <bitbar.desc>Zoom Video State</bitbar.desc>
# <bitbar.dependencies>Applescript</bitbar.dependencies>

# <swiftbar.hideAbout>true</swiftbar.hideAbout>
# <swiftbar.hideRunInTerminal>true</swiftbar.hideRunInTerminal>
# <swiftbar.hideLastUpdated>true</swiftbar.hideLastUpdated>
# <swiftbar.hideDisablePlugin>true</swiftbar.hideDisablePlugin>
# <swiftbar.hideSwiftBar>false</swiftbar.hideSwiftBar>

property btnTitle : "Stop Video"

if application "zoom.us" is running then
	tell application "System Events"
		tell application process "zoom.us"
			if exists (menu bar item "Meeting" of menu bar 1) then
				if exists (menu item btnTitle of menu 1 of menu bar item "Meeting" of menu bar 1) then
					do shell script "if ls /dev/cu.usbmodem* &> /dev/null; then PORTS=$(ls /dev/cu.usbmodem*); echo videoON>$PORTS; fi"
					set returnValue to "? | color=red | symbolize=True"
				else
					do shell script "if ls /dev/cu.usbmodem* &> /dev/null; then PORTS=$(ls /dev/cu.usbmodem*); echo videoOFF>$PORTS; fi"
					set returnValue to "?"
				end if
			else
				set returnValue to ""
			end if
		end tell
	end tell
else
	set returnValue to ""
end if

return returnValue & "| size=16
---
zoomVideoState"
These scripts scrape the Mac OS System Events to check if there’s anything named Meeting in the menu bar, and if yes then check if there’s any item named Stop Video or Mute Audio, which would indicate the mute/video status on Zoom. It would also then run a shell script to check if there’s anything in ls /dev/cu.usbmodem*, which is the port for Arduino based devices, and if yes then communicate the mute/video status via the serial port.
Note: the naming of files in SwiftBar is important. The .1s. means that it will refresh every 1 second
This script is a combination of my googling, Chromatic’s article and nickjvturner’s code.
If the icons are not showing up properly, open the SF Symbols app that you installed, search the icon that you want to use (e.g. mic.fill), right click it and select Copy Symbol, then paste it to wherever it says
set returnValue to "*paste here* | color=red | symbolize=True"
in the AppleScript.
Step 4: Enable Global Shortcut on Zoom
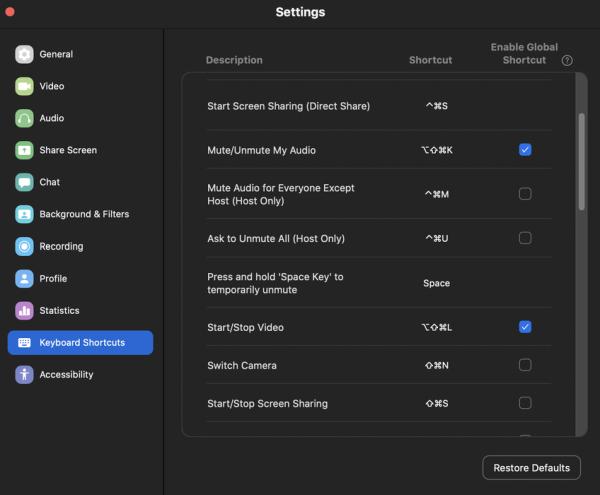
We want to have the Zoom Mute Button work even when we don’t have the Zoom window open, so we need to enable Global Shortcut on the Zoom app.
Go to settings in the Zoom app, then go to “Keyboard Shortcuts, and turn “Enable Global Shortcut” ON for “Mute/Unmute My Audio” and “Start/Stop Video”. You can keep the default shortcuts, but they tend to conflict with existing shortcuts on other apps, so I went for SHIFT+ALT+COMMAND+K for audio and SHIFT+ALT+COMMAND+L for video.
Step 5: Set Up the Circuit
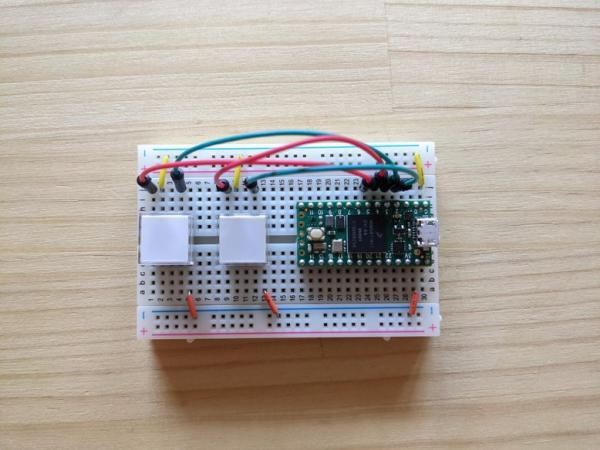
The role of this circuit is to act as an HID device to send the shortcut keys to Zoom, as well as reading from the serial port to turn the LEDs on when unmuted/video is on.
Some watch outs here:
- If you are using an Arduino, not all Arduinos support HID so you must use the 32u4 and SAMD based boards (Leonardo, Esplora, Zero, Due and MKR Family). More info on this here. I would personally recommend using Teensy.
- In the diagram it uses a push switch and an LED, but I used an LED embedded push switch as in the photo.
- If you changed the Zoom shortcut keys, make sure to update the code with the right keys.
Then write the following code to write to your microcontroller.
Note: I used Teensy
#include <Bounce.h>

String inData;
Bounce buttonAudio = Bounce(2, 10);
Bounce buttonVideo = Bounce(3, 10);
const int ledAudio = 4;
const int ledVideo = 5;

void setup() {
  Serial.begin(9600);
  pinMode(2, INPUT_PULLUP);
  pinMode(3, INPUT_PULLUP);
  pinMode(ledAudio, OUTPUT);
  pinMode(ledVideo, OUTPUT);
}

void loop() {

  buttonAudio.update();
  buttonVideo.update();

  if (buttonAudio.fallingEdge()) {
    Keyboard.press(MODIFIERKEY_SHIFT);
    Keyboard.press(MODIFIERKEY_GUI);
    Keyboard.press(MODIFIERKEY_ALT);
    delay(200);
    Keyboard.press(KEY_K);
  }

  if (buttonAudio.risingEdge()) {
    Keyboard.release(MODIFIERKEY_SHIFT);
    Keyboard.release(MODIFIERKEY_GUI);
    Keyboard.release(MODIFIERKEY_ALT);
    Keyboard.release(KEY_K);
  }

  if (buttonVideo.fallingEdge()) {
    Keyboard.press(MODIFIERKEY_SHIFT);
    Keyboard.press(MODIFIERKEY_GUI);
    Keyboard.press(MODIFIERKEY_ALT);
    delay(200);
    Keyboard.press(KEY_L);
  }

  if (buttonVideo.risingEdge()) {
    Keyboard.release(MODIFIERKEY_SHIFT);
    Keyboard.release(MODIFIERKEY_GUI);
    Keyboard.release(MODIFIERKEY_ALT);
    Keyboard.release(KEY_L);
  }

  if (Serial.available() > 0) {
    char recieved = Serial.read();
    inData += recieved;

    // Process message when new line character is recieved
    if (recieved == '\n')
    {
      //Serial.print("Arduino Received: ");
      //Serial.print(inData);

      if (inData == "audioON\n"){
        digitalWrite(ledAudio, HIGH);
      }
      else if (inData ==  "audioOFF\n"){
        digitalWrite(ledAudio, LOW);
      }
      else if (inData == "videoON\n"){
        digitalWrite(ledVideo, HIGH);
      }
      else if (inData ==  "videoOFF\n"){
        digitalWrite(ledVideo, LOW);
      }
      inData = ""; // Clear recieved buffer
    }
  }
}<br>
Source: Bidirectional Zoom Mute Button