Summary of BATTERY (LITHIUM, NIMH, NICD) CAPACITY TESTER USING ARDUINO
This article details a DIY battery capacity tester designed to verify the true energy storage of Lithium-Ion, Lithium-Polymer, NiCd, and NiMH batteries under 5V. The project mitigates risks from fake ampere-hour ratings by using an Arduino Nano to monitor voltage drops during a constant current discharge. An adjustable load is created via an LM358 op-amp and MOSFET, while user inputs are managed through push buttons. Results are displayed on an LCD screen, providing accurate capacity calculations for IoT developers.
Parts used in the Battery Capacity Tester:
- Arduino Nano
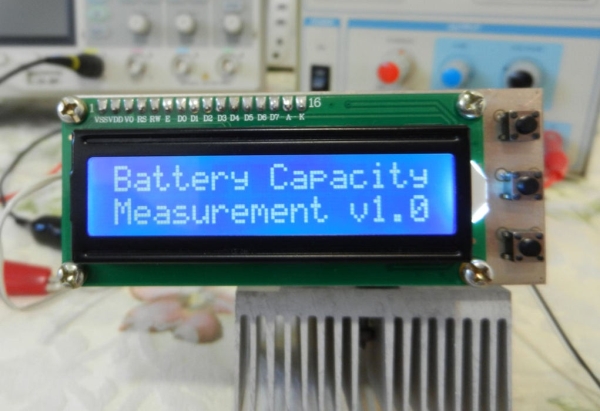
- 16×2 LCD Display
- LM358 operation amplifier
- MOSFET
- Resistor network
- Three push buttons (+, -, and reset)
The increased interest in IoT and electric automobiles around the world is driving an increase in the use of Lithium-Ion/Lithium-Polymer/NiCd/NiMH batteries as more devices and applications are using them, due to their high energy storage capacity to size ratio. This increased interest is, however, causing an increase in the number of batteries with “fake” ampere-hours ratings in the market. These fake ratings could lead to the failure of several projects, especially IoT projects in which developers factor in the Battery ratings in their On-time calculations. As such, to find a way of mitigating the failure-risks this problem poses, for today’s tutorial, we are going to build a battery capacity tester which can be used to get the correct energy storage capacity of any Lithium-Ion/Lithium-Polymer/NiCd/NiMH batteries (with voltage below <5v).
There are quite a number of battery testing projects on the internet, each with a different approach, but for today’s tutorial we will be chronicling the efforts of Instructables user: Sam Moshiri, due to the quality of his build and its standalone and compact nature. The goal of the project according to him was to build a compact, easy-to-build device, capable of measuring the capacity of almost any kind of battery (< 5V) using an adjustable constant load setup with an LCD on which the capacity of the battery is displayed.
The idea behind the constant load current setup is simple. If you draw a constant current from a battery over a particular period of time, you will be able to calculate the true ampere-hour capacity of the battery based on the amount of voltage that was dropped during that time. To achieve the constant load current, a resistor network with an LM358 operation amplifier and a MOSFET was used. The setup has two push buttons (+ and -) that allow users to set the load current before the process starts, and a third push-button to reset the board when it’s time to test another battery. The Battery’s voltage is fed into one of the analog pins on an Arduino Nano which monitors the voltage drop based on the preset current draw, calculates the battery capacity, and displays it on a 16×2 LCD Display.
At the end of this tutorial, you would know not only how to determine the battery capacity, but also how to design for constant load / constant current draw and use a 16×2 LCD display with the Arduino.
Read more: BATTERY (LITHIUM, NIMH, NICD) CAPACITY TESTER USING ARDUINO
- What is the primary goal of this project?
To build a compact device that measures the true capacity of batteries below 5V. - How does the device calculate battery capacity?
It draws a constant current over time and calculates capacity based on the voltage drop. - Which types of batteries can this tester measure?
Lithium-Ion, Lithium-Polymer, NiCd, and NiMH batteries with voltages below 5V. - Can users adjust the load current before testing?
Yes, two push buttons allow users to set the load current before starting the process. - What component monitors the voltage drop?
The Arduino Nano monitors the voltage drop fed into one of its analog pins. - How is the calculated capacity displayed?
The results are shown on a 16×2 LCD Display connected to the board. - What happens if you need to test another battery?
You press the third push button to reset the board. - Why is this tool important for IoT projects?
It helps mitigate failure risks caused by fake ampere-hour ratings in battery specifications.