I made a lot-based plant monitoring device. From this device, you can measure the condition of your plant from anywhere in the world. The device is able to measure temperature, humidity, and soil moisture.

Description
I hope you are doing well because a few days ago I recovered from the virus.
In the pandemic we all know how oxygen is important to our lives, we should have a plant pot at our house.
But in our busy life taking care of plants is a little difficult, we are not able to take care of them. Even when I go to the office in the early morning and after work, I do my youtube channel’s work.
So I made a lot-based plant monitoring device. From this device, you can measure the condition of your plant from anywhere in the world. The device is able to measure temperature, humidity, and soil moisture, so if your plants look trusty you can serve water to them.
Why this is an Avengers Plant monitoring device?
I am a huge fan of Avengers, I really like the characters in the Avengers movies. So I decided to give a name to my plants, i have two plants and I selected hulk and thor as my plant name.
But why I selected thor and hulk?
Because they are worthy !!!!
Supplies
Electronics
- Arduino Uno
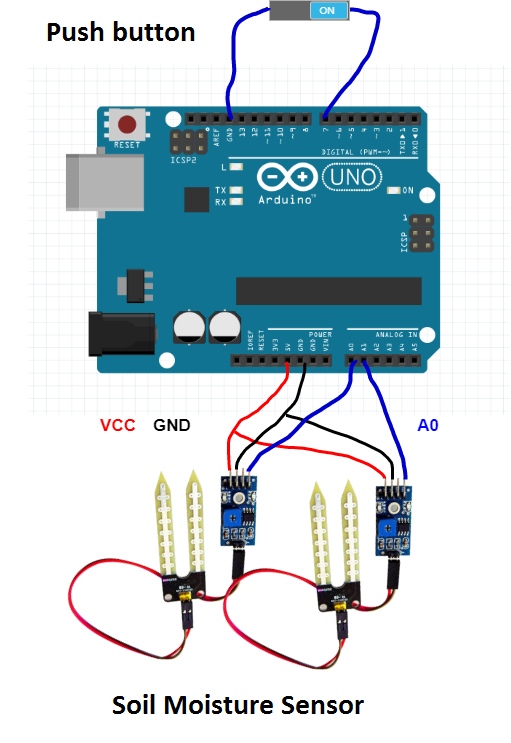
- Soil moisture sensor
- Push-button
- On/ off switch
- Tuya CBU wifi and bluetooth module
- Tuya temperature and humidity sensor
- MT3608
- TP4056
- 3.7v 1000mAh battery
Tools
- Soldering iron
- Solder wire
- Hot Glue
- Laptop
Let’s Start
Arduino is an AVR-based board. It does not come with wifi functionality to connect with the cloud. To increase the ability of Arduino and add wifi functionality in Arduino I used the tuya CBU board.
But what is tuya CBU board?
We will discuss it later fist we need to know what is Tuya?
Tuya IoT platform
Tuya Smart is a global IoT platform that enables smart home products to come to life, Tuya provides an IoT cloud so we can use it to monitor our data. Its several SDK and boards will make your project easy.
It provides different types of wifi and Bluetooth boards to connect our device with the internet, even we can connect raspberry pi, Arduino, and ST microcontroller with it.
It also provides App SDK so we can customize our app as we want, as I made the app in avengers addition. The image of hulk and thor is in the background looks so cool.
Tuya sent me three boards but I use two of them a CBU wifi and Bluetooth board and another is a sensor board.
CBU wifi and Bluetooth board:-
CBU is a low-power embedded Wi-Fi module developed by Tuya Smart. It is composed of a highly integrated radio-frequency identification (RFID) chip BK7231N and a few peripheral components and supports dual connection of AP and STA as well as BLE connection.
Temperature and humidity sensor board:-
The onboard SHT30 sensor with an I2C interface is used to collect and transmit data of temperature and humidity.
Install the Driver
First of all, The driver of CH342 should be installed on your pc, if not let’s install it.s
Download the folder from my GitHub page.
Github link:- https://github.com/vishalsoniindia/Plant_Monioring_Using_Tuya_Iot_cloud
After downloading the folder find the CH343 folder and install the software by clicking on the setup file.
After installing you will see a window like shown in the image, here select CH343 series and click on install. You will see an installation success it means your driver is installed successfully.
To verify the driver, connect your board with the PC but before connecting the board makes sure the jumper on the board is in between USB and Rx, Tx as shown in the image.
Now open Device Manager and see the Ports section, As soon as you connect the board with the PC, you will see two ports of CH342 name. One port is used for logs and the other is for communicating with the CBU chip.
Burn authorization
Tuya CBU board does not come with authorization to connect with your account on the tuya IoT cloud. It is a one-time process no need to do it again. To authorize the board first of all go to tuya.com and log in to the account, if you don’t have an account make it via clicking on sign up.
Now you will see the screen as shown in the image. Here click on create to create a product on tuya.
If you didn’t understand what is happening then just follow the steps.
After clicking on create button, nowhere select the sensor and then select temperature and humidity sensor.
Here select custom and then again click on temperature and humidity. Now fill in all details as asked. The product name is anything you want to name your device then select power type low power consumption and click on ok.
All done for now we have created a product on tuya.com, now copy the PID you can see on the top of the website as given in the image. Save PID in any secure place or in notepad, we will use it later.
Now go to pms.tuya.com and make an account and log in to the website, if you find the website in the Chinese language you can change it from the top of a website but better if you use google translator.
Now Write a mail to [email protected] and the subject of the mail should be your email which you have used to create a pms.tuya.com account. In the mail write “I want token for CBU board
PID:- f2myt7qjeetup6l1” make sure the PID should be your PID.
In 24 hour you will see a replay from the mail which contain the token number. Copy the token number and go to the pms.tuya.com >> Product management >> Work order management >> Activation code. Here paste your code as shown in the image below and click on confirm. Your code will be activated.
Now go to the pms.tuya.com >> Knowledge Basics >> Software Download
Here you need a google translator to translate the webpage into English, find “Cloud module burning authorization platform” software and install it.
Open the software and you will see a login screen, log into the software via the same psm.tuya.com account. If you find the Chinese language you can change the language via an option on the top bar of software for detail watch my video on youtube.
Now click on enter token and enter the token which you have got in the mail, check the check box of firmware download and then select burn authorization and click on ok.
Now select the com port, here you will see there is two com port because one is for logs of chip and another one is to communicate with the chip. So select the com port one after another means if select any com port if it does not work then select another one.
Hit on the run button you will see the yellow screen, as soon as you see the yellow screen press the reset button in the tuya CBU wifi Bluetooth board and wait for some second. If you get a red screen in place of the yellow screen then your com port is wrong but if you see the percentage in the right corner is increasing then all going well. When this percentage reaches 50 % press the reset button again and you will see a red screen this time is not failed it succeeds.
my board is already authorized before so it stopped at 50%
Upload the Code
After burning authorization now we will upload the code in Arduino, make sure you have downloaded the code from my Github page.
Before uploading the code go to tuya.com and here you can see standard functions, which are temperature and humidity. But we need to custom function for soil moisture measurement of hulks and thor.
To make a custom function click on Add button in the custom function and fill in the details as shown in the image.
The DP name is the name of your device I give it “Hulk’s Moisture”. And identifier should be a name without space I give it “hulk_moisture”. Select data type as value and enter minimum value 0 and maximum value 100.
Enter Pitch 1, Scale 0, and Unit as %, Enter remark as you want. Do the same thing for Thor too just change the name and identifier.
After creating custom functions, you will see a “Hardware Development” Tab above. Click on the tab and you will see several modules here. There select “Tuya Standard Module MCU/SDK” and then select “CBU Wi-Fi and Bluetooth Module”, select the module.
After selecting the module select firmware as shown in the image, select “low power general solution” and hit on ok.
Now here we want two things here, a PID and the version of firmware that we have selected.
Open the Plant monitoring code which you will find in the downloaded folder, In the code just change two things PID and the version of the firmware which we have selected on the tuya website.
Connect your Arduino with a PC and go to the tools and select the correct board and port. Now hit on upload button to upload the code.
Connect the board with the app
After uploading the code we are ready to connect our board with wifi and also with our android app.
Make sure the jumper on the CBU wifi and Bluetooth board is in between RX, TX and RX1, TX1 as shown in the image below, And connect the CBU board on the Arduino Uno.
The power you Arduino with a USB cable and download the “Tuya smart” android app.
App link:- https://play.google.com/store/apps/details?id=com.tuya.smart
Open the app and click on sign up to make an account, after sign up log in to the app.
After log in click on add device,>> auto scan, here allow your location, turn on wifi and connect it to your router or hotspot, and then allow Bluetooth, after clicking on start scan.
Now take a jumper wire and connect it between the 7th pin and GND. as soon as you connect this jumper you will see a device in-app, which has the same name as we created the product on the tuya website.
Click on the device and enter a wifi password and connect the device. When you open the device in your app you will see some random data on the app because there is no sensor connected to Arduino.
Now connect the Sensor shield on the CBU shield you will see temperature and humidity values in the app but still need to connect the soil moisture sensor. Do not forget to disconnect power while connecting the sensor with Arduino.
Hardware Connection
Take soil moisture sensor as given in the image. These soil moisture sensors are very common you will find them online. I have soldered a long wire to the sensor because it will go into the plants.
Connect the sensor as shown in the circuit below.
To make this device more portable we will connect it with a battery. To connect the battery we need a charging circuit and also the battery is 3.7 volt but Arduino needs 5v to operate so we need a DC to DC booster circuit.
Here we are using MT3508 as a DC to DC booster circuit and TP4056 is a charging circuit. But before connecting the circuit with the Arduino we need to set the booster voltage.
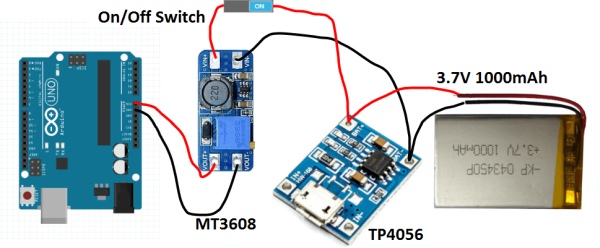
Now connect the Positive pin of the booster at the VIN pin and the negative pin of the Booster at GND. Press the on-off button to check it is working or not.
If it works fine then place a piece of cardboard behind the Arduino and then place all the components behind the Arduino as shown in the image. The piece of paper is used to isolate the Arduino from components.
Now insert soil moisture sensor into the soil of plants and you are ready to go.
App customization
You might have noticed that my app is a little bit different from yours, I did it with the Tuya app development platform.
To customize your app go to the Device panel on the top and click on create blank panel and customize your app as you want.
Source: Avengers plant monitoring device with Arduino uno (Tuya IoT platform)