Introduction
Since its inception in 2005, the Arduino Project has witnessed the sale of over 500,000 boards globally. Unofficial clone boards likely surpass this number, suggesting a presence of over a million Arduino boards or their variants worldwide. Its popularity is on the rise as more individuals recognize the remarkable potential of this open-source project, offering the ability to swiftly and effortlessly create exciting projects with a minimal learning curve.
One of Arduino’s most significant advantages over other microcontroller development platforms is its user-friendliness, allowing non-technical individuals to grasp the basics and embark on their own projects relatively quickly. Artists, in particular, find it ideal for creating interactive artworks without requiring specialized knowledge of electronics. A vast community of Arduino users shares code and circuit diagrams, offering support and guidance readily, notably through the Arduino Forum.
Despite the abundance of information available online for beginners, it is often scattered across various sources, making it challenging for novices to access the desired information. This book addresses this gap by presenting 50 projects that systematically guide readers through the realms of electronics and Arduino programming in an easily understandable manner. Embracing a hands-on approach, this book refrains from overwhelming readers with theoretical content before allowing them to engage with their Arduino. It acknowledges the excitement of experimenting with a new gadget and encourages readers to dive straight into connecting components, uploading code, and initiating their Arduino journey promptly. This practical approach is deemed optimal for learning subjects such as physical computing, central to the essence of Arduino.
How to Use This Book
The book commences with an introduction to Arduino, covering hardware setup, software installation, initial sketch upload, and ensuring the functionality of both Arduino and the software. Following this, we delve into explaining the Arduino IDE (Integrated Development Environment) and its usage, paving the way for project exploration. Projects are structured to progress from fundamental to advanced topics, each beginning with hardware setup instructions and necessary code. Subsequently, we provide separate explanations for both the code and hardware, elucidating their functionalities in detail with clear, step-by-step instructions. Abundant diagrams and photographs are included to facilitate easy comprehension and verification of project execution.
Throughout the book, readers may encounter unfamiliar terms and concepts initially. However, as they progress through the projects, these aspects will gradually become clearer.
What You Will Need
To engage with the projects outlined in this book, you’ll require a variety of components. Executing all projects may entail purchasing numerous parts, which could be costly. Hence, I recommend beginning by procuring the components listed for the initial chapters’ projects. As you progress, you can obtain parts required for subsequent projects.
Additionally, several other items will either be necessary or prove beneficial. Firstly, you’ll need an Arduino board or one of the various clone boards available on the market, such as Freeduino, Seeeduino, Boarduino, Sanguino, Roboduino, or any other “duino” variant. These options are fully compatible with the Arduino IDE, shields, and other accessories usable with an official Arduino board. Remember that Arduino is an open-source project, allowing anyone to create clones or variants. However, if you wish to support the original Arduino board’s development team, consider obtaining an official board from recognized distributors. While this book primarily utilizes an Arduino Uno, any available Arduino board will suffice.
Access to the internet is necessary for downloading the Arduino IDE, the software for writing and uploading Arduino code, as well as downloading code samples provided within this book (if you prefer not to type them manually), and any required code libraries.
Furthermore, you’ll need a well-lit table or flat surface to organize your components, situated near your desktop or laptop PC for code uploading. Given that you’ll be working with electricity (albeit low voltage DC), ensure that metal tables or surfaces are covered with a non-conductive material like a tablecloth or paper before arranging your materials. While not essential, wire cutters, long-nosed pliers, and a wire stripper may prove useful. Additionally, a notepad and pen can aid in sketching rough schematics and developing concepts and designs.
Lastly, the most crucial requirement is enthusiasm and a readiness to learn. Arduino is designed as an accessible and affordable entry into microcontroller electronics, and with determination, no task is insurmountable. This book will serve as your guide on this exciting and creative journey.
What Exactly Is an Arduino?
According to Wikipedia, Arduino is a single-board microcontroller intended to simplify the incorporation of electronics into multidisciplinary projects. Its hardware comprises a straightforward open-source board centered on an 8-bit Atmel AVR microcontroller, although a newer model has been developed around a 32-bit Atmel ARM. The software includes a conventional programming language compiler and a boot loader that operates on the microcontroller.
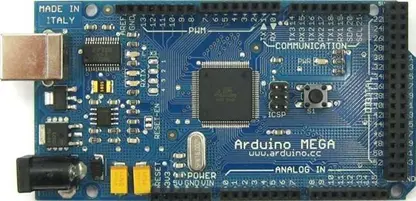
In simpler terms, an Arduino is a small computer that you can program to manage communication between itself and external components you attach to it. It falls under the category of physical or embedded computing platforms. For instance, a basic application of an Arduino could involve turning on a light for a specific duration, like 30 seconds, after pressing a button. In this scenario, the Arduino would be connected to both a lamp and a button. It would wait for the button to be pressed, and upon activation, it would illuminate the lamp and commence a countdown. After 30 seconds, it would switch off the lamp and resume waiting for the next button press. This setup could be utilized to control a cupboard light, for instance.
This concept can be expanded so that the device detects when the cupboard door is opened or some other event occurs, automatically activating the lamp and deactivating it after a predefined period. Further enhancements could involve incorporating a passive infrared (PIR) sensor to detect movement and activate the lamp upon detection. These are simple examples demonstrating the versatility of an Arduino.
An Arduino can be utilized to develop standalone interactive objects or be linked to a computer, network, or even the internet to exchange data and execute actions based on that data. For instance, it could transmit data collected from sensors to a website for display in the form of a graph.
The Arduino can be connected to various components including LEDs, dot-matrix displays, buttons, switches, motors, temperature sensors, pressure sensors, distance sensors, GPS receivers, Ethernet or WiFi modules, or virtually any device that generates data or can be controlled. A quick online search will reveal a plethora of projects showcasing the Arduino’s capability to interface with and control an extensive range of devices.
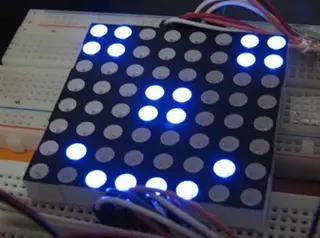
The Arduino board comprises an Atmel AVR microprocessor, a crystal or oscillator that functions as a clock by emitting time pulses at a specified frequency to maintain the correct operational speed, and a 5V voltage regulator (though certain Arduinos may utilize a switching regulator, and others, such as the Due, may not operate at 5 volts). Additionally, depending on the Arduino model, there may be a USB socket for connecting to a PC or Mac to upload or retrieve data. The board exposes the microcontroller’s I/O (input/output) pins, allowing for connection to external circuits or sensors.
To program the Arduino and customize its functionality, the Arduino IDE (Integrated Development Environment) is utilized. This software, available for free, facilitates programming in the language specific to Arduino. This language is based on C/C++ and can be expanded through C++ libraries. The IDE enables the creation of computer programs, which are sets of step-by-step instructions uploaded to the Arduino. These instructions are then executed by the Arduino, allowing it to interact with connected components. In the Arduino context, these programs are referred to as “sketches.”
The Arduino hardware and software are both open source, meaning that the code, schematics, and designs are freely available for anyone to use and modify as they see fit. Consequently, numerous clone boards and Arduino-based variants are accessible for purchase or replication from provided schematics. In fact, individuals are not hindered from assembling their own Arduino on a breadboard or homemade PCB (printed circuit board) using the appropriate components. The only stipulation set by the Arduino team is the exclusion of the term “Arduino,” which is reserved solely for the official board. As a result, clone boards are often labeled with names such as Freeduino or Roboduino.
Moreover, the Arduino’s functionality can be expanded through the use of “shields,” which are circuit boards containing additional devices, such as GPS receivers, LCD displays, or Ethernet modules, that can be easily affixed to the top of the Arduino to enhance its capabilities. Shields also extend the pins on the Arduino, providing continued access to all available input/output points. However, shields are not mandatory, as similar circuitry can be achieved using a breadboard, Stripboard, Veroboard, or homemade PCBs. Most projects in this book utilize circuits on a breadboard.
Due to the open-source nature of the designs, clone boards like the Freeduino can be fully compatible with Arduino, supporting software, hardware, and shields without any issues. While some clones may feature intentional differences to accommodate special features, compatibility remains high. However, genuine Arduino boards like the Due may present specific issues, such as its 3-volt operation, which may not be compatible with all shields.
Various Arduino variants are available, with the Uno being the most common and widely used since its release in 2010 (currently on Revision 3). Other variants include the Due, Leonardo, Duemilanove, Mega 2560, Mega ADK, Fio, Arduino Ethernet, Mini, Nano, Lilypad, and Bluetooth Arduinos. Notably, the Arduino team’s latest additions are the Leonardo and Due, marking their venture into ARM processors instead of AVR architecture processors. The Due boasts a 32-bit processor, operates at 84MHz, and offers 512KB of flash memory.
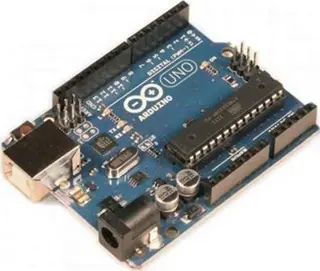
The Uno stands out as perhaps the most versatile Arduino, hence its popularity, as it utilizes a standard 28-pin chip attached to an IC socket. This setup allows for easy transition from Arduino prototyping to permanent circuitry integration. Users can develop their device using Arduino, program the chip, then transfer it to their custom circuit board, effectively creating a custom-embedded device. Additionally, users can replace the AVR chip in their Arduino for minimal cost, provided it is pre-programmed with the Arduino bootloader. The newer Arduino Uno further enhances functionality with a programmable USB chip onboard, enabling customization of USB device recognition when connected to a PC. However, this feature requires advanced expertise.
A cursory internet search for Arduino reveals a wealth of websites dedicated to the platform or showcasing innovative Arduino projects. The Arduino’s versatility empowers users to create anything from interactive artworks to robots. With a blend of programming skills, imagination, and enthusiasm, the possibilities for Arduino projects are virtually limitless.

This book will equip you with the essential skills to embark on this exhilarating and imaginative hobby. Now that you understand what an Arduino is, let’s connect one to our computer and begin utilizing it.
Setting Up Your Arduino
In this section, you’ll find instructions on setting up your Arduino and the IDE for the first time, covering both Windows and Mac operating systems. If you’re using Linux, please consult the Getting Started instructions on the Arduino website at http://playground.arduino.cc/learning/linux. For this guide, it’s assumed that you’re using an Arduino Uno, Duemilanove, Nano, Diecimila, or Mega 2560 (or their equivalent clone) and are installing on either Windows 7 or a recent version of OSX (Lion or Mountain Lion). If you’re using a different type of board, please refer to the corresponding page in the Getting Started guide on the Arduino website.
You’ll also require a USB cable (A to B plug type), which is the same type of cable used for most modern USB printers. If you have an Arduino Nano, you’ll need a USB A to Mini-B cable instead.
Next, you’ll need to download the Arduino IDE, the software you’ll utilize to write your programs (or sketches) and upload them to your board. To obtain the latest IDE, visit the Arduino download page at http://arduino.cc/en/Main/Software and download the appropriate version for your operating system.
For Mac users, once the Zip file has finished downloading, unzip it, and you’ll find the Arduino icon. Drag it to the Applications folder to install the program. To start it, simply double-click the icon. For Windows users, download the ZIP file, unzip it, and place the unzipped folder wherever you prefer, ensuring the directory structure remains intact.
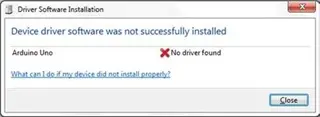
Now, connect your Arduino board before installing the drivers and software. Attach the USB cable to the Arduino and plug the other end into a USB socket on your computer. The green Power LED (marked PWR) on your board will illuminate to indicate power. If you’re using a Mac, no drivers need to be installed. For Windows users, the system will attempt to install the drivers for the Arduino, which will fail, resulting in a message stating that the “Device driver software was not successfully installed” (Figure 1-5). However, this can be disregarded.
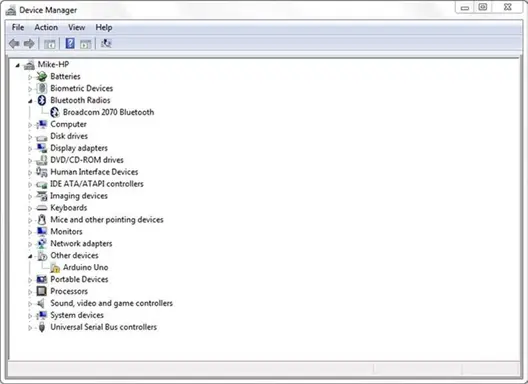
Access the Start Menu and proceed to click on Control Panel. From there, navigate to System and Security, and click on System. Open the Device Manager. Within the list of hardware under Other Devices, you should observe an entry resembling Figure 1-6, displaying “Arduino Uno” with a yellow hazard icon overlay.
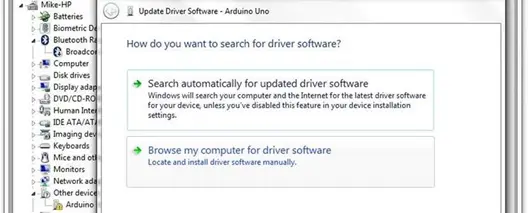
Simply right-click on the icon representing Arduino Uno in the list, then select “Update Driver Software” from the options provided (refer to Figure 1-7).

Now choose “Browse my computer for driver software”.
Next, browse to the driver folder of the Arduino installation, and then click the Next button. Windows will now finish the driver installation. If you get a message that says “Windows can’t verify the publisher of this driver software” then click the “Install this driver software anyway.” If you have a Mac, then there are no drivers to install.
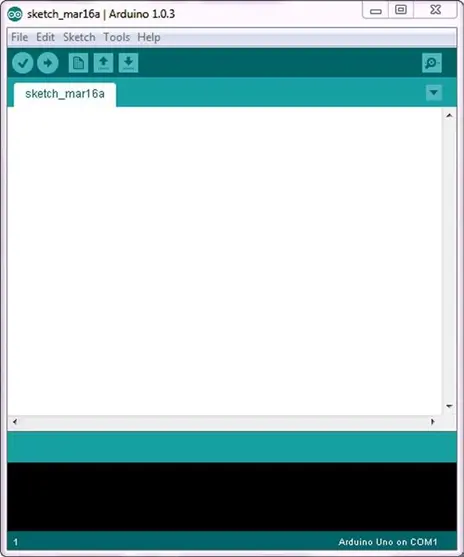
Now that the drivers are installed, you are ready to open up the Arduino IDE. For Windows, double-click the arduino.exe file inside the unzipped Arduino folder. For a Mac, click the Arduino icon in the Applications folder. The IDE will now open up and present you with a blank sketch as in Figure 1-9.
Next, open up an example sketch to test out the IDE and the Arduino. Click File, then Examples, then 01.Basics, and finally, Blink (see Figure 1-10).
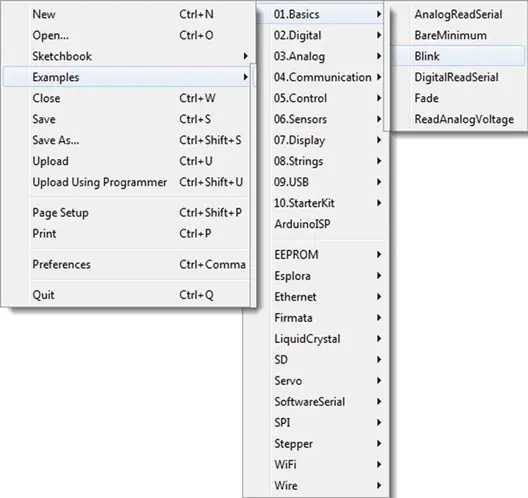
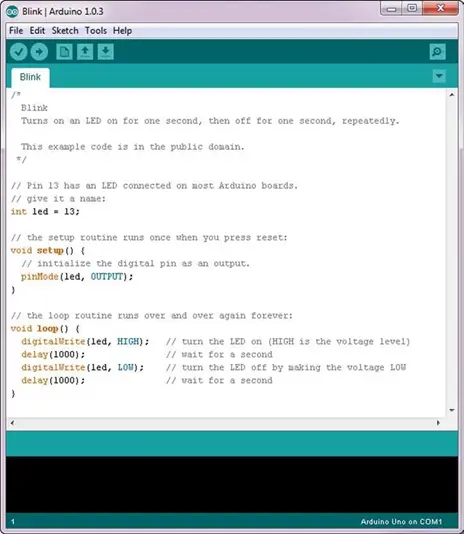
This will load the Blink example sketch into the IDE and will look something like Figure 1-11.
Next, you’ll need to choose your board from the options provided in Tools ➤ Board (refer to Figure 1-12). For an Arduino Uno, simply select it from the top of the list. If you’re using an older Arduino Duemilanove or a clone equipped with an Atmega328 chip, you should opt for Arduino Duemilanove or Nano w/ Atmega328. In the case of an even older board featuring an Atmega168 chip, pick Arduino Diecimila, Duemilanove, or Nano w/ ATmega168. Alternatively, you might have a Leonardo, Mega, or a DUE. Select the board that matches yours accordingly.
Follow this link for complete project: Arduino’s Explosive Growth: Powering Innovation Worldwide
