Summary of Arduino tutorial – organize your projects
This article addresses the messiness of large Arduino breadboard projects and introduces the phi-connect shield as a solution. It explains how the shield organizes wiring, powers breadboards, and allows quick project switching. The guide details obtaining a phi-connect kit, necessary soldering tools, and step-by-step assembly instructions for the main board and breakout board to create a clean, stackable setup.
Parts used in the Phi-Connect Project:
- Phi-connect kit (main board)
- Breadboard
- Arduino board
- Breakout board
- Male pins
- Push button
- Ribbon cable
- Soldering iron
- Solder
- Goggles
If you have succeeded in a few arduino projects, congratulations! You may be motivated to take on a larger project.
But as you take on a larger project, your breadboard becomes messier and messier, like a bowl of spaghetti (jumper wires). You will even have a hard time keep your arduino flat on your table since the jumper wires are dragging it sideways.
Plus, if you want to switch to a different project, you need to disconnect and reconnect dozens of wires every time you switch. See second picture. You have a couple dozen wires to disconnect to switch to a different project or connect back when you return your Arduino.
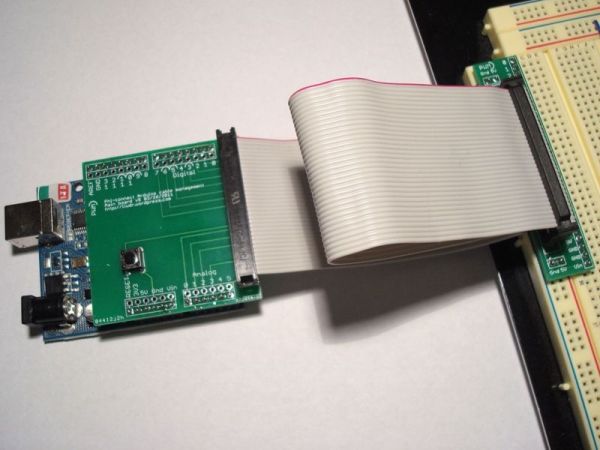
See the third picture, here is a neat way I have created to keep your arduino away from all the crazy wires. Plus, as you work on more than one project, you can easily and quickly switch between your projects. This tutorial teaches you to use an Arduino shield, the phi-connect, to organize your projects. The picture is a phi-connect shield connecting an arduino to a bread board. It passes all Arduino pins to the bread board, and powers the bread board buses with 5V and GND.
Please read more about the phi-connect on my blog:
http:// http://liudr.wordpress.com/gadget/phi-connect/
Step 1: Obtain a phi-connect kit
First, obtain a phi-connect kit from here:
http://www.inmojo.com/store/liudr-arduino-and-physics-gadgets/
The kit includes the main board (left board on picture), the breakout board (right board), male pins, a push button, a ribbon cable (not pictured) and one extra breakout board (not pictured).
Make sure you have a decent soldering iron. I use this basic iron from radioshack. It includes some solder a couple of tools, including a clip that is very useful.
http://www.radioshack.com/product/index.jsp?productId=2062758
If you don’t wear a pair of glasses, you are strongly encouraged to get a pair of goggles. Solder in a well-ventilated area is suggested. Make sure you wait at least 3 minutes for your iron to heat up before soldering. The solder should melt when touching the iron if the iron is hot enough.
With tools in hand, we’re ready to assemble the phi-connect kit.
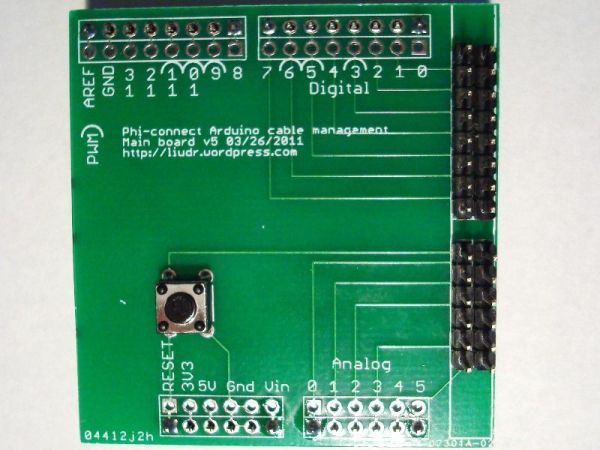
Step 2: Assemble the main board
You can first solder on the button. It’s easy. The button snaps on the board. Next, solder one row of male pins with the help of the clip. The row should face up and be the inside row, not the outside. The reason is that the inside row won’t be easily clipped tight if there is an outside row. So start with the inside rows and solder two opposite pins to secure the pins. Then remove the clip and solder the rest of the pins. Then solder the 8-row pins to the outer row. Then solder the 6-row pins on the inner side followed by the 6-row pins on the outer side.
Step 3: Finish the main board assembly
Now solder the pins that face down to the outer holes on the top and bottom sides of the board. These are to be plugged into arduino below it. Again use the clip to help you secure the pins while soldering. If you have female stacking headers, you can replace the male headers with them to stack other shields above it. It nice to have those female headers but they cost more.
For more detail: Arduino tutorial – organize your projects
- What problem does the phi-connect shield solve?
It organizes messy jumper wires, keeps the Arduino flat on the table, and allows quick switching between projects. - How do I obtain a phi-connect kit?
You can purchase the kit from the provided link at www.inmojo.com/store/liudr-arduino-and-physics-gadgets/. - What tools are required to assemble the kit?
You need a decent soldering iron, solder, a clip to secure pins, and safety goggles. - How long should I wait before soldering?
You must wait at least 3 minutes for your iron to heat up so the solder melts upon contact. - In what order should I solder the pins on the main board?
Start with the inside row of male pins, then the outer rows, followed by the 8-row pins, and finally the inner and outer 6-row pins. - What is the purpose of the pins facing down on the main board?
These pins are designed to be plugged into the Arduino located below the board. - Can I replace male headers with female stacking headers?
Yes, you can use female stacking headers to stack other shields above it, though they cost more. - Where should I work while soldering?
You should solder in a well-ventilated area.