Summary of Arduino SoftwareSerial Mastery: Harnessing Multiple Serial Ports
This article explains the Arduino SoftwareSerial library, showing how to create additional serial ports on Arduino Uno/Nano (e.g., for GSM and Bluetooth) when the single hardware serial is insufficient. It includes a Proteus simulation and example code demonstrating two software serial ports on pins 2/3 and 7/8, while reserving the hardware Serial for debugging. Advanced project uses are noted.
Parts used in the Software Serial Multiple Serial Ports Project:
- Arduino Uno or Arduino Nano
- Bluetooth module (HC-05 or HC-06)
- GSM module (e.g., SIM900A)
- Proteus simulation software (for virtual testing)
- USB connection or serial debugger (for hardware Serial debugging)
- Wiring/jumper cables
Description:
This article delves into the Software Serial library, a commonly utilized resource in Arduino programming. It explores its significance in programming for Arduino Uno or Arduino Nano and provides insights into when and why to employ this library. Through the aid of a Proteus simulation, I will elucidate its practical applications, alongside showcasing advanced-level projects where the Software Serial library plays a pivotal role.
Software Serial:
The Software Serial library functions as a tool that facilitates Serial Communication on digital pins beyond the default Serial Port. With this library, it becomes possible to establish multiple software serial ports, each capable of operating at speeds of up to 115200bps.
When and why we need the Software Serial?
Depending on your preference, if you opt for the Arduino Mega, the necessity for the Software Serial library is unlikely. This is because the Arduino Mega offers a total of four hardware serial ports, capable of communicating with various devices that support serial communication.
With the Arduino Mega, simultaneous communication with up to four serial devices is achievable.
In contrast, the Arduino Uno offers only a single serial port, accessible via Pin 0 and Pin 1.
Pin0 = RX
Pin1 = TX
While the default Serial Port of Arduino facilitates connection with only one serial communication supported device, it becomes inadequate when dealing with multiple Serial devices.
Consider a scenario where you’re working on a project requiring connectivity with two serial devices like GSM Sim900A and a Bluetooth module HC-05 or HC-06, or any other serial device. Although you can connect one of these devices to Arduino’s default serial port, the question arises: how do you manage the other serial device?
In such situations, the SoftwareSerial library becomes indispensable as it enables the creation of multiple serial ports. Whether you’re utilizing Arduino Uno or Arduino Nano, it’s essential to refrain from using the default serial port for communication with additional devices, reserving it solely for debugging purposes.
Multiple Serial Ports Proteus Simulation:
To provide a comprehensive explanation, I will illustrate this using a Proteus simulation.
Download the Proteus Simulation: Software Serial
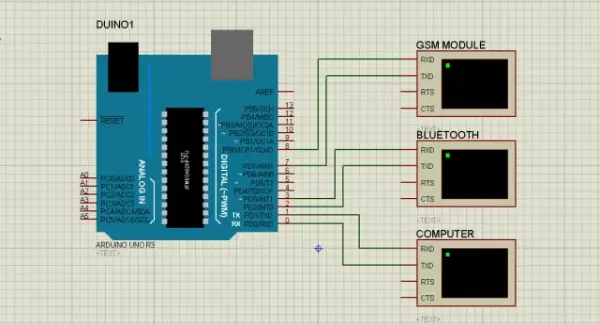
As evident, I’ve established connections between a Bluetooth module and a GSM module with Arduino’s pins 2, 3, 7, and 8. Pin 2 and pin 3 are dedicated to the Bluetooth module, while pin 7 and pin 8 are allocated for the GSM module. The default serial port of the Arduino will remain reserved for debugging purposes. Subsequently, I’ll proceed to develop a basic program aimed at transmitting text messages through these interfaces.
Multiple Serial Ports Arduino Programming using Software Serial Library:
// multiple serial ports


#include "SoftwareSerial.h"

SoftwareSerial blue(2,3) ; // rx , tx
SoftwareSerial gsm(7,8); // rx , tx

void setup()
{
Serial.begin(9600);
blue.begin(9600);
gsm.begin(9600);

}

void loop()

{

  Serial.println(" message from Computer");
  blue.println(" message from bluetooth");
  gsm.println(" message from gsm module");
  delay(1000);
}
Multiple Serial Ports Arduino Program explanation:
I started off by adding the SoftwareSerial library.
#include “SoftwareSerial.h”
SoftwareSerial blue(2,3) ; // rx , tx
SoftwareSerial gsm(7,8); // rx , tx
Defined two Serial ports for the Bluetooth Module and GSM module with names blue and gsm.
void setup()
{
Serial.begin(9600); // activated the serial communication
blue.begin(9600); // activated the serial communication for Bluetooth
gsm.begin(9600); // activated the serial communication for GSM
you can use different baud rates as per your requirement.
}
void loop()
{
The following instructions are used to send messages using the Serial.println().
Serial.println(” message from Computer”);
blue.println(” message from bluetooth”);
gsm.println(” message from gsm module”);
delay(1000);
}
Upon compiling the code, I copied the link to the hex file and inserted it into the Proteus simulation. By double-clicking on the Arduino component within the Proteus simulation, I accessed the program file text box where I pasted the link. Finally, I clicked on the play button to execute the simulation.
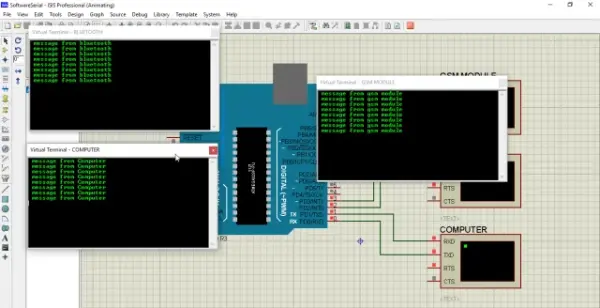
As evident, data is transmitted serially to multiple devices that support serial communication. Below are examples of advanced projects that utilize the Software Serial library.
- What is the purpose of the SoftwareSerial library?
The SoftwareSerial library enables serial communication on digital pins other than the default hardware serial pins, allowing multiple software serial ports. - When should I use SoftwareSerial instead of hardware Serial?
Use SoftwareSerial on Uno or Nano when you need to communicate with multiple serial devices and reserve the hardware Serial for debugging. - Can Arduino Mega avoid using SoftwareSerial?
Yes, Arduino Mega typically does not need SoftwareSerial because it provides four hardware serial ports for multiple serial devices. - Which pins were used for Bluetooth and GSM in the Proteus example?
Bluetooth used pins 2 and 3, and GSM used pins 7 and 8 in the Proteus simulation example. - How do you define multiple software serial ports in code?
You include SoftwareSerial.h and create SoftwareSerial objects, for example SoftwareSerial blue(2,3) and SoftwareSerial gsm(7,8). - What baud rates were used in the example code?
The example initialized Serial, blue, and gsm with a baud rate of 9600, though different baud rates can be used as needed. - How does the example send messages to each interface?
The example uses Serial.println and blue.println and gsm.println to send messages to the computer, Bluetooth, and GSM respectively, with a delay of 1000 ms. - How was the Proteus simulation programmed with the compiled code?
The compiled hex file link was copied, pasted into the Arduino component program file textbox in Proteus, and the simulation was run.