
Summary of Arduino Sketch Fade
This Arduino sketch demonstrates how to fade an LED connected to pin 9 using the `analogWrite()` function. The code initializes variables for brightness and fade amount, sets pin 9 as an output in the setup routine, and then continuously adjusts the LED's brightness in a loop. It increases or decreases brightness by a set amount every 30 milliseconds, reversing direction when reaching maximum (255) or minimum (0) levels to create a smooth fading effect.
Parts used in Fade Arduino Sketch:
- Arduino board
- LED
- PIN 9 (output pin)
- Fade.ino source code file
This is a standard Arduino example sketch, copied here for reference.
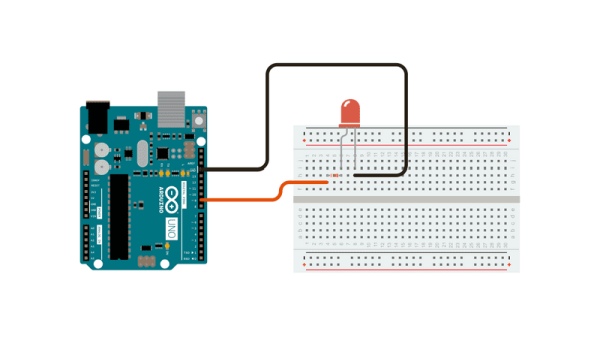
Full Source Code
The full code is all in one file Fade.ino.
/*
 Fade

 This example shows how to fade an LED on pin 9
 using the analogWrite() function.

 This example code is in the public domain.
 */

int led = 9;           // the pin that the LED is attached to
int brightness = 0;    // how bright the LED is
int fadeAmount = 5;    // how many points to fade the LED by

// the setup routine runs once when you press reset:
void setup() {
  // declare pin 9 to be an output:
  pinMode(led, OUTPUT);
}

// the loop routine runs over and over again forever:
void loop() {
  // set the brightness of pin 9:
  analogWrite(led, brightness);

  // change the brightness for next time through the loop:
  brightness = brightness + fadeAmount;

  // reverse the direction of the fading at the ends of the fade:
  if (brightness == 0 || brightness == 255) {
    fadeAmount = -fadeAmount ;
  }
  // wait for 30 milliseconds to see the dimming effect
  delay(30);
}
Source: Fade Arduino Sketch
-
How does the Fade Arduino sketch work?
The sketch uses the analogWrite() function on pin 9 to gradually change the LED brightness between 0 and 255. -
Which pin is used for the LED in this example?
Pin 9 is declared as the output pin where the LED is attached. -
What determines the speed of the fading effect?
The delay(30) command creates a 30-millisecond pause between each brightness adjustment. -
How does the code reverse the fading direction?
When brightness reaches 0 or 255, the fadeAmount variable is multiplied by -1 to reverse the direction. -
Can I modify the fade rate in this sketch?
Yes, changing the fadeAmount variable alters how many points the brightness changes per loop iteration. -
What is the purpose of the setup() function here?
The setup() function runs once to declare pin 9 as an output using pinMode(). -
Does this sketch require external libraries?
No, it uses standard Arduino functions like analogWrite() and pinMode() without extra libraries. -
What happens if I change the delay value?
Changing the delay affects how fast or slow the dimming effect appears to the human eye.
