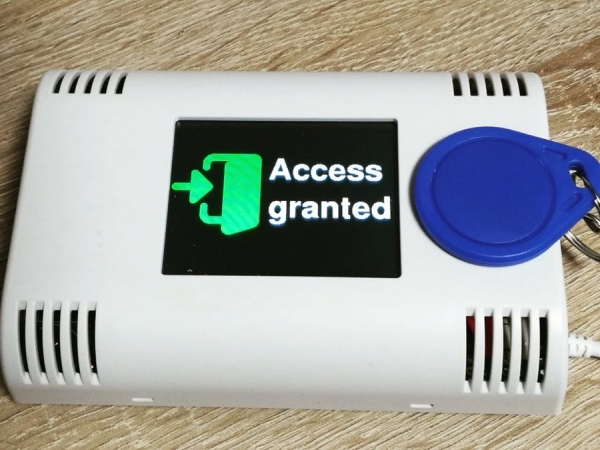
RFID based projects are one of the most popular Arduino projects out there and we have also built a couple of them here too, but I recently came across an RFID access control project by hwhardsoft that was built using the ArduiTouch MKR enclosures. The ready-made nature of the enclosures and their existence for different kinds of boards caught my attention and I felt it might be of interest to most readers here too. So for today’s project, we will build an RFID based Access Control system using the ArduiTouch MKR enclosure, an Arduino MKR WiFi 1010 and an InnovateKing-EU RFID reader.
The ArduiTouch series of enclosures come with a display already fitted on a PCB specifically designed for a specific family of maker board. The best way to describe them will be “evaluation boards with screens and enclosures for maker boards”. The ArduiTouch MKR enclosure to be used today, was designed for the Arduino MKR family of boards and it comes with; an 120 x 80 x 33 mm enclosure for top wall mounting, a 2.4-inch resistive touch TFT, an integrated voltage regulator, an integrated piezo beeper, breadboard area for easy mounting of components, and a slot for an MKR shield.
All of the above features make it easy to create a very nice looking RFID reader, with TFT output for wall/door mounting with an Arduino MKR of your choice. The Arduino MKR of choice selected for this tutorial is the Arduino MKR WiFi 1010, and the RFID module selected is the InnovateKing-EU RFID Reader.
At the end of today’s tutorial, you would know not only how to build a fancy RFID reader but also the intricacies of working with an ArduiTouch MKR Enclosure and using the InnovateKing-EU RFID Reader.
REQUIRED COMPONENTS
The following components are required to build this project:
All of these components can be bought via the attached links, and you could choose to go with other versions/types of components like a different Arduino MKR board or a different RFID Reader. Just ensure you take note of the changes that might be introduced into other parts of the project (like schematics and code) as a result of that.
SCHEMATICS
As mentioned earlier, today’s project is centered around the ArduiTouch MKR evaluation board. What this means is that we do not need to worry about arranging the components on a breadboard or designing a PCB to make things compact. All we need to do is to connect the components to the right pins on the ArduiTouch MKR PCB and off we go. The display and Arduino MKR WiFi 1010 already have their pins mapped out on the board as such we only need to plug them in, but the InnovateKing-EU RFID Reader needs to be connected to specific pins on the board. The schematics showing how it is connected is provided in the image below;
Read more: ARDUINO RFID READER USING THE ARDUITOUCH MKR ENCLOSURE