Long-time readers will know I’m not one to promote trendy marketing phrases and certainly ‘Internet of Things’ or ‘IoT’ is right up there with the best (worst) of them. But the concept behind the phrase is worth understanding as it drives the next generation of connected devices.
Single-function or ‘embedded’ gadgets built from microcontrollers like the Arduino’s Atmel ATMEGA328P can now jump on-board the internet, thanks to the proliferation of low-cost wireless connectivity.
So this month, we’re introducing you to the developer’s view of Bluetooth with a basic example of how to connect up an Arduino Uno to an Android device using this low-power wireless technology.
Wireless Light ‘n’ Sound
And to do that, we’ve come up with a project guaranteed to provide seconds of memorable entertainment that lets you turn a piezo buzzer on and off, plus – fade an LED up and down. It’s called (drumroll, please) Wireless Light ‘n’ Sound.
Okay, so it won’t turn up on a TED talk any time soon – but, you’ll learn how to add Bluetooth connectivity to your own projects. And all for less than $6.
Cheap Bluetooth hardware
Not that long ago, adding wireless to anything would cost an arm and a leg, but in recent times, Bluetooth technology prices have crashed dived and you can now pick up an HC-06 Arduino-ready Bluetooth transceiver (that’s transmitter and receiver) for under $6, including shipping.
Bluetooth is a low-power personal-area-network wireless communications standard that’s good for up to 10 metres in ‘clear air’ (meaning ‘no obstacles’). But the beauty of the HC-06 is that, to the Arduino Uno, it looks like just a standard serial device. There isn’t even a special library you have to add.
There’s just one small problem – the Arduino Uno only has one serial port, consisting of pins D0 (RX) and D1 (TX) – and it’s normally used, first, to upload your sketch to the Uno’s on-board program storage; and second, to provide rudimentary debugging via the Serial Monitor. If we pinch the Serial port for the Bluetooth module, neither of those other two functions will work.
But this isn’t an uncommon problem for the Uno and the Arduino IDE has a built-in solution called SoftwareSerial. The idea is to simulate a real serial port in software, allowing us to use any two other digital pins to do the job and it works extremely well – except here.
Unfortunately, the SoftwareSerial library is a bit slow, but we’ve found an alternative software serial library that, unsurprisingly, is called the Alternative Software Serial library or AltSoftSerial. It’s stunningly easy to use and works perfectly.
Our project
You can see the design of our project in the circuit diagram. The HC-06 module has just four-pins – transmit (TX), receive (RX), Vcc (5V) and GND (0V).
It’s designed to work off a 5VDC voltage rail, however, the logic level (the voltage level of the data) is only 3.3V, so in order to protect the Bluetooth module from blowing up, we’re providing its RX input with a simple voltage divider consisting of a 4.7Kohm and 10kohm resistor that drops the 5VDC output of the Arduino’s D9 pin to the required 3.3V (or thereabouts).
The rest of the project hardware is very simple – we’ve connected an LED to the Arduino’s D6 pin in series with a 470ohm resistor, plus a 5VDC piezo buzzer to pin D3 (you can pick up these piezo buzzers for about $2 on eBay).
DIY proto shield
We’ve built our project again using the Arduino DIY proto shield. It combines a general-purpose adapter board or ‘shield’ with a tiny breadboard to create your own circuits with easy-to-use dupont wires.
These shields are available on eBay for around $5, including shipping and they’re an ideal way of creating your own small Arduino-powered electronic circuits.
Android software
To control our project, we first need an Android tablet or smartphone with built-in Bluetooth, along with a free Google Play app called Ardudroid. The interface is fairly Spartan, but it provides everything we need to control our hardware.
Powering up the project
Grab the source code/sketch for this project from our Arduino page and load it into your Arduino Uno board. When the project is first powered up, the pairing LED on the Bluetooth module should flash rapidly.
Go to your Android device, make sure Bluetooth is switched on, launch Ardudroid and press the Menu button. Select ‘Connect me to a Bluetooth device’ and press the Scan for Devices button if you don’t see any entries.
When the Bluetooth module appears, tap on that entry and within a couple of seconds, you’ll be asked for the module passcode. It’ll either be ‘1111’ or ‘1234’. A couple of seconds after entering the correct code, that pairing LED on the module should light up solid and the app will indicate the two are now linked or ‘paired’.
On the top of the Ardudroid app window, you’ll see a series of 12 buttons – these are toggle buttons that send the corresponding Arduino digital port output alternately high and low. If you’ve wired the project correctly, pressing the ‘3’ button should sound off the buzzer. Tap it again and it should stop.
Underneath those buttons are a series of sliders – these provide a pseudo-analog output using the Arduino’s pulse-width modulation (PWM) on pins 6, 9, 10 and 11.
Now unfortunately, our use of the AltSoftSerial library means the Arduino D10 pin is no longer useable, but you can still choose from the other three PWM ports. If you drag the pin 06 slider, you should see the LED now fade up and down. Buttons 08 and 09 are also out of action – they’re working now as a software serial port.
If you can do that…
Sure, this isn’t the most exciting project, but if you can built it and get it working, you have any number of creative possibilities – for example, with the right hardware, a phone-controlled low-voltage LED light dimmer.
Or even a phone-controlled robot or drone. If you have skills in Java programming, you can even create your own Android app with a more targeted user interface for specific projects. All you need is your imagination.
Bluetooth Arduino – how it works
Our Wireless Light ‘n’ Sound project might be simple enough, but if you want to master Bluetooth communications with your Arduino projects, it’s well worth understanding what goes on under the bonnet.
Serial communications
The HC-06 Bluetooth module is really a stand-alone unit – you don’t need to provide any specific code to interface it with your Arduino. Just apply power and its up and running, it’ll even appear on and pair up to your Android device.
What you need to take care of is the data available in the HC-06’s on-board RAM, the data received from your Android device.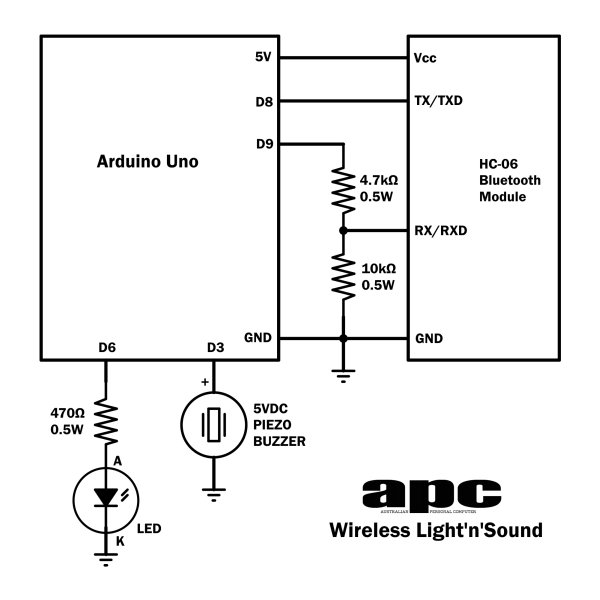 We’ll look at the data specifically in a moment, but it’s important to understand how your Arduino communicates with the HC-06 module.
If you remember back to the old PSTN modem days, asynchronous serial communications with a PC required a basic two-wire standard consisting of a number of data bits, stop bits and parity bits.
The most common of these was, and still is, known as the ‘8-N-1’ configuration – it uses 8-bits for data, one ‘stop’ bit and no parity or error correction bits. The rate of data transfer can also be set and it’s known as the ‘Baud rate’, measured in bits per second.
The HC-06 defaults to a 9600 Baud data rate and uses the ‘8-N-1’ config. Connecting the HC-06 to the Arduino Uno is a case of cross-wiring – the HC-06’s transmit (TX) pin goes to the Arduino’s designated receive (RX) pin and vice versa.
AltSoftSerial library
If you look at our project source code, we set up or ‘initialise’ an AltSoftSerial object called ‘arduinoBT’ and set its data rate to 9600 to match the HC-06 module using the ‘begin’ command inside the ‘setup’ method.
Once inside the main loop method, we first flush the ‘arduinoBT’ serial port and then wait until some data becomes available in the HC-06 module’s RAM – this indicates the module has received data from another Bluetooth device (namely, our Ardudroid app and our Android device).
For more detail: Arduino Projects: Wireless Arduino