Summary of Arduino Programming with .NET and Sketch
This article introduces Arduino as an open-source development platform for embedded systems, targeting .NET developers. It details various board models (UNO, MEGA, ZERO, MKR1000, YUN, 101) and compatible alternatives (RedBoard, RBBB, Feather). The text outlines necessary software like the Arduino IDE and Visual Studio on Windows 10, covering connectivity protocols such as WiFi, Bluetooth, and LoRa for IoT applications.
Parts used in Arduino Development:
- Arduino UNO R3
- Arduino MEGA 2560
- Arduino ZERO
- Arduino M0 PRO
- Arduino UNO WiFi
- Arduino/Genuino MKR1000
- Arduino YUN
- Arduino/Genuino 101
- SparkFun RedBoard
- Really Bare Bones Board (RBBB)
- Adafruit Feather 32u4 Adalogger
- Jumper cables
- Sensors
- Actuators
- WiFi modules
- Bluetooth modules
- GPS modules
- LoRa modules
Introduction
Arduino serves as a development platform for creating embedded applications, incorporating a variety of sensors and actuators. It relies on open-source hardware, offering a range of Arduino models for your development needs. This book is tailored for developers, particularly those proficient in .NET, who aim to craft Arduino programs for both general and specialized applications.
For the Readers
This book presupposes a potential background in programming and specifically targets individuals with prior experience in .NET development who are interested in transitioning to Arduino board-based embedded programming.
How This Book Is Organized
This book adopts a sequential method, guiding you through the process of creating Arduino programs through the utilization of sketches and .NET. It delves into various Arduino functionalities, encompassing digital and analog I/O operations, serial communication, SPI, and the I2C bus.
The book also elucidates how .NET interfaces with Arduino sketch programs to enable the remote control of sensor and actuator devices. It introduces the concept of the Internet of Things (IoT) and its practical application, culminating in the establishment of a connection between an Arduino board and a cloud server.
Required Software, Materials, and Equipment
Typically, it is advisable to have a computer running the Windows operating system, specifically Windows 10, for optimal performance. You’ll want to install both Arduino software and Visual Studio on your computer.
To execute our demonstration effectively, you will require various Arduino models. Additionally, you should have a variety of sensor and actuator devices on hand, along with several network modules like WiFi, Bluetooth, GPS, and LoRa.
Introduction to Arduino Boards and Development
Arduino stands out as one of the most renowned development boards, offering seamless integration of sensor and actuator devices. In this section, we will delve into the intricacies of working with Arduino development and getting your development machine ready. To undertake this chapter, you will need one of the available Arduino board models for practical implementation. The chapter encompasses the following key subjects:
1. Investigating various Arduino boards.
2. Establishing the development environment.
3. Initiating your inaugural project.
4. Delving into sketch programming.
5. Harnessing the power of Arduino programming with Visual Studio.
Exploring Arduino Boards
Arduino is a development platform that enables the creation of embedded applications using a variety of sensor and actuator devices. It operates on open source hardware principles, allowing individuals to design their own Arduino-compatible boards, but it’s important not to use the Arduino name due to trademark restrictions. At present, Arduino boards are manufactured by both Arduino LLC (www.arduino.cc) and Arduino SRL (www.arduino.org), and there are distinctions between certain models produced by these entities.
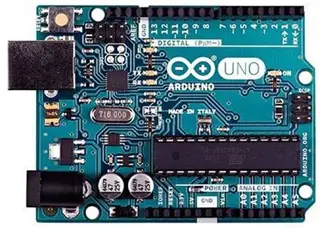
In general, an Arduino board offers a range of digital and analog input/output (I/O) pins for interfacing with external devices. Moreover, Arduino supports communication via UART, SPI, and I2C protocols. Each Arduino model possesses its own unique features and physical design. It’s crucial to select the appropriate board model for your specific needs. An example of an Arduino board is illustrated in Figure 1-1.
One of the benefits of using an Arduino board is its user-friendliness. You won’t have to engage in soldering electronic components, as the Arduino board is preassembled and readily usable. Simply connect sensor and actuator devices to the board using jumper cables. In this segment, we will delve into the different Arduino boards offered by both Arduino LLC and Arduino SRL, each with its own distinctive features. To make the most of your Arduino board, it’s essential to identify and comprehend the specific Arduino model you are working with. I will present a range of Arduino models categorized by complexity and intended applications. Let’s embark on our exploration of Arduino boards.
Arduino Boards for Beginners
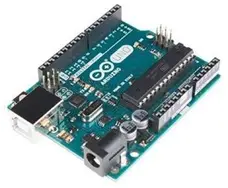
I suggest the Arduino UNO board for individuals interested in learning Arduino programming. It serves as a versatile development board with support for various Arduino shields. Additionally, it’s commonly featured in tutorials and books as the go-to experimental platform. The Arduino UNO offers a comprehensive range of I/O protocols, including digital and analog I/O, SPI, UART, and I2C/TWI, making it well-suited for interfacing with sensors and actuators. Moreover, it’s readily available and accessible for purchase.
Arduino Boards for Advanced Users
In certain situations, there is a need to enhance the input/output capabilities of your circuit board or to troubleshoot your programs. The Arduino MEGA 2560 board offers a larger number of I/O pins, approximately 54 in total, and features an advanced microcontroller unit (MCU) designed to boost program performance. This board is powered by the Atmega 2560 MCU with an internal flash memory capacity of 256 KB. Additionally, the Arduino MEGA 2560 board is equipped with two UARTs. More information about this board can be found at the following links:
– Official Arduino website: https://www.arduino.cc/en/Main/ArduinoBoardMega2560
– For the Arduino MEGA 2560 from Arduino SRL, you can find details at: http://www.arduino.org/products/boards/arduino-mega-2560.
For a visual representation of the Arduino MEGA 2560 board, please refer to Figure 1-3.

Many Arduino boards lack a built-in debug chip, so if you wish to debug your program, you will need to incorporate an extra debugging tool. Fortunately, you can utilize the Arduino ZERO board from Arduino LLC (available at https://www.arduino.cc/en/Main/ArduinoBoardZero) and the Arduino M0 PRO board from Arduino SRL (accessible at http://www.arduino.org/products/boards/arduino-m0-pro) for debugging without the need for additional tools. These boards are equipped with Atmel’s Embedded Debugger (EDBG), which can be used for debugging purposes. I recommend utilizing these Arduino models if you have concerns about debugging without additional tools. An illustration of a form of the Arduino Zero board is displayed in Figure 1-4.
Arduino for Internet of Things
Today, the term “the Internet” is commonly employed to describe the means of remotely accessing data. It enables data retrieval from virtually any device and any location. When considering Arduino, the ability for our boards to connect to the Internet proves highly advantageous. Picture this: your boards are capable of detecting physical objects and transmitting this information to your smartphone. This becomes a reality when our boards are connected to the Internet.
There exists a variety of options for integrating network modules into Arduino shields, which facilitate the connection of Arduino boards to the Internet. In essence, this means you may need to acquire supplementary modules to establish Internet connectivity for your boards. Thankfully, several Arduino board models come equipped with built-in network modules. In the subsequent discussion, we will explore some Arduino board models with this Internet connectivity capability.
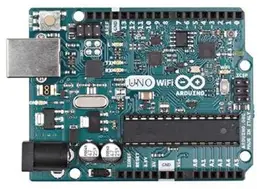
One such model is the Arduino UNO WiFi, which is essentially an Arduino UNO board featuring an additional chip, the ESP8266. This chip serves the dual purpose of connecting to pre-existing WiFi networks and functioning as an access point (AP) node. The Arduino UNO WiFi is manufactured by Arduino SRL, and its physical form is depicted in Figure 1-5. To access more detailed information about the Arduino UNO WiFi, you can visit the following website: http://www.arduino.org/products/boards/arduino-uno-wifi.
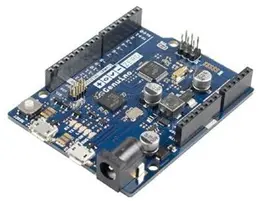
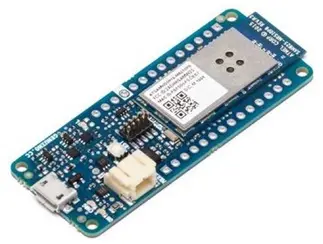
The Arduino/Genuino MKR1000 is a compact development board created by Arduino LLC, specifically tailored for IoT applications. Powered by the ATSAMW25 System-on-Chip (SoC), this board combines the SAMD21 Cortex-M0+ processor, the WINC1500 WiFi module, and the ECC508 CryptoAuthentication, making it well-suited for IoT connectivity, including seamless access to cloud servers. For more in-depth information on the Arduino/Genuino MKR1000, you can refer to the official documentation at https://www.arduino.cc/en/Main/ArduinoMKR1000. As depicted in Figure 1-6, this board boasts a small form factor.
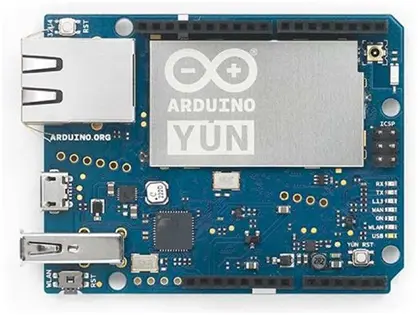
Many Arduino boards are compatible with a real-time operating system (RTOS) environment. The Arduino YUN, in particular, is a unique board that combines a microcontroller unit (MCU) and a WiFi MCU, which operates on the OpenWrt Linux system, known as Linino OS. This board essentially functions as a compact computer with a Linux operating system, allowing you to oversee the Arduino MCU ATmega32u4 from the Linux environment.
Furthermore, it is possible to interact with the Linux API directly from your Arduino program. The Arduino YUN board is equipped with built-in WiFi and Ethernet modules, making it well-suited for various Internet of Things (IoT) applications. In Figure 1-7, you can see an illustration of the Arduino YUN board. To explore and purchase this board, please visit the following website: http://www.arduino.org/products/boards/arduino-yun.
If you need an Arduino board that comes with Bluetooth Low Energy (BLE) connectivity, you might want to explore the Arduino/Genuino 101 board, as depicted in Figure 1-8. This particular board is equipped with an Intel Curie microcontroller that includes an integrated BLE module. It allows you to wirelessly control and communicate with the board using Bluetooth from your smartphone, whether it’s an Android or iPhone device.

Arduino-Compatible
In general, the original Arduino board is relatively costly. If you are concerned about the price while embarking on your Arduino learning journey, you have the option of purchasing an Arduino-compatible board. It’s worth noting that Arduino makes its designs and schematics available through an open-source project, enabling us to create our own Arduino-compatible board without explicitly using the “Arduino” name. Typically, these Arduino-compatible boards are produced by third-party companies. This section will explore various Arduino-compatible boards available in the market.
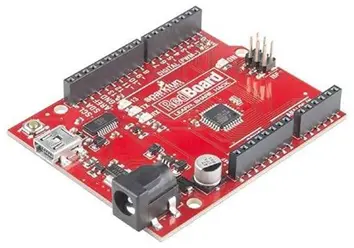
One such example is the SparkFun RedBoard, which is an Arduino-compatible board manufactured by SparkFun. This board shares a similar form factor with the Arduino UNO board and is powered by an ATmega328 microcontroller with the Optiboot (UNO) Bootloader pre-installed. To facilitate development, you can utilize the Arduino IDE to write Sketch programs and then upload them to the RedBoard. If you are interested in acquiring the SparkFun RedBoard, it is available for purchase at https://www.sparkfun.com/products/12757. You can view the SparkFun RedBoard in Figure 1-9.
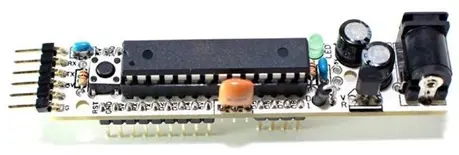
The Really Bare Bones Board (RBBB) is an Arduino-compatible board created by Modern Device. Unlike some other boards, the RBBB doesn’t come with an integrated serial module. To program it using a Sketch, you’ll require a separate serial tool, like an FTDI cable. You can see an image of the RBBB board in Figure 1-10. For more details and the option to purchase this board, visit https://moderndevice.com/product/rbbb-kit/.
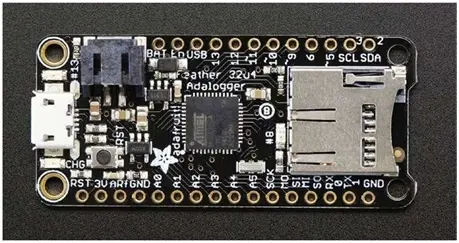
Feather is a line of Arduino development products offered by Adafruit. One of the Feather board variants is the Adafruit Feather 32u4 Adalogger, which includes a MicroSD module for data storage. You can create Arduino programs with the Adafruit Feather 32u4 Adalogger. To explore more details and purchase this board, visit https://www.adafruit.com/products/2795.
In the upcoming segment, we’ll establish our computer’s development environment, employing the official Arduino development application.
Setting up Your Development Environment
Arduino development offers the advantage of easy setup for a development environment, as it is compatible with various platforms like Windows, Linux, and Mac. This book primarily focuses on the Windows platform and also delves into the utilization of .NET technology to interact with Arduino boards.
Your initial step should involve installing the Arduino software. Depending on the type of Arduino module you possess, if you have Arduino boards from Arduino LLC, you can obtain the Arduino software from https://www.arduino.cc/en/Main/Software. For Arduino boards from SRL, the software can be downloaded from this site: http://www.arduino.org/downloads.
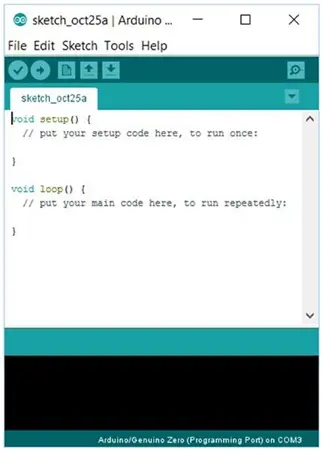
Once you’ve downloaded and installed the Arduino software, you can launch the program, and Figure 1-12 displays the Arduino interface from Arduino LLC.
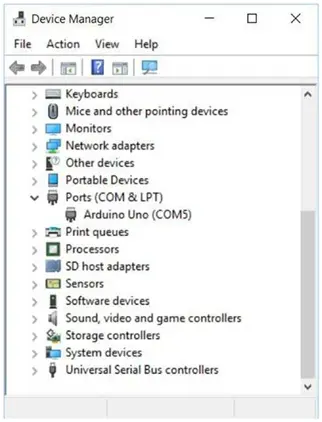
You can now connect your Arduino board to your computer. If you’re using Arduino boards with ATTiny and ATMega MCUs like the Arduino UNO, there’s no need to manually install a driver because the Arduino software has already taken care of it for you. For example, when I connected my Arduino UNO to a Windows 10 computer, I found that the system recognized it as COM5, as illustrated in Figure 1-13.
To create a .NET application that interacts with Arduino boards, Visual Studio is a necessary tool. If you don’t possess a Visual Studio license, you have the option to acquire and install the Visual Studio Express edition from the following web address: https://www.visualstudio.com/vs/visual-studio-express/. For my testing purposes, I employ Visual Studio 2015 with update 2, as depicted in Figure 1-14.
- What operating system is recommended for optimal performance?
Windows 10 is specifically recommended for optimal performance. - Which software tools are required to interact with Arduino using .NET?
You need to install both the Arduino software and Visual Studio. - Can I use third-party boards without using the Arduino name?
Yes, you can create or buy Arduino-compatible boards provided by third-party companies. - Which board is best for beginners learning Arduino programming?
The Arduino UNO board is suggested for individuals interested in learning Arduino programming. - How can I debug my program without additional tools?
You can utilize the Arduino ZERO or Arduino M0 PRO boards which have built-in Embedded Debugger chips. - Does the Arduino YUN support Linux environments?
Yes, the Arduino YUN operates on the OpenWrt Linux system known as Linino OS. - Which board includes built-in Bluetooth Low Energy connectivity?
The Arduino/Genuino 101 board is equipped with an Intel Curie microcontroller that includes an integrated BLE module. - Do I need to manually install drivers for Arduino UNO boards on Windows?
No, the Arduino software handles driver installation automatically for boards with ATTiny and ATMega MCUs.