Summary of Arduino for Photographers: Building a Universal Intervalometer
This article guides photographers on constructing a DIY intervalometer using an Arduino platform to automate time-lapse photography without purchasing commercial devices. It details the necessary hardware components, software setup including the Multi Camera IR Control library, and provides a specific code sketch for Nikon DSLRs. The project allows users to customize intervals and status indicators for various camera brands like Canon, Sony, and Pentax.
Parts used in the Arduino Intervalometer:
- Infrared LED (940nm)
- Green or red LED
- 100 Ohm resistor
- Breadboard
- Jumper M/M wires
- Arduino board
Practicing the art of time-lapse photography without an intervalometer is doable, but not particularly efficient. And while any decent photo equipment store will be happy to sell you one, you can go the DIY way and build your own intervalometer based on the excellent Arduino platform.
Theoretically, building an Arduino-based intervalometer is as easy as connecting an infrared (IR) LED to the GND and 13 pins and then feeding the Arduino a simple sketch with controls the IR LED. But by adding a few more components and tweaking the sketch, you can build something a little more advanced.
 First of all, here is a list of parts you need for this project (besides Arduino, of course):
- Infrared LED (940nm)
- Green or red LED
- 100 Ohm resistor
- Breadboard
- Handful of jumper M/M wires
You need the last two items only if you want to build a prototype first. Before you start, you should connect Arduino to your machine and install the Arduino IDE. The Arduino Getting Started guide can help you with this. Once Arduino is up and running, grab the latest version of the Multi Camera IR Control library, unzip the downloaded archive, and move the resulting folder into the ~/sketchbook/libraries directory (if the directory doesn’t exist, create it manually). The great thing about the Multi Camera IR Control library is that it supports a wide range of camera models of many popular brands, including Nikon, Canon, Pentax, Olympus, and Sony. So you can use your DIY intervalometer with virtually any DSLR with an IR receiver.
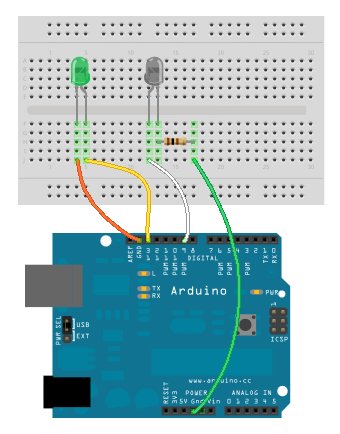
If you are using a breadboard for prototyping, here is the wiring diagram for your convenience:
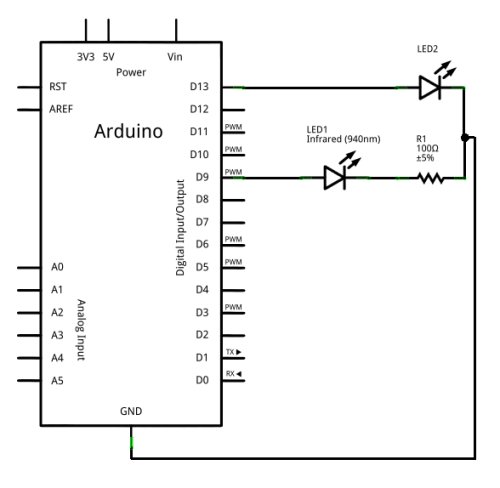
(Both the schematics and the breadboard wiring are created using the excellent Fritzing software). As you can see, this is all pretty straightforward stuff. LED2 acts as a status indicator: it blinks just before the IR LED is activated, which signals to you that the camera is about to fire.
All you need to do now is to write a sketch that controls the LEDs. Here is what the sketch for controlling Nikon DSLRs looks like (tested with Nikon D5000 and Nikon D90):
#include <multiCameraIrControl.h>

int onValue = 10; // specify how long the status LED is turned on
int delayValue = 5000; // specify interval between shots in milliseconds
Nikon D90(9); // specifies the camera model

void setup(){
  pinMode(13, OUTPUT); // initialize pin 13 as an output.
}

void loop(){
  digitalWrite(13, HIGH); // set the LED on
  delay(onValue); // wait
  D90.shutterNow(); // trigger the shutter
  digitalWrite(13, LOW); // set the LED off
  delay(delayValue-onValue); // wait
}
 Of course, you can easily modify it for use with your particular camera model, and the sample code bundled with the Multi Camera IR Control contains a few examples that can help you to get started.
So how does this sketch works? The onValue variable specifies how long the LED2 stays on. Usually, you’d want it to blink briefly, so 10 milliseconds work just fine. The delayValue variable defines the interval between shots in milliseconds, while the Nikon D90(9); statement defines the camera model and the pin to which the IR LED is connected. In this case, the camera is Nikon D90 and the IR LED is connected to pin 9. The rest is easy. The digitalWrite command turns LED2 on and off, and the D90.shutterNow(); command activates the IR LED which, in turn, triggers the camera shutter.
For more detail: Arduino for Photographers: Building a Universal Intervalometer
- Can I build my own intervalometer instead of buying one?
Yes, you can build your own intervalometer based on the Arduino platform. - Does the Multi Camera IR Control library support multiple camera brands?
Yes, it supports popular brands including Nikon, Canon, Pentax, Olympus, and Sony. - How do I install the required library for this project?
You must unzip the archive and move the folder into the ~/sketchbook/libraries directory. - What is the function of the second LED in the wiring diagram?
It acts as a status indicator that blinks just before the IR LED activates to signal the camera is about to fire. - How do I modify the code for a different camera model?
You can easily modify the sample code bundled with the Multi Camera IR Control library to suit your specific camera. - What does the delayValue variable control in the sketch?
The delayValue variable defines the interval between shots in milliseconds. - Which pin is typically used for the IR LED connection in the example?
In the provided example, the IR LED is connected to pin 9. - Do I need a breadboard if I am not prototyping?
No, the breadboard and jumper wires are only needed if you want to build a prototype first.