Summary of Arduino Pathways: How to Make Informed Decisions
This article details a student's journey from struggling with an IR remote project to successfully building a proximity sensor using an Arduino. The author initially faced challenges with C++ syntax and library errors, leading to a pivot toward an ultrasound distance sensor tutorial. By integrating LEDs and a buzzer, the final project alerts users when objects are within 10 cm.
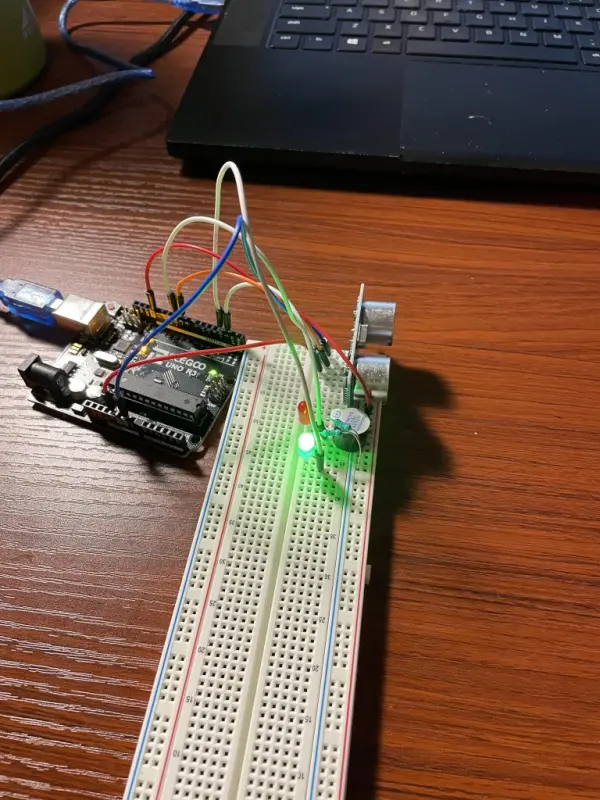
Parts used in the Proximity Sensor Project:
- Arduino board
- Ultrasound (distance) sensor
- Green LED
- Red LED
- Two 330-ohm resistors
- Buzzer
- Breadboard
- IRRemote library (attempted but replaced)
My initial encounter with Arduino through this assignment marked my first independent experience. Reflecting on the challenges I faced during the in-class tutorial, I harbored reluctance towards reengaging with the breadboard. Consequently, I made an early decision to opt for a more uncomplicated circuit. While exploring the Arduino kit’s components, the IR remote and sensor piqued my interest. Subsequently, after conducting online research, I stumbled upon a circuit and corresponding code that appeared relatively simple and easy to understand.

At first, my plan involved activating particular colored LEDs upon pressing specific numbers on the remote. To proceed, I entered the given code into the Arduino software for verification before constructing the circuit. However, as a preliminary step, I needed to install an IRRemote library and designate it for use. Among several similarly named packages, I opted for the first one that appeared. After downloading the IR library, I attempted to verify the code, only to encounter an immediate error message.
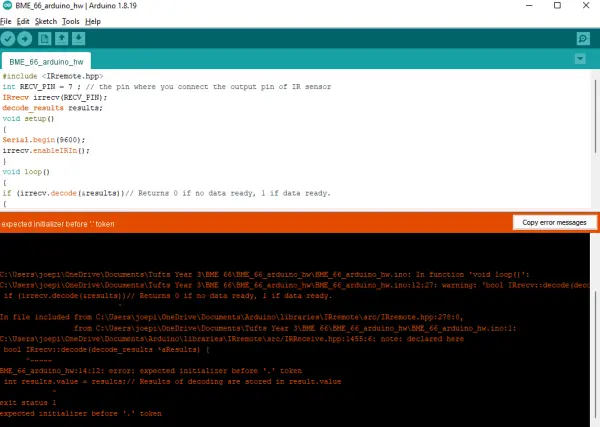
At this juncture, I confronted a consistent challenge throughout this task: comprehending the coding language required. The Arduino code is scripted in C++, a programming language with which I haven’t had the opportunity to acquaint myself. My proficiency in computing is primarily centered around MATLAB, hence the syntax used in Arduino coding was unfamiliar to me. Consequently, the error message proved to be less than informative. Seeking assistance, I approached one of my housemates, a Mechanical Engineer experienced in Arduino projects. Regrettably, he too was unfamiliar with the IR remote/sensor library, rendering him unable to diagnose the issue. Opting not to invest more time in deciphering and rectifying the IR remote code, I made the decision to employ a less intricate sensor system instead.
SHIFTING GEARS – DISTANCE SENSOR
In my quest for a fresh project idea, I turned to YouTube. Spending approximately an hour immersed in various videos such as “Arduino for Beginners” and “Easy Arduino Projects,” I discovered that learning through tutorial videos was far more accessible than deciphering instructions on the Arduino Project Hub posts. A recurring theme among beginner project videos was the utilization of an ultrasound sensor for distance measurement. This led me to concentrate my research on videos demonstrating circuits for measuring distance using ultrasound sensors. While several tutorials employed digital displays to showcase sensor data, I stumbled upon one video that transmitted this information to the serial monitor within the Arduino software.
As outlined in the video, the sensor emits an ultrasound wave at a specific frequency, and by analyzing the duration of the wave’s round trip, the distance can be calculated. This process includes configuring the pulse duration while considering the speed of sound, set at 340 m/s. Following the wiring diagram demonstrated in the video, I established the fundamental circuit for measuring distance.
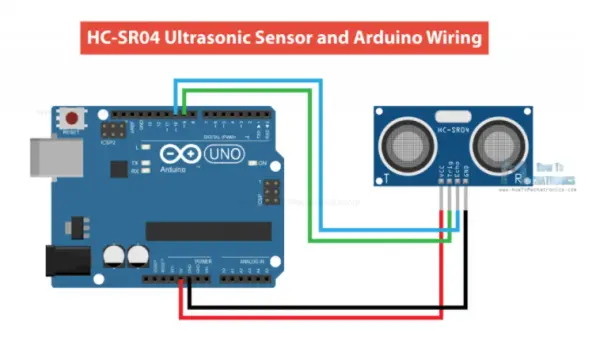
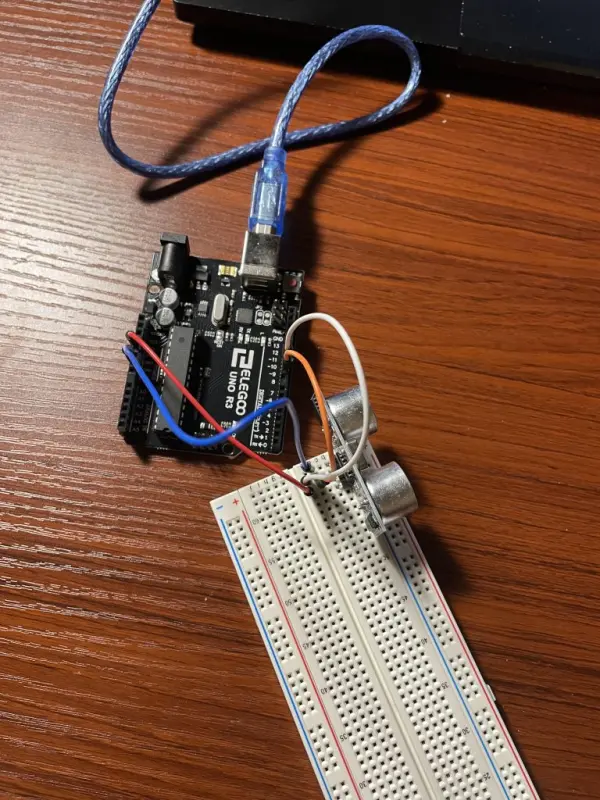
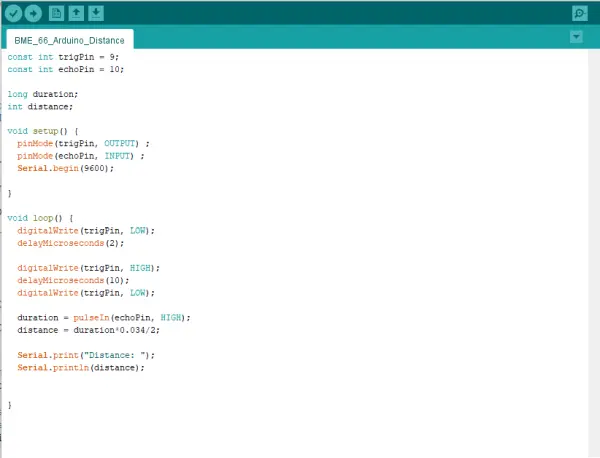
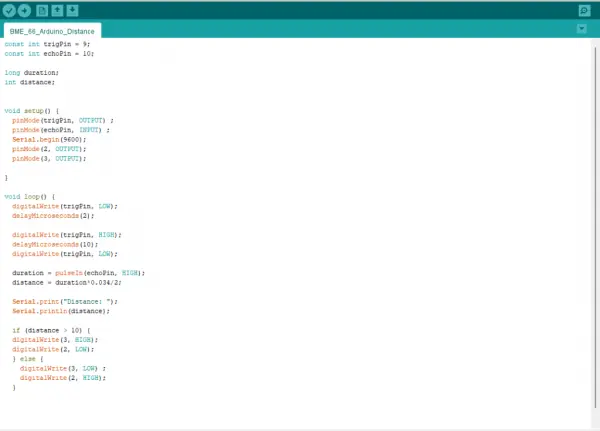
Having established the circuit, my focus shifted to programming the distance sensor. I made sure to connect the echo pin of the ultrasound sensor to Arduino’s pin 10 and the trig pin to pin 9 on the board. During a previous tutorial session, I had encountered an issue by not accurately specifying these pins in the Arduino code. Hence, I was determined not to repeat the mistake. While the instructional video provided the code, I opted to comprehend it rather than simply copying and pasting as I did with the IR remote.
The code initiates by defining the Arduino pins 9 and 10 as the Trig and Echo pins, respectively. In the setup segment, the Trig pin is configured as an output, and the Echo pin as an input. Additionally, the code incorporates a serial function to display sensor readings on the serial monitor. Within the loop section, the code handles the states (low or high) and measures the duration of the ultrasound waves, followed by distance calculation. The code’s output is then transmitted to the serial monitor using the serial print function.
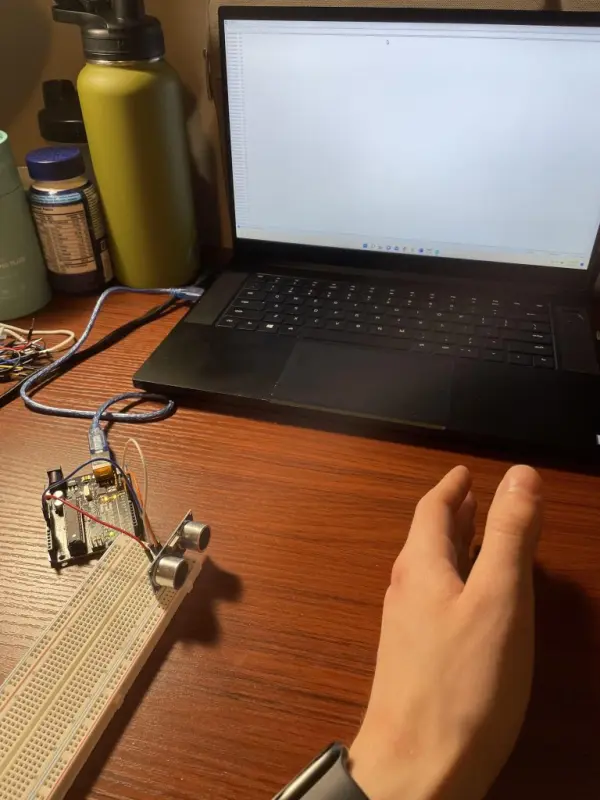
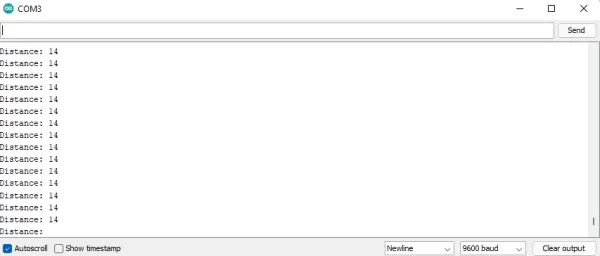
Upon successful verification, I proceeded to upload the code to my Arduino setup. To confirm its functionality, I accessed the serial monitor and positioned my hand in front of the sensor. Fortunately, the sensor accurately measured and displayed the distance from my hand, operating precisely as intended. The recorded distance from the sensor was presented in centimeters.
THE NEXT STEP – PROXIMITY SENSOR
To add a personal touch to the distance sensor circuit, I opted to integrate an LED configuration similar to what we covered in our classroom tutorial. My concept involved activating a green light when an object exceeds a specific distance from the sensor and a red light when the object gets closer than that threshold. Thus, I placed a red and green LED, each accompanied by a 330-ohm resistor, onto the breadboard. I connected the positive leg of each LED to digital pins 2 and 3 on the Arduino board.
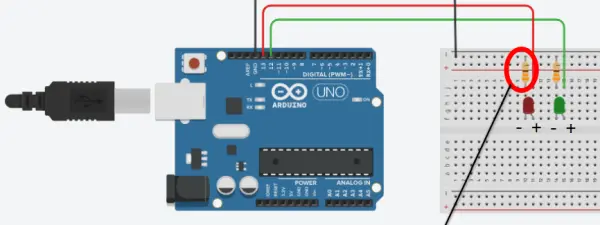
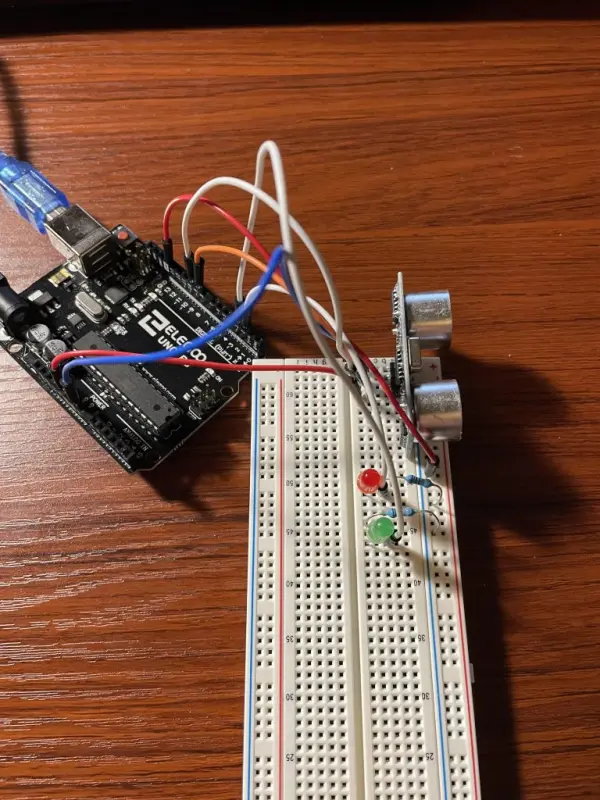
I proceeded to develop the code responsible for illuminating the LEDs based on the readings from the distance sensor. The class example demonstrated this functionality with temperature readings, prompting me to adapt that code for a different sensor. Initially, I configured the pin modes of the LEDs as outputs in the setup section. Subsequently, I formulated an if-else loop: when the distance reading exceeded 10 cm, the green light’s output would be set to high and the red light’s output to low. Conversely, if an object was within 10 cm, the loop’s else statement would trigger the opposite LED settings. To enhance the impact, I interconnected a buzzer in series with the red light, enabling it to emit a sound when an object approached within 10 cm of the sensor. This coding setup completed my proximity sensor project.
- Why did the author switch from the IR remote project?
The author switched because they struggled with C++ syntax, encountered unhelpful error messages, and could not find assistance for the specific IR library. - What sensor was chosen as the alternative to the IR remote?
An ultrasound sensor was chosen after researching beginner-friendly YouTube tutorials on distance measurement. - How were the Trig and Echo pins connected in the code?
The Trig pin was configured as an output connected to digital pin 9, and the Echo pin was configured as an input connected to digital pin 10. - At what distance does the green light turn on?
The green light turns on when the object is more than 10 cm away from the sensor. - What happens when an object comes within 10 cm of the sensor?
The red light turns on, and a buzzer emits a sound to indicate the object is too close. - How is the speed of sound utilized in the calculation?
The system calculates distance by analyzing the round-trip duration of the ultrasound wave and considering the speed of sound at 340 m/s. - Where can the user view the sensor readings?
The sensor readings are displayed on the serial monitor within the Arduino software. - Why did the author choose to watch videos instead of reading text instructions?
The author found learning through tutorial videos like "Arduino for Beginners" far more accessible than deciphering written posts.