Summary of Arduino OLED Spectrum Analyzer
This article details building an Arduino-based OLED Spectrum Analyzer for simple audio devices like MP3 players and iPods. It uses an SSD1306 display to visualize audio frequencies via a 0–3.3V analog input. The project emphasizes safety, warning against using high-power signals like radar or microwave inputs which could damage the Arduino.
Parts used in the Arduino OLED Spectrum Analyzer:
- Arduino Nano
- Arduino Uno
- 128x64 I2C OLED Display
- Jumper Wires
- Breadboard
- 10k Variable Resistor
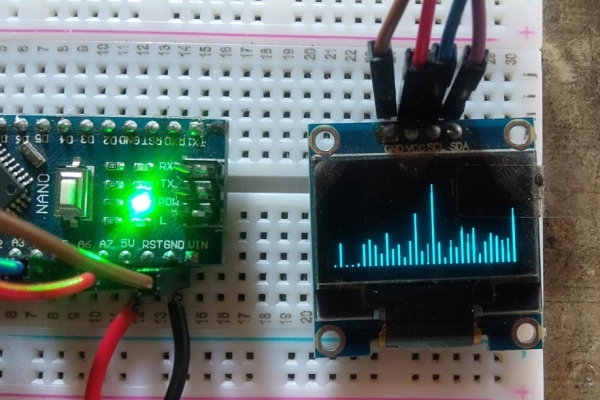
Image:
Today I am make an Arduino OLED Spectrum Analyzer its work with 0 to 3.3v Analog input. This is very smooth and clear Visualization of audio frequencies. This is very important to make an audio spectrum analyser for DVD Music player, IPod, MP3 player and other Music player not only its look good it also represents any kind of music. You can make a box to fit it and attached in car or anywhere you want but I make just simple in breadboard. Note: This project is only for simple audio device, a Real Spectrum Analyser devices are use in Microwave signal, Radar Signal, Dish Antenna Signal, Cable frequencies Signal, etc. Do not try to use for these proposes your Arduino will burn or crash and it cause permanently Damage. In this blog you are learning about a Arduino Spectrum Analyzer which follows: >>SSD1306 Oled Display
>>Needed Parts
>>Libraries in we need to use
>>Super Easy Breadboard connection
>>Complete Code
Step 1: SSD1306 Oled Display:
This very common and simple OLED Display for Arduino that very less count of Pin to connect in arduino that called I2C two wire interface the I2C stands for (I2C=IIC=Inter-Integrated Circuit) and OLED stands for Organic Light-Emitting Diodes. The size of this oled display is 0.96 inch that make it too much small and the total pixel is 128X64 px resolution you can convert a pic to bitmap and program to show in this display. In 16X2 LCD Display We need a backlight pin but in OLED this pin not required. This is very simple to connect an OLED to Arduino Just follow these wiring:
OLED Pins : Arduino Pins
Vin | 5V //this is power Pin
GND | GND //this is GND Pin
SCL | A5 // this is I2C Pins
SDA | A4 //this is I2C Pins
Varieties of Arduino Pin If you use:
Arduino Uno: SDA (A4), SCL (A5)
Arduino Nano: SDA (A4), SCL (A5)
Arduino Leonardo: SDA (20), SCL (21)
Arduino MEGA: SDA (20), SCL (21)
Step 2: Parts :
Arduino Nano or https://amzn.to/2RTdsLe
Arduino Uno https://amzn.to/3cD1hcy
128×68 I2C OLED Display https://amzn.to/3cD1hcy
Jumper Wires https://amzn.to/3cD1hcy
Breadboard https://amzn.to/3cD1hcy
Step 3: Libraries Used in This Project:

If you are beginner for this project, you need to download the Adafruit SSD1306 Master zip Library From here available in Github and also need one more Adafruit GFX Library master.zip also available in Github. Open Arduino IDE Software go to the sketch tab, then here click include library and click Add Zip Library here you can add your downloaded library you can also download and install from Manage Library Option just search these library in this box.And Now for This Project need to download FIX_FFT.h master zip from here Fix_FFT.h git and nano_engine.h library here: NanoEngine.h (if you are already installed ssd1306 then Nano engine is not necessary or if not then paste it in new tab with same name).
Step 4: Breadboard Connection:
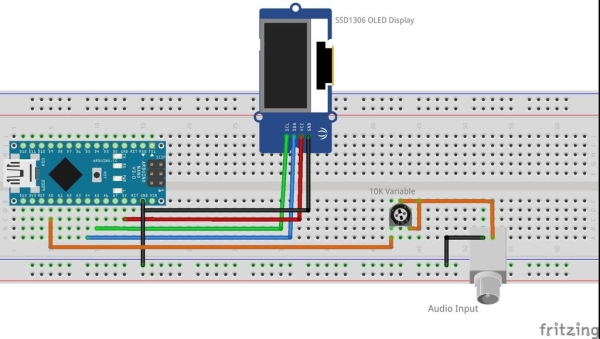
This is very simple connection for Arduino Nano and oled. Here I am using 10k variable for adjust the volume of Music it connected with A0 pin and Audio input plug for connect with audio devices.
Step 5: Audio Input:
Make sure always check voltage and current level in Analog Input of Arduino Board as Music or Sound Input, some amplifiers and Sound Devices are too much high Current as Output, do not plug on it. This Device needs only 3.8 to 4V and 40mA to 300mA Max voltage and current that come from mini portable amplifier, IPod, Portable Speaker, Mp3 Players, etc.
Step 6: Complete Code:
Here you can copy and paste the in your Arduino IDE Software:
Have it Fun and Enjoy Music!
- What is the maximum voltage allowed for the analog input?
The device requires an input between 0 to 3.3 volts. - Can this analyzer be used with microwave or radar signals?
No, using it for such signals will burn or crash the Arduino and cause permanent damage. - Which libraries are required for this project?
You need the Adafruit SSD1306 library, Adafruit GFX library, FIX_FFT.h, and nano_engine.h. - How do you connect the SDA pin on an Arduino Uno?
The SDA pin connects to A4 on an Arduino Uno. - Does the OLED display require a backlight pin?
No, unlike 16X2 LCD displays, this OLED does not require a backlight pin. - What is the pixel resolution of the 0.96 inch OLED display?
The resolution is 128 by 64 pixels. - What is the purpose of the 10k variable resistor in this circuit?
It is used to adjust the volume of the music connected to the analog input. - Are portable speakers suitable for this audio input?
Yes, mini portable amplifiers, iPods, and portable speakers are suitable as they output within the safe range.