
Summary of Arduino Morse Code Shield
This article details a DIY Arduino-based Morse code trainer project. It combines an LED for visual signals, a piezo speaker for audio beeps, and an LCD display to show characters. The software cycles through alphanumeric sequences and random letters to aid memorization. Built as a shield using point-to-point wiring ("haywiring"), the device is compatible with various protoshields or breadboards, offering an effective tool for learning Morse code without relying on traditional radio equipment.
Parts used in the Arduino Morse Code Trainer:
- Blank protoshield board (Adafruit or Sparkfun)
- 8x2 LCD (type JHD802A-2) or 16x2 LCD
- High-intensity LED
- Cheap piezo beeper
- 220 ohm resistor
- 47 ohm resistor
Morse code was the breakthrough that made possible long-distance
communication in the era of the telegraph. The code represents
alphanumeric characters by short and long intervals of signal — those
familiar dots and dashes. For many years passing a Morse code test was a
prerequisite of getting a Ham license, but nowadays most radio amateurs
use it only infrequently. No longer are ship-to-ship distress signals
sent in Morse, as was the famous CQD (dah-dit-dah-dit dah-dah-dit-dah
dah-dit-dit) transmitted by the sinking Titanic’s radio operator in 1912.
Still, Morse remains important for signalling distress, if only by a lost
hiker blinking a flashlight into the lonely, dark night.
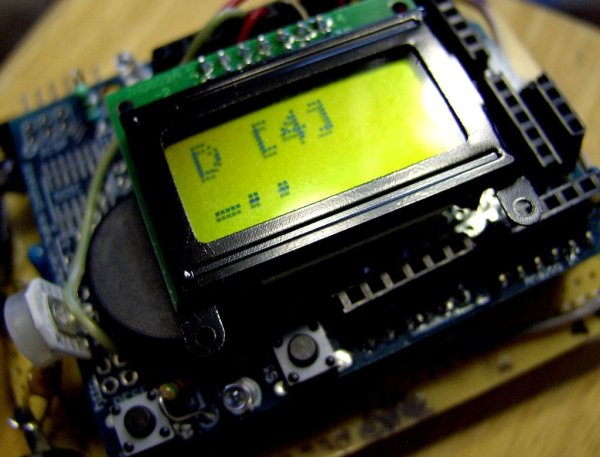
Hacking the Arduino as a Morse code trainer is fairly straightforward.
All you need is a blinking light, such as a high-intensity LED, and a sound
source, say a mini piezo speaker, to provide the beeps. Rounding out
the project is an LCD display to show the character being beeped/blinked.
The goal is to beep and simultaneously display the letters, numbers,
and a few important punctuation marks in ordered sequence. Following
this, do 50 random letters. Then, have the entire routine repeat.
The combination of beeps, flashes, and LCD display serves as an
effective tool for memorizing the Morse code.
I built this project as an Arduino shield, using an Adafruit protoshield
blank board. It will likewise work with most of the commercially pre-built
16×2 LCD shields or even just breadboarded. The hardware consists of
an 8×2 or 16×2 LCD wired to the Arduino in conventional fashion, an LED,
and a piezo speaker. Most of the actual work is done by software.
I used point-to-point wiring, otherwise known as “haywiring,” a
venerable technique lost in the mists of antiquity. Before the mid 1950s,
virtually all electronic devices were built this way, and by humans,
not robots or automatic devices.
Step 2: Pictorial schematics
The illustration depicts the project built on a Sparkfun protoshield.
An Adafruit or equivalent board works just as well. Even a
general-purpose prototyping project board is fine, though it might
be a bit tricky to get the headers aligned just right.
You can even build the project on a wireless breadboard.
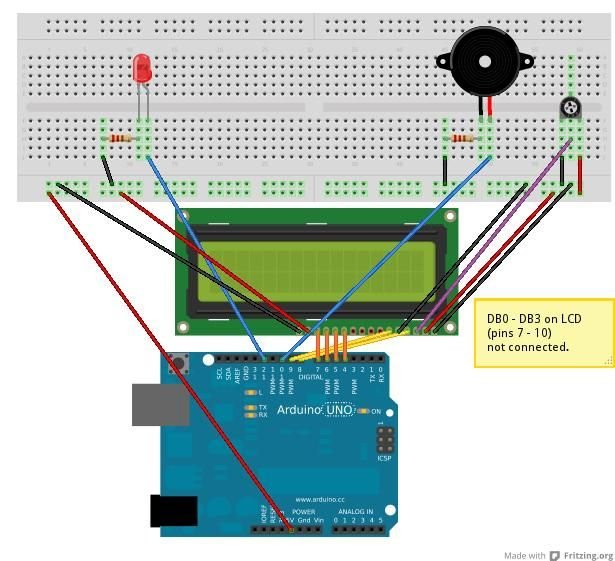
Note that the current-limiting resistor on the LED is 220 ohms, and the
one on the piezo speaker is 47 ohms. The LED needs that resistor, or it
will burn out. The speaker may or may not need one, but it’s better to be
safe.
What you’ll need to build it
Materials:
blank protoshield board (Adafruit and Sparkfun sell nice ones)
8×2 LCD, type JHD802A-2 (the kind with no backlight preferred)
[This project will work just as well with a 16×2 LCD,
with one change on line 105 of the sketch.)
1 high-intensity LED
(Doesn’t need to be the ultra-bright variety.
A “clear” LED works just fine.)
1 cheap piezo beeper
(All Electronics sells a plastic-encased one for $1.50,
which is nice and loud and non-polarized. Catalog # SBZ-26.)
1 220 ohm resistor
1 47 ohm resistor
For more detail: Arduino Morse Code Shield
- What components are needed to build the Morse code trainer?
You need a blank protoshield board, an 8x2 or 16x2 LCD, a high-intensity LED, a cheap piezo beeper, a 220 ohm resistor, and a 47 ohm resistor. - Can I use a 16x2 LCD instead of an 8x2 LCD?
Yes, the project works just as well with a 16x2 LCD, requiring only one change on line 105 of the sketch. - Why is a current-limiting resistor necessary for the LED?
The LED needs a 220 ohm resistor, otherwise it will burn out. - Does the piezo speaker require a resistor?
The speaker may or may not need one, but it is safer to include a 47 ohm resistor. - How does the training routine function?
The system beeps and displays letters, numbers, and punctuation in order, followed by 50 random letters, then repeats the entire routine. - What wiring technique was used for this project?
The author used point-to-point wiring, also known as haywiring. - Which specific piezo beeper model is recommended?
All Electronics sells a plastic-encased non-polarized beeper (Catalog # SBZ-26) that is loud and costs $1.50. - Is the LED required to be ultra-bright?
No, a clear LED works just fine; it does not need to be the ultra-bright variety.
