Summary of Arduino MKR1000 & Blynk
This article guides users through an IoT experiment using an Arduino MKR1000 to control two LEDs and monitor a potentiometer via the Blynk app. It details hardware setup, software installation including the Arduino IDE and Blynk library, and provides the necessary code for connecting the device to Wi-Fi and controlling widgets.
Parts used in the Arduino MKR1000 & Blynk IoT Experiment:
- Arduino MKR1000 board
- LED (generic)
- Rotary potentiometer (generic)
- Breadboard (generic)
- Jumper wires (generic)
- Arduino IDE
- Blynk mobile app
- WiFi101 library
- Blynk library
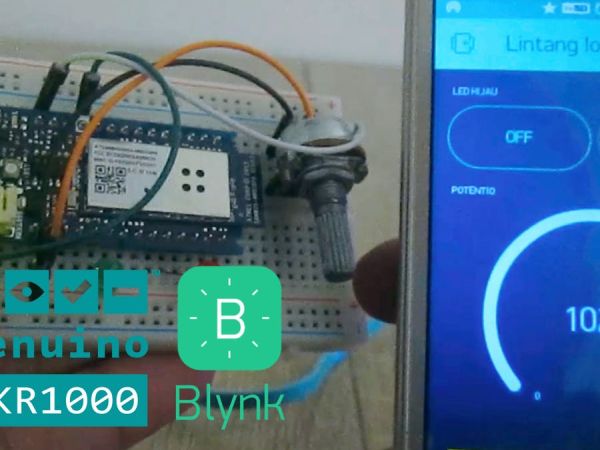
A simple Internet of Things experiment, using an Arduino MKR1000 board to control two LEDs and monitor a potentiometer, via Blynk app.
Things used in this project
Hardware components |
||||||
 |
|
× | 1 | |||
 |
|
× | 2 | |||
 |
|
× | 1 | |||
 |
|
× | 1 | |||
 |
|
× | 5 | |||
Software apps and online services |
||||||
 |
|
|||||
|
||||||
Story
A simple Internet of Things (IoT) experiment using an Arduino MKR1000 and Blynk. Watch the video below to see it in action, then follow the instructions to build your own!
1. What You Need ?
To build this project, you will need the following items:
- 1 Arduino MKR1000 board
- 2 LEDs
- 1 potentiometer
- 1 breadboard
- Some jumper wires
- Arduino IDE (download here)
- Blynk mobile app
- Android (download here)
- iOS (download here)
- WiFi101 library (read how to install here)
- Blynk library (download here)
2. Set Up Blynk App ?
- Open Blynk app, login then create a new project. Choose device: Arduino MKR1000 with connection type: WiFi. Click Create button and you will receive Blynk Auth Token by email.
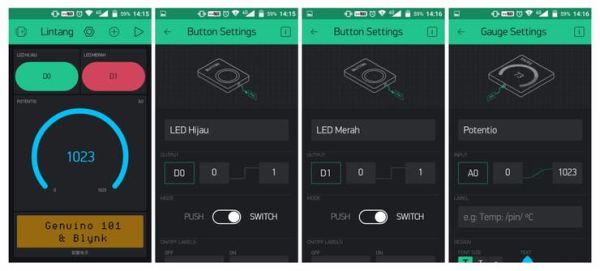
- On your project, add 2 button widget and a gauge. Set each widget as the picture below.
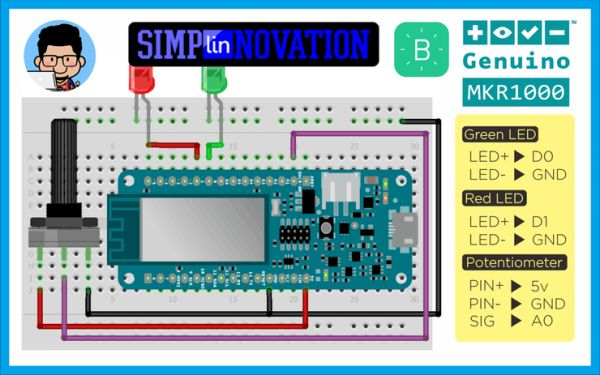
3. Schematics ??
- Connect your parts to Arduino MKR1000 as the following picture:
4. Sketch ?
- First, extract Blynk library then copy it to C:\…\Documents\Arduino\libraries.
- Open Arduino IDE then copy sketch below. Insert your WiFi SSID, WiFi password & Blynk Auth Token. Make sure you have chosen the right option for Board and Port under Tools menu. Upload it!
#define BLYNK_PRINT SerialUSB
#include <SPI.h>
#include <WiFi101.h>
#include <BlynkSimpleWiFiShield101.h>
char auth[] = "Blynk_Auth_Token";
char ssid[] = "Your_WiFi_Name";
char pass[] = "Your_WiFi_Password";
void setup(){
    SerialUSB.begin(9600);
    Blynk.begin(auth, ssid, pass);
}
void loop(){
    Blynk.run();
}
5. Have Fun! ?
- After uploading done, make sure your Arduino MKR1000 and smartphone has a good internet connection. Click play button ▶️ on top right corner of your Blynk project, then you’re ready to go! Have fun!
Code
Source : Arduino MKR1000 & Blynk
- How do I create a new project in the Blynk app?
Open the Blynk app, login, create a new project, choose the Arduino MKR1000 device with WiFi connection, and click Create. - What widgets should I add to the Blynk project?
You should add 2 button widgets and a gauge to the project interface. - Where can I download the Arduino IDE?
The article mentions downloading the Arduino IDE but directs users to a link provided in the text. - Can I use this project on both Android and iOS devices?
Yes, the article lists download links for the Blynk mobile app on both Android and iOS platforms. - What libraries are required for this project?
You need the WiFi101 library and the Blynk library installed in your Arduino environment. - How do I install the Blynk library?
Extract the Blynk library and copy it to the C:...DocumentsArduinolibraries folder. - Does the Arduino MKR1000 require a specific board selection in the IDE?
Yes, you must ensure you have chosen the right option for Board under the Tools menu before uploading. - What information is needed in the sketch code?
The sketch requires inserting your WiFi SSID, WiFi password, and Blynk Auth Token.