Summary of Arduino Fart-O-Meter
This Arduino Fart-O-Meter project humorously measures methane emissions using an emitter module with a sensor and wireless transmitter, paired with a receiver unit for data visualization. It demonstrates practical skills in sensor integration, analog-to-digital conversion, and RF communication while emphasizing calibration and power management.
Parts used in the Arduino Fart-O-Meter:
- Arduino microcontroller (ATMEGA168/328)
- Methane gas sensor (MQ-4)
- nRF2401A transceiver
- Voltage regulators (LM117 and 7805)
- LEDs with resistors
- Potentiometers
- Audio jack connectors
- Capacitors
- Battery pack
- Plastic enclosure
- Servo motor
- Acrylic sheet
- Bumpers, screws, and standoffs
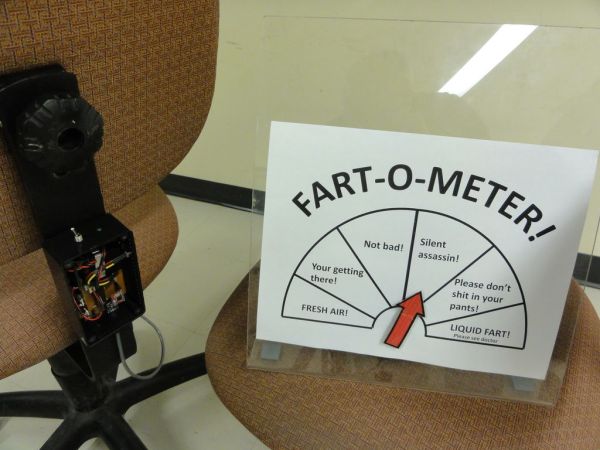
Arduino Fart-O-Meter Project
Innovation in electronics often emerges from playful experimentation, and this project—though humorous in concept—demonstrates practical use of wireless communication and sensor integration. The Arduino Fart-O-Meter is essentially a system designed to measure methane emissions (commonly associated with human flatulence) and transmit the data wirelessly to a receiver unit for visualization.
Project Overview
The system is built around two primary modules:
-
Emitter Module – mounted on the chair, equipped with a methane sensor, Arduino microcontroller, and a wireless transceiver.
-
Receiver Module – placed remotely (e.g., on a desk), where incoming data is processed and represented using LEDs and servo movement.
The novelty of this project lies not in its comedic framing, but in its technical execution: employing gas sensors, analog-to-digital data acquisition, and wireless data transmission. It also highlights the importance of calibration, power regulation, and safe handling of electronic components.
Step 1: Component List
The Emitter is powered by an Arduino (ATMEGA168/328), methane gas sensor (MQ-4), and an nRF2401A transceiver. Supporting components include:
-
Voltage regulators (LM117 for 3.3V, 7805 for 5V)
-
LEDs with resistors for indication
-
Potentiometers for calibration and debugging
-
Audio jack connectors for sensor interface
-
Capacitors for filtering and stabilization
-
Battery pack and plastic enclosure for portability
The Receiver module is also Arduino-based, paired with an nRF2401A transceiver, shield, and servo motor. It is mounted on an acrylic sheet with bumpers, screws, and standoffs for stability, powered by a dedicated AA battery pack.
Step 2: Required Tools
The project demands common electronics tools such as:
-
Multimeter for measurements
-
Side cutters, pliers, and screwdrivers
-
USB cable for Arduino programming
-
Drill set and safety glasses for safe assembly
-
Heat-shrink tested via lighter (also useful in checking sensor responsiveness)
These tools emphasize that even a playful build requires discipline in electronics handling and assembly.
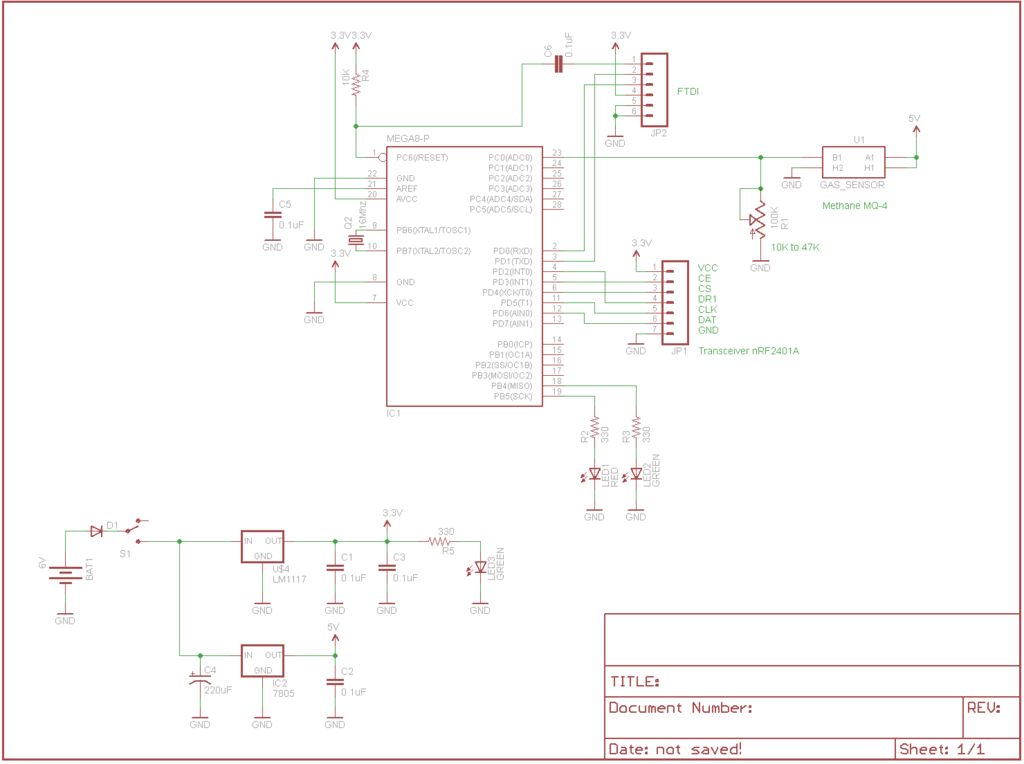
Step 3: Understanding the Methane Sensor
At the core of this project is the MQ-4 Methane Sensor, which detects gas concentrations ranging from 200 to 10,000 ppm. Its analog output voltage corresponds to the detected gas concentration:
-
~1.3V baseline when no gas is present
-
Rising up to 5V upon methane detection (e.g., during flatulence)
The sensor’s built-in heater, however, consumes 175mA, making power source selection an important design consideration.
Educational Value
Although comedic in presentation, the Fart-O-Meter demonstrates:
-
Practical sensor calibration
-
Wireless data transmission using RF modules
-
Real-time analog monitoring via Arduino
-
System integration of sensors, regulators, and actuators
This project effectively blends humor with technical knowledge, serving as both an entertaining and educational demonstration for hobbyists.
Major Components Used
-
Arduino microcontroller
-
MQ-4 Methane Gas Sensor
-
nRF2401A Wireless Transceiver with Chip Antenna
For more detail: Arduino Fart-O-Meter
- What is the primary function of the Arduino Fart-O-Meter?
The system measures methane emissions and transmits data wirelessly to a receiver unit for visualization. - How does the MQ-4 sensor indicate methane detection?
The analog output voltage rises from a baseline of ~1.3V up to 5V upon detecting methane. - Which components are used in the Emitter Module?
The Emitter uses an Arduino microcontroller, an MQ-4 methane sensor, and an nRF2401A transceiver. - Can this project be built without professional tools?
No, it requires common electronics tools like multimeters, cutters, pliers, screwdrivers, and a drill set. - What is the power consumption of the sensor heater?
The sensor's built-in heater consumes 175mA, making power source selection critical. - How is the Receiver Module stabilized?
The receiver is mounted on an acrylic sheet with bumpers, screws, and standoffs for stability. - Does the system use wireless technology?
Yes, it employs RF modules for real-time wireless data transmission between the emitter and receiver. - What educational value does this project offer?
It demonstrates practical sensor calibration, wireless transmission, and system integration of sensors and actuators.