Summary of Arduino/ESP32 Capacitive Touch Sensor
This article guides users in building a capacitive touch sensor using an Arduino or ESP32 board. It details the necessary hardware, including tinfoil and wires, and explains how to connect them to specific pins. The guide provides complete code examples for both platforms, utilizing the ADCTouch library for Arduino and the built-in touchRead() function for ESP32. It also covers calibration techniques to adjust sensitivity against environmental drift.
Parts used in the Capacitive Touch Sensor:
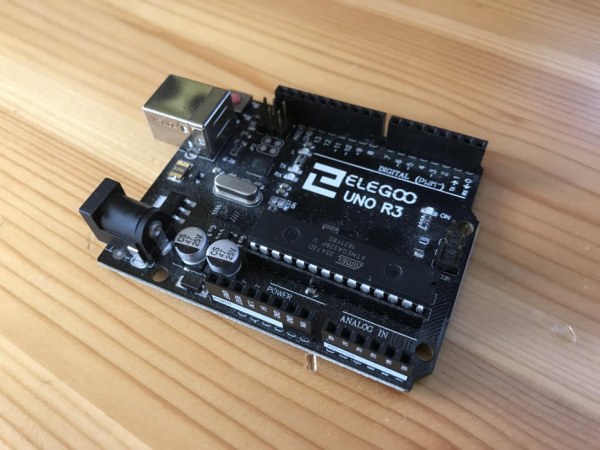
- Arduino or ESP32 development board
- Wires
- Tinfoil
- Sticky tape
Adding touch interfaces to your projects might seem difficult at first, but it really isn’t. In this Instructable I’ll show you how to do it using an Arduino or ESP32 development board.
What you will need:
- an Arudino* or ESP32 development board
- a wire
- some tinfoil
- some sticky tape
*It should work on pretty much any Arduino excluding the Arduino Due, as it is running on an ARM chip instead of an AVR chip.
Arduino Capacitive Sensing
Now, for Arduino touch sensing we’re going to utilize a library called ADCTouch. Other options like the CapacitiveSensor library do exist, but from my experience ADCTouch delivers the best accuracy while also being the easiest to setup and use.
ESP32 Capacitive Sensing
For ESP32 touch sensing we’re going to utilize the Arduino framework and the built-in touchRead() function.
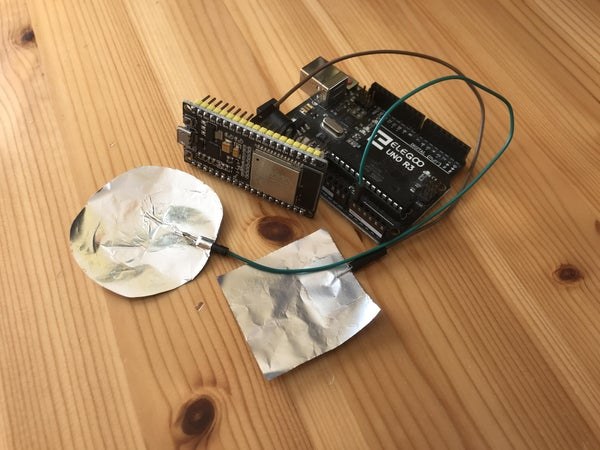
Step 1: The Wiring
Let’s wire everything together. It is going to be stupid simple – I promise. 😉
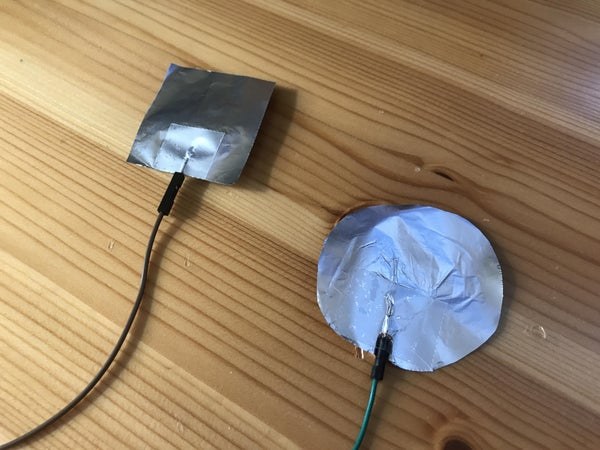
Preparing the Sensor:
First off all we take a piece of tinfoil and attach it to a wire using some sticky tape – the bigger the tinfoil, the higher the sensitivity of our sensor. With this done, our sensor is ready to use.
Arduino:
For Arduino all we have to do is to connect our shiny new sensor to one of the Analog Pins. I’m using A0 but you can really use anyone of them. You can now continue with Step 2.
ESP32:
For the ESP32 people there are even more pins available for the sensor to connect, namely the pins 2, 4, 12, 13, 14, 15, 27, 32 and 33. Once again, you should be able to use any of those pins, but don’t take my word for it ;). In this case I’m using pin 27. You can skip the next step and continue with Step 3, as Step 2 is Arduino code.
Step 2: The Code – Arduino
With the wiring done it’s time for the code, which is a little more complicated but still very doable.
Libraries:
First of all we have to import the ADCTouch library. In the Arduino IDE we do this by navigating to Sketch -> Include Library -> Manage Libraries…. There we search for ADCTouch and hit Install.
Now we import it by writing:
#include <ADCTouch.h>
Preparations:
Let’s set some values. We’ll start by defining the used touch pin. I used Analog Pin 0, but your choice might be different.
#define TOUCHPIN A0
Next, we’ll decide how exact our sensor should be. [RESOLUTION] defines how many samples the ADCTouch library takes per reading, [SMOOTH] sets how many of the previous readings are stored (this should make your sensor more reliable and resistant against environmental changes or sensor drift). I found 100 to be a good value for both.
Note that a too low [SMOOTH] value will result in no detection when the sensor is approached slowly.
#define RESOLUTION 100
#define SMOOTH 100
Somehow we have to decide when we think the sensor is triggered. I decided to use a multiplier instead of a static value. This way changes in the environment or some sensor drift shouldn’t affect the sensor at all. For me a value of 1.7 was just perfect, but this depends on the size of your tinfoil and whether your sensor should sense through something (the lower the multiplier the easier the sensor is triggered).
float multiplier = 1.7;
Finally, we quickly define some variables we use for reading the sensor and compensating for environmental changes/sensor drift.
int previousReadings[SMOOTH];
int currentIndex = 0;
int reading;
Smoothing Preparations:
As I’ve mentioned before, we are storing some previous readings. We will use these as a stable value to compare new readings to. To get one smoother value from multiple previous readings, we need to calculate their average by summing them up and then dividing the sum by the number of elements in the [previousReadings] array.
int average(){
  unsigned long sum = 0;
  for(int i = 0; i < SMOOTH; i++){
    sum += previousReadings[i];
  }

  return sum / SMOOTH;
}
Setup:
To make our smoothing system useful and to prevent false positives when starting our sketch, we have to fill the [previousReadings] array with values. We also begin Serial Communication.
void setup(){
  Serial.begin(9600);

  for(int i = 0; i < SMOOTH; i++){
    previousReadings[i] = ADCTouch.read(TOUCHPIN, RESOLUTION);
  }
}
Loop:
Onto the main logic (put the following code in your loop function). To read the sensor we use the ADCTouch.read() function. It takes two arguments, the first being the used pin and second being the sample count (how many sensor readings to take per function call, i.e., the resolution).
reading = ADCTouch.read(TOUCHPIN, RESOLUTION);
Next, we have to check whether the sensor is triggered or not. We do this by multiplying the average with our [multiplier] and then comparing this value with our new reading. If the condition is met our sensor is triggered and the Serial Monitor outputs “HIGH”.
if(reading > average() * multiplier){
  Serial.prinln("HIGH");
}
If the condition is not met it means that we can use the reading as a baseline to compare other readings to. That’s why we replace the oldest reading of [previousReadings] with this value. This is done by keeping track of the latest overwritten index. Every time we overwrite a value, we increase this number in order to overwrite another value the next time. To prevent [currentIndex] from getting out of bounds, we reset it when it is greater or equals to the length of the [previousReadings] array.
We also output “LOW” on our Serial Monitor, so we can easier spot a new trigger.
else{
  Serial.println("LOW");

  previousReadings[currentIndex] = reading;

  currentIndex++;

  if(currentIndex >= SMOOTH){
    currentIndex = 0;
  }
}
Calibration:
Finally, we need a way to determine our needed multiplier. This is pretty straightforward as we only have to note an average untriggered value (i.e., the value when you are not close to the sensor) and one average triggered value (i.e., the value when you want the sensor to trigger). We then divide the triggered value by our untriggered value to get our multiplier.
If the sensor doesn’t trigger with the chosen multiplier, just lower it a bit, and try again. After you’ve found this value you can delete this line of code.
Serial.println(reading);
Finished:
And with all of this done you are ready to upload the sketch to your Arduino. Congrats, you’ve successfully built your own touch sensor. You don’t need to continue with Step 3, as this is ESP32 code.
TL;DR:
So, you don’t want to read this whole explanation? You just want to copy the code? Well, I’ve uploaded it on Github.

Let’s now focus on the ESP32. The code for our ESP32 is basically the same as for our Arduino, with the exception that the ESPs touchRead() function returns lower values the closer you get to your sensor, instead of returning higher values with ADCTouch. This requires a little different logic than on Arduino.
Preparations:
Let’s set some values. We’ll start by defining the used touch pin. I used GPIO27, but your choice might be different.
#define TOUCHPIN 27
Next, we’ll decide how many of the previous (idle) readings are stored (this should make your sensor more reliable and resistant against environmental changes or sensor drift). As the ESP32 is much more powerful than the Arduino, I used a higher value of 500 readings.
Note that a too low value will result in no detection when the sensor is approached slowly.
#define SMOOTH 500
Somehow we have to decide when we think the sensor is triggered. I decided to use a multiplier instead of a static value. This way changes in the environment or some sensor drift shouldn’t affect the sensor at all. For me a value of 0.2 was working well, but this depends on the size of your tinfoil and whether your sensor should sense through something (the higher the multiplier the easier the sensor is triggered).
float multiplier = 0.2;
Finally, we quickly define some variables we use for reading the sensor and compensating for environmental changes/sensor drift.
int previousReadings[SMOOTH];
int currentIndex = 0;
int reading;
Smoothing Preparations:
As I’ve mentioned before, we are storing some previous readings. We will use these as a stable value to compare new readings to. To get one smoother value from multiple previous readings, we need to calculate their average by summing them up and then dividing the sum by the number of elements in the [previousReadings] array.
int average(){
  unsigned long sum = 0;
  for(int i = 0; i < SMOOTH; i++){
    sum += previousReadings[i];
  }

  return sum / SMOOTH;
}
Setup:
To make our smoothing system useful and to prevent false positives when starting our sketch, we have to fill the [previousReadings] array with values. We also begin Serial Communication.
void setup(){
  Serial.begin(9600);

  for(int i = 0; i < SMOOTH; i++){
    previousReadings[i] = ADCTouch.read(TOUCHPIN, RESOLUTION);
  }
}
Loop:
Onto the main logic (put the following code in your loop function). To read the sensor we use the touchRead() function. It only takes one argument, being the used GPIO pin.
reading = ADCTouch.read(TOUCHPIN, RESOLUTION);
Next, we have to check whether the sensor is triggered or not. We do this by multiplying the average with our [multiplier] and then comparing this value with our new reading. If the condition is met our sensor is triggered and the Serial Monitor outputs “HIGH”.
if(reading < average() * multiplier){
  Serial.prinln("HIGH");
}
If the condition is not met it means that we can use the reading as a baseline to compare other readings to. That’s why we replace the oldest reading of [previousReadings] with this value. This is done by keeping track of the latest overwritten index. Every time we overwrite a value, we increase this number in order to overwrite another value the next time. To prevent [currentIndex] from getting out of bounds, we reset it when it is greater or equals to the length of the [previousReadings] array.
We also output “LOW” on our Serial Monitor, so we can easier spot a new trigger.
else{
  Serial.println("LOW");

  previousReadings[currentIndex] = reading;

  currentIndex++;

  if(currentIndex >= SMOOTH){
    currentIndex = 0;
  }
}
Calibration:
Finally, we need a way to determine our needed multiplier. This is pretty straightforward as we only have to note an average untriggered value (i.e., the value when you are not close to the sensor) and one average triggered value (i.e., the value when you want the sensor to trigger). We then divide the triggered value by our untriggered value to get our multiplier.
If the sensor doesn’t trigger with the chosen multiplier, just raise it a bit, and try again. After you’ve found this value you can delete this line of code.
Serial.println(reading);
Finished:
And with all of this done you are ready to upload the sketch to your ESP32. Congrats, you’ve successfully built your own touch sensor.
TL;DR:
So, you don’t want to read this whole explanation? You just want to copy the code? Well, I’ve uploaded it on Github.
Source: Arduino/ESP32 Capacitive Touch Sensor
- Which library is recommended for Arduino capacitive sensing?
The ADCTouch library is recommended because it delivers the best accuracy while being the easiest to setup and use. - Can I use any analog pin for the Arduino sensor?
Yes, you can use any Analog Pin, though the author uses A0 as an example. - Which GPIO pins are available for the ESP32 touch sensor?
Pins 2, 4, 12, 13, 14, 15, 27, 32, and 33 are available for the sensor connection. - How does the ESP32 touchRead function differ from the Arduino approach?
The ESP32 touchRead function returns lower values the closer you get to the sensor, whereas ADCTouch returns higher values. - What value should be used for SMOOTH on an ESP32 compared to Arduino?
The author suggests using a higher value of 500 for ESP32 due to its power, while 100 was found good for Arduino. - How do you calculate the multiplier for sensor calibration?
You divide the average triggered value by the average untriggered value to determine the multiplier. - Does the size of the tinfoil affect the sensor sensitivity?
Yes, the bigger the tinfoil, the higher the sensitivity of the sensor. - What happens if the SMOOTH value is too low?
A too low SMOOTH value will result in no detection when the sensor is approached slowly. - Is the Arduino Due compatible with this project?
No, it should not work on the Arduino Due because it runs on an ARM chip instead of an AVR chip. - How can I find the correct multiplier value for my specific setup?
Note an average untriggered value and one average triggered value, then adjust the multiplier until the sensor triggers correctly.