
Summary of ARDUINO based IR remote control robot using arduino
This article outlines a simple DIY project to build an Arduino-based robot controlled by an IR remote. It details the necessary components, circuit connections between the Arduino, L293D motor driver, and DC motors, and provides a step-by-step guide to reading IR codes via the Serial Monitor for programming.
Parts used in the IR Remote Control Robot:
- Arduino Uno
- TSOP1738 IR receiver
- L293D H-bridge IC
- Two DC motors
- Robot base
- 9V Battery
- TV IR remote
Hi everyone. This my new project IR remote control robot using arduino. This is a simple design robot you can easily build it.
Step 1: Requirements:
Project requirements:
- Arduino uno Tsop1738 (ir receiver)
- H bridge ic (L293D)
- Two dc motor
- A robot base
- 9v Battery
Step 2: Circuit Diagram
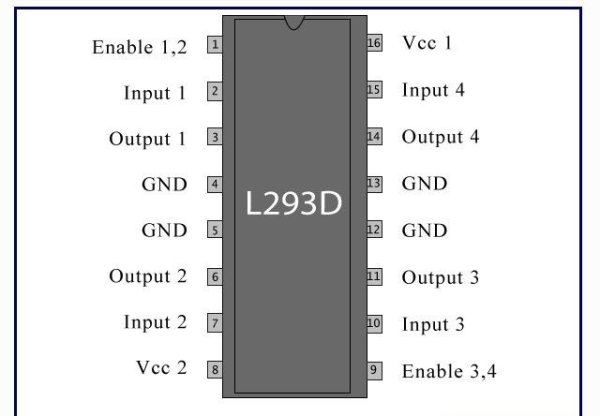
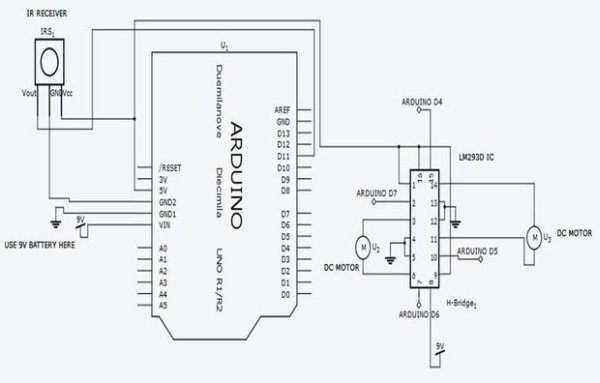
For The circuit diagram refer the bellow device pin description and make connection to arduino based on the program of the robot:
Important: connect ir receiver out to arduino digital pin 11 only.
- Connect arduino pin 7- l293d INPUT 1 pin 2
- Connect arduino pin 6- l293d INPUT 2 pin 7
- Connect arduino pin 5- l293d INPUT 3 pin 10
- Connect arduino pin 4- l293d INPUT 4 pin 15
Connect two motor show like above images.and configure the lm293d as in image 3 above.
First do the circuit connection shown previous and download the ir remote library file for arduino IDE. And copy the library file in the arduino libraries folder.
And then run the arduino ide select sketch like that given bellow
File -> examples->IR remote->IR recv demo
Upload the sketch to arduino and open serial monitor. Press the TV IR remote (any company) in front of ir receiver then you will see the decode hex code in serial monitor (example : FF30CF). the code will vary according to the remote company. Press any 5 button in remote and note down the codes shown in the serial monitor for programming purpose.
For more detail: ARDUINO based IR remote control robot
-
What components are required to build this robot?
You need an Arduino Uno, TSOP1738 IR receiver, L293D H-bridge IC, two DC motors, a robot base, and a 9V battery. -
Which digital pin should the IR receiver output connect to?
The IR receiver output must be connected to Arduino digital pin 11 only. -
How do I find the hex codes for my remote buttons?
Upload the IR recv demo sketch, open the serial monitor, press remote buttons, and note down the decode hex codes displayed. -
Where can I download the IR remote library file?
You must download the IR remote library file and copy it into the Arduino libraries folder within the Arduino IDE. -
Which Arduino pins connect to the L293D INPUT pins?
Connect Arduino pin 7 to L293d INPUT 1 pin 2, pin 6 to INPUT 2 pin 7, pin 5 to INPUT 3 pin 10, and pin 4 to INPUT 4 pin 15. -
Can I use any company's TV IR remote for this project?
Yes, you can use any company TV IR remote, though the hex codes will vary according to the remote company. -
What is the first step in the programming process described?
The first step is to read your IR remote button value using the serial monitor after connecting the circuit.
