
Summary of Arduino Based Four Legged Robot
This article guides readers through building FIER, a budget-friendly four-legged walking robot. The design prioritizes low cost and light weight by using balsa wood for the body and inexpensive servos. The project involves constructing four identical legs with reinforced pivot points, assembling a custom circuit board to control multiple servos via an Arduino, and programming the robot using specific drivers. While optional components like an accelerometer are suggested for balance, the core build focuses on creating a functional prototype that can walk and wave.
Parts used in the FIER Robot:
- Balsa wood
- Inexpensive servos
- 1/8 drill bit
- 1/8 dowel
- Wood glue
- Hot glue
- 5 - 6 volt power source
- Arduino
- TLC5940 PWM driver
- Protoboard or custom PCB
- Accelerometer (optional)
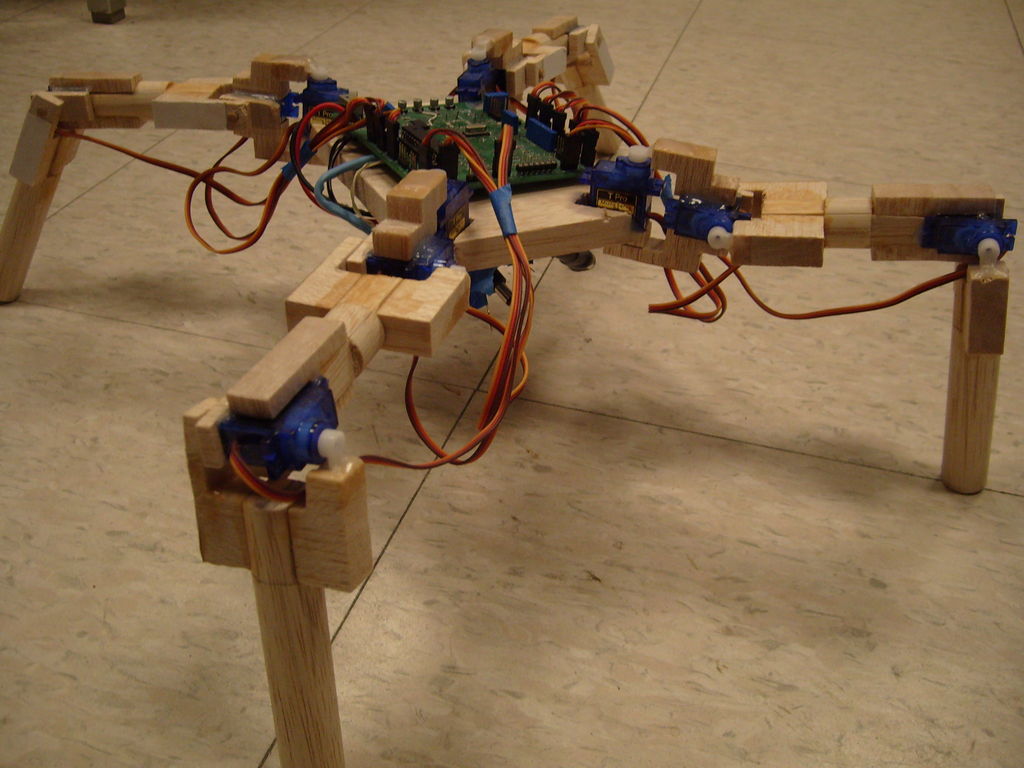
In this instructable, I will try to show you the basic steps to making your own walking robot for the most bang for your buck.
You may be asking why did I use balsa wood as the body for the robot. The reason I did this was to make the robot as lite weight as possible. In order to make the robot as cheap as possible I had to use the cheapest servos I could find since there is so many needed and because the servos are so cheap they have a low torque and can’t handle much weight and in turn, balsa wood. Plus balsa wood is really easy to work with.
Age: 23
Step 1:
Step 2: Equipment and Supplies
I also added some optional items. I suggest holding off, on getting the battery for they can be a little expensive and the one listed doesn’t even come with a charger. I suggest just getting a 5 – 6 volt source and run a wire, because the robot won’t be walking very far, very fast. Finally I would suggest getting the accelerometer to help the robot balance itself, but it may be a little hard for someone that doesn’t have much experience in programming.
Step 3: Robot’s Body
I won’t be going over all the details to building the body of your robot, but I’ll try to give you a general idea on how to do it.
As mentioned earlier the body is made out of balsa wood, which is a very nice material to work with, for all you need is a knife. Since I had a table saw available to use, I used that for some cutting rather than the knife to be able to get more consistent and parallel cuts. If you decide to use a table saw instead, please be careful and wear goggles.
I have add a drawling of one leg and several pictures so that you can use those to refer to when you are building the legs. One detail I will point out for the legs is the pivot point. You may see in my drawling there is a pin underneath the servo. This is to strengthen the leg, instead of having all the weight on the servo axle. This is where you will be needing the 1/8 drill bit and 1/8 dowel. As for the belly of the robot, its just a rectangle with notches on the corners to hold the servos.
I used wood glue to attached balsa pieces together, this creates a strong bond. You can also coat the balsa wood with wood glue to strengthen it. I used hot glue to attach the servos to the balsa wood, but I later found out that after a month or so, the hot glue begins to fail, so you may want to try somethings else if you want a more permanent bond.
If you have a better design, go for it. I choose this design because the robot has the capability of rotating its leg 180 degrees so that it can walk upside down.
This video is a test of single leg moving each servo 180 degrees.
This video is just showing me cutting out the legs using a table saw.
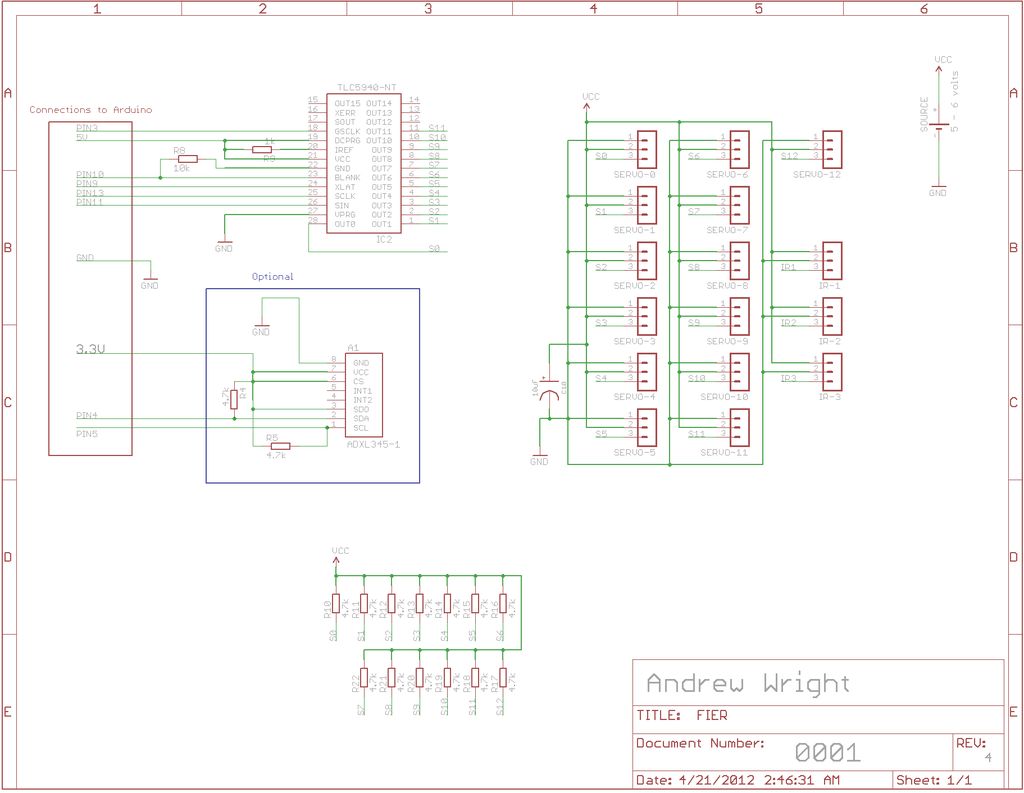
Step 4: Schematic
As marked in the schematic there is a 5 – 6 volt source. This is the main source for all the servos and with so many servos they can pull quite a bit current. Make sure to only use a source that can handle 1A or more, like listed on the Equipment and Supplies list, a battery or a power supply. DO NOT use the 5v source on the Arduino to power the servo, only use the Arduino source to power the PWM driver.
To put all the components together I would suggest using a protoboard and solder them all together. Since we were doing this project for class, I had a PCB outsourced to Advanced Circuits. Advanced Circuits is a great company to get your boards made for a great price.
Step 5: Software
http://www.arduino.cc/playground/Learning/TLC5940
One error you may run into, due to the poor instructions, would be that the legs move in the opposite ways. The easiest way to fix this would be to modify the code. In the code you will see multiple function that look like, tlc_setServo(4, 100). The first parameter is the motor you want to control and the second parameter is the angle of the servo. Just modify the second parameter until it reacts how you think it should.
Like I said previously, I would suggest that you use the accelerometer to help the robot balance itself, but I haven’t had enough time to add that feature. There is example codes available online to test your accelerometer though.
http://www.sparkfun.com/products/9156
 FIER_Wave.ino2 KB
- Why was balsa wood chosen for the robot's body?
Balsa wood was selected to keep the robot lightweight because the cheap servos have low torque and cannot handle much weight. - How should the servo be powered in this project?
You must use a separate 5-6 volt source capable of handling 1A or more; do not use the 5v source from the Arduino. - What is the purpose of the 1/8 dowel and drill bit?
These parts are used to create a pin underneath the servo to strengthen the leg pivot point instead of putting all weight on the servo axle. - Is hot glue recommended for attaching servos permanently?
No, hot glue may begin to fail after a month or so, so another method is suggested for a more permanent bond. - What should you do if the legs move in the opposite direction?
You need to modify the code by changing the second parameter in the tlc_setServo function until the reaction matches expectations. - Can the robot walk upside down?
Yes, the design allows the robot to rotate its legs 180 degrees so it can walk upside down. - What is the estimated total cost for the basic robot?
The total cost for the basic robot is just a little over $100, excluding shipping. - Does the included battery come with a charger?
No, the listed battery does not come with a charger and is considered expensive compared to a simple wire solution.