Summary of Arduino 101
This tutorial guides beginners through essential Arduino concepts using Tinkercad, covering variables, input/output pins, sensors, mapping, and functions. It establishes coding conventions like camel case and indentation, explains the `setup()` and `loop()` structures, and distinguishes between global and local variable scopes while emphasizing the use of constants for pin definitions.
Parts used in the Arduino Basics Project:
- Tinkercad account
- Arduino board
- Breakout board
- Digital pins
- Analog pins
- Power and ground connections
- Temperature or light sensors
- LEDs (on-board or external)
To get started with Arduino, you’ll need some basics. In this tutorial, we’ll go beyond a little blinky light and teach you about:
- Variables
- Input and Output pins
- Sensors and reading data
- Mapping results
- Functions
In another tutorial, I’ll cover classes and why we might use them.
But, we might still make a little light blink… Just because… Hello, World! Ok. Bad joke.
This will be fairly simple, but it will progressively get more difficult. I suggest breaking it in to parts and just going through one section at a time.
To do this, you’ll need a Tinkercad account (open www.tinkercad.com) and use Google to sign up (makes things easier) or just sign up with your email. Let’s get started!
I’ll embed the circuit design here for reference. It is basic, but it isn’t meant to be about electronics design but about interacting with various components using code features in Arduino.
Step 1: Environment Setup
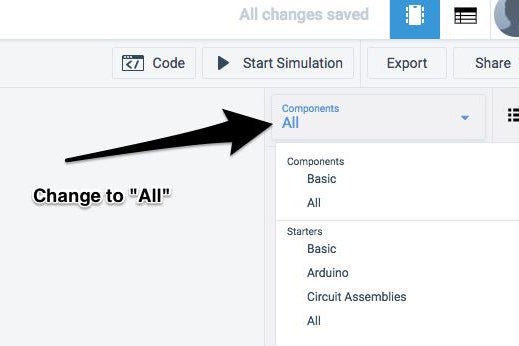
Let’s setup the environment. Throughout this tutorial, we wont need much other than an Arduino. Check out the pictures above, but you’ll need to:
- Use the drop-down menu to change to All components.
- Type Arduino in the search and put an Arduino board by click-dragging on to the canvas
- Open the Code menu and change to Text (you can clear the warning that appears)
- Clear all the code, leaving the void setup() and void loop() functions in place (see the image for what the code panel should look like)
Step 2: Arduino Basics
Let’s talk conventions.
A convention is something all programmers do to keep their code clean and organised. You can adopt a certain convention that is published, or you can follow a general guide and define your own. If you’re starting out, it is best to have good code from the outset. If you’ve been programming a bit and have poor code management, then now is the time!
I suggest reading this: http://isocpp.github.io/CppCoreGuidelines/CppCoreGuidelines#main. These C++ core guidelines will help you understand more.
These are my (very basic) conventions.
- Camel case for writing variable names – First word lower case, remainder with a first letter capital, because… camels.
int someVariableName;
// I find this better than:
int some_variable_name;
- Minimise spaces between symbols but maintain legibility
int someVariable = 9;
// Rather than
int someVariable=9
In my opinion, the second is much less readable.
- Declare one, maybe two variables maximum on one line. Never two separate instructions on a line
int someVar, anotherVar;

// Gross. Debugging, please?!
int someVar; someVar = someVar - 10;

// Much clearer
int someVar;
someVar = someVar - 10;
- Use constants where possible/beneficial
- Code to describe functions and where necessary, but clearer code is better
- Functions with capitals for first letter of all words
void MyGreatFunction();
// It's clear this is different to a variable in a call, now

int someVar = MyGreatFunction();
- Clear indenting at all times using 4 spaces or 1 tab.
void MyGreatFunction() {
	int someVar = 10;
}

// Rather than this...

void MyGreatFunction()
{
int someVar = 10;
}
// It's more compact, too!
This is be no means exhaustive, but it gives most of the basics for what we need. Stick to your own styles and you’ll be able to create great code!
Step 3: Characteristics & Features
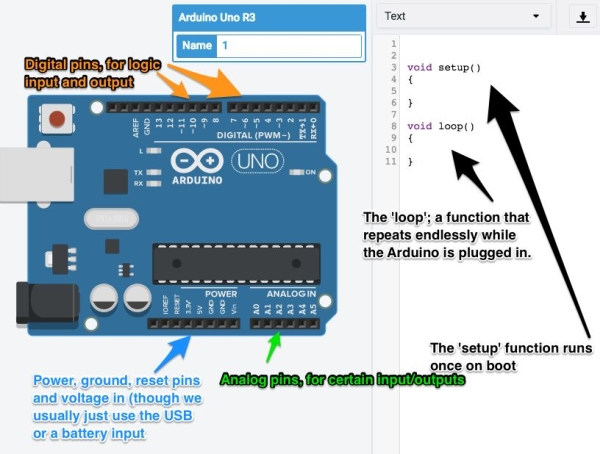
If you haven’t seen an Arduino before, or aren’t familiar with it, let’s look at the characteristics of the board and features of the environment.
First, the Arduino is a prototyping board with a microprocessor attached that is capable of controlling inputs, outputs and talking to other devices. It uses C++ as a core programming language. Take a look at the image. There are:
- Digital pins for logic input and output. This can be a simple True / False, or it can be used as an analog pin with a little code. You can also attach lights and other devices that can be turned on and off with 5v power. We’ll use these for a number of things. You can extend these with other devices, too.
- Analog pins are read/write pins too, but they are not digital and don’t provide a logic output or input. These are good for resistive devices like temperature or light sensors.
- Power and ground – these are provided so you can route power to a device without using up a digital pin set to high. We often use a breakout board to extend these pins as they are very useful and easily extended
That’s the board. For the code, we have two critical functions. Let’s look at these.
void setup() {
}
This function runs once every time the Arduino loads, like when you plug it in to a USB outlet or you connect a battery. It only runs once and cannot be called (without potential problems).
void loop() {
}
The loop runs endlessly after the setup function completes, and it will not halt unless the board is unplugged, you accidentally crash the loop or exit it prematurely.
Whenever you start your code, you should delete everything in the Arduino IDE (an Integrated Development Environment) or in Tinkercad. Often, these programs put stuff in there to show you where to start, but it can get in the way, so clear it and that way you won’t run in to issues that aren’t yours.
Step 4: Functions
A function is a piece of code that runs when we call it. They usually provide a return value, but in some cases, no value. We know this because the function starts with void. This means that compiler won’t expect a return value at the end of the function. If I was to write a function like this –
bool myFunction(){
	// do something
	return someBooleanValue;
}
Then the function would be required to return a value of either true or false. Normally, in the loop() function, we do all the work we need to do. We can extract parts of this work into other functions, or we can create our own classes that help us attach objects we can interact with. We’ll do more in another tutorial, though!
Step 5: Variables
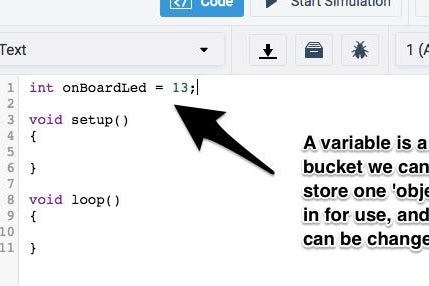
The images above capture declaration of variables on the global scope. Wait, what?!
The global scope is like the root of the program. It’s a space where all functions can access your variables. This is good and bad. Sometimes, it can cause conflicts and sometimes, it can help functions communicate easily. Generally, you would declare variables here that need to be declared once and used many times. Try and only access/change/update them in one location, though. The idea is that if multiple functions are updating the same variable, then you might have an unexpected result or code that is really hard to follow, but we can get to that when we discuss functions. Let’s look at the code.
int onBoardLed = 13;
In this first line of code, we are doing three things. First, we name a variable onBoardLed. A variable is a bucket, and we can put stuff into that bucket as long as it is the same type. Array’s are a little different, but that’s for later. The second thing we are doing is using an assignment symbol. The equals sign indicates the variable will hold that value. In this case, we are assigning an integer – a whole number. Hence, at the start of the line we typed int. That makes this type an integer type variable. We can also use:
- float (decimal number, 7 digits of precision)
- double (decimal number, 15 digits of precision)
- bool (true/false, 0/1)
- char
These are the main ones we will use in Arduino. For the time being, it’s unlikely we will even use an Array, but we’ll still cover them later.
When assigning a variable, remember that the value of a variable can be changed. So the following is valid:
int onBoardLed = 13;
onBoardLed = 12;
This might have unexpected results. Let’s look at a better example.
const int onBoardLed = 13;
int someInteger = 0;

void SomeFunction() {
	onBoardLed = 9;
	someInteger = 9;
}
In this example, I assigned the onBoardLed to a const int – a constant integer. This is no longer a variable but a constant, which means it cannot change. The first line inside SomeFunction would fail, because you’re trying to assign a value to a constant. Try it in Tinkercad! Type the code in and click Start Simulation. You’ll see the compiler will throw an error.
Delete the code from Tinkercad you typed in and go back to the two basic functions in the image above. You can re-type the constant for onBoardLed. You should have this:
const int onBoardLed = 13;

void setup() {
}

void loop() {
}
The other place we can assign variables in within the local scope, which is within a function. If you do that, the variable is only available within that function and not by another. Let’s see an example.
// A global variable
int myVar = 10;

void SomeFunction() {
	// A local variable
	int fooVariable = 15;
}

void anotherFunction() {
	// If I tried to reference fooVariable here, the code would fail
	fooVariable = 5;

	// But I can reference myVar
	myVar = 5;
}
You’ll notice the errors created (see fourth image for the error).
The general principle is:
- If you want to declare variables, do so globally if you know you’ll need to access them in a number of functions. For Arduino, we’ll declare variables for pins and some other reference points we don’t want constantly updated or reset. In the next step, we’ll do a practical example of this.
- Declare variables you’re happy to destroy locally – sometimes we don’t need to keep track of every variable, so we can ‘lose’ them each time the program loops.
So, that’s variables. Let’s do a practical example on the Arduino.
Source: Arduino 101
- How do I set up the environment in Tinkercad?
Select All components, search for and drag an Arduino board, switch the code menu to Text, and clear existing code leaving only void setup() and void loop(). - What is the best way to name variables in Arduino?
Use camel case where the first word is lowercase and subsequent words start with a capital letter. - Does the void setup function run multiple times?
No, it runs once every time the Arduino loads or connects to power. - Can I change the value of a constant integer?
No, assigning a new value to a const int will cause the compiler to throw an error. - What is the difference between global and local variables?
Global variables are accessible by all functions, while local variables exist only within the specific function they are declared in. - Which pins are suitable for resistive devices like temperature sensors?
Analog pins are read/write pins designed for resistive devices such as temperature or light sensors. - Why should I declare one or two variables maximum on one line?
This practice makes debugging easier and improves code readability compared to cramming multiple instructions on a single line. - What happens if the void loop function crashes?
The loop will not halt unless the board is unplugged, the loop is accidentally crashed, or it is exited prematurely.