Summary of Arduino 101 Fundamentals
This guide introduces Arduino sketch fundamentals for beginners, explaining core structures like `setup()` and `loop()`. It details essential functions including `pinMode`, `digitalWrite`, `delay`, `digitalRead`, `Serial.begin`, `analogRead`, and `analogWrite`. The article provides step-by-step examples using the Blink, DigitalReadSerial, and ReadAnalogVoltage sketches to demonstrate controlling LEDs, reading push buttons, and adjusting brightness with a potentiometer.
Parts used in the Arduino Sketch Fundamentals Project:
- Arduino board
- Solder less breadboard
- LED
- Jumper wires
- Push button
- 10Kohm resistor
- Potentiometer
- Arduino IDE

The purpose of this instructable is to introduce the sketch writing fundamentals to all new comers to the Arduino world. It is meant to be a beginners guide that includes detailed explanation about the basic statements and functions. Most of the sketches I use are taken from the Arduino IDE for their simplicity. I wrote this guide when I first started working with Arduino as a way to help me code easier.
For the purpose of this instructable, I modified it this document a little bit to make it a better fit for everyone.
I hope you like it, if you have comments or questions do not hesitate to ask.
Happy building.
Step 1: The Basics
To load the most basic Arduino sketch, open the Arduino IDE click on file then examples then 01.Basics and select the BareMinimum.
Here is the sketch:
void setup() {
// put your setup code here, to run once:
}
void loop() {
// put your main code here, to run repeatedly:
}
Essentially this is a complete code, it complies and can be uploaded to the Arduino but there is nothing in this code. It is important to understand this code structure because every Arduino sketch will contain a void setup() and a void loop() functions even if they are empty. The sketch will not compile without either one.
The void setup() is the first function to be executed in the sketch and it is executed only once. It usually contains statements that set the pin modes on the Arduino to OUTPUT and INPUT, example:
pinMode (12, OUTPUT);
pinMode(11, INPUT);
Or to start the serial monitor example: serial.begin(9600);
There are other statements that can be included in the void setup(),the above functions were only examples, but the important thing is to remember that the setup() is a statement that runs only once at the beginning of the sketch.
The void loop() is a function that executes indefinitely until you power off the Arduino. The functions in the void loop() usually manipulates the Arduino’s I/Os , example: Write a HIGH or LOW to a certain pin, and the data collected from them , example: Change the temperature sensor value from Celsius to Fahrenheit . You can also call upon local and global variables as well as other functions. In short this were the magic happens.
Step 2: PinMode(), DigitalWrite() and Delay()

In this example I will introduce you to three statements that will be used in almost all Sketches. To follow this example, load the blink sketch from the Arduino IDE. It can be found in File then Examples then 01.Basics and select Blink.
You will need and Arduino, a solder less bread board, an LED, and two jumper wires.
Connect the short –ve prong of the LED to the GND on the Arduino and the long +ve prong to PIN 13 on the Arduino.
The Sketch:
void setup() {
pinMode(13, OUTPUT); // initialize digital pin 13 as an output.
}
void loop() {
digitalWrite(13, HIGH); // turn the LED on (HIGH is the voltage level)
delay(1000); // wait for a second
digitalWrite(13, LOW); // turn the LED off by making the voltage LOW
delay(1000); // wait for a second
}
Let’s dissect the sketch:
void setup() {
pinMode(13, OUTPUT); // initialize digital pin 13 as an output.
}
We already established that the void setup() is a function that runs only once at the beginning of the sketch. Within this function there is a statement called pinMode(). The job of the pinMode statement is to set the Arduino pins to OUTPUT or INPUT. OUTPUT means that this pin will produce a result like turning on or off an LED. INPUT is used to prepare the pin to receive information from a connected device like a sensor.
pinMode(Pin, Mode): The Pin can be any physical pin on the Arduino, you can use Pin number like 1, 2, 3 etc… or you can use the variable name assigned to this pin, example LED1, pinLed, etc… The Mode is OUTPUT or INPUT in capital letters. Example:
- pinMode(11, OUTPUT);
- pinMode(echo, INPUT);
Curly braces{}: Are used to define the beginning and the end of functions and certain statements. The braces are not only used with the void setup(), they are used throughout the sketch including the void loop, if statements, user defined functions, etc… every opening { should be followed by a closing } otherwise the code will produce an error when compiling.
Semicolon ;: Are used to define the end of a statement. Missing a semicolon will also produce an error while compiling the code. They are also be found separating elements in a for loop.
Line comment //: Anything written after the // is not used by the program and they are optional. However it is usually good practice to add comments so that other people can understand the code also later on when the code gets bigger and more complicated, it will help the programmer not to lose track of the code.
Back to the code:
void loop() {
digitalWrite(13, HIGH); // turn the LED on (HIGH is the voltage level)
delay(1000); // wait for a second
digitalWrite(13, LOW); // turn the LED off by making the voltage LOW
delay(1000); // wait for a second
}
Within the curly braces of the void loop there are two new statements: digitalWrite() and delay().
digitalWrite() changes the status of a pin by either writing a 5V or 0V using the following syntax:
- digitalWrite(13, HIGH); this will write 5V to pin 13 on the Arduino
- digitalWrite(LEDpin, LOW); this will write a 0V to the variable LEDpin
essentially if you have an LED on PIN 13 on the Arduino, using digitalWrite(13, HIGH); will turn on the LED and using digitalWrite(13,LOW); will turn off the LED.
delay() is straight forward, it is used to delay the execution of the next statement by the amount of milliseconds within the (). Example:
- delay(1000) means delay the execution of the next statement by 1000 milliseconds or 1 second.
Step 3: Variables
In this example I will introduce the concept of variables and the statements Serial.begin(), Serialprintln() and digitalRead(). So fire up the Arduino IDE and load the DigitalReadSerial sketch from File à Examples à 01.Basics.
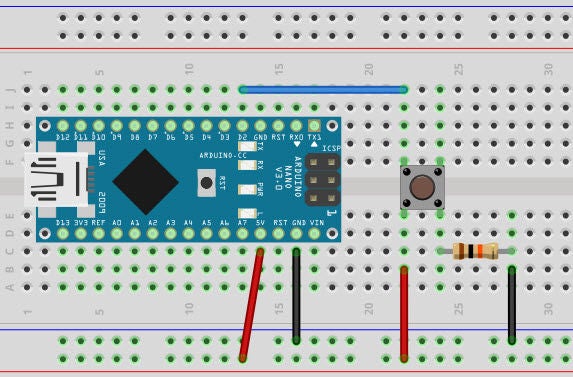
You will need an Arduino, a push button, a 10Kohm resistor, a solder less breadboard and some jumper cables. Connect the push button on the breadboard as in the picture. One pin of the button connects on the 5v on the Arduino, the other pin connects to the resistor then to the GND on the Arduino. The third pin connects to Pin 2 on the Arduino.
The Sketch:
int pushButton = 2; // digital pin 2 has a pushbutton attached to it. Give it a name
void setup() {
Serial.begin(9600); // initialize serial communication at 9600 bits per second
pinMode(pushButton, INPUT); // make the pushbutton’s pin an input
}
void loop() {
int buttonState = digitalRead(pushButton); // read the input pin:
Serial.println(buttonState); // print out the state of the button
delay(1); // delay in between reads for stability
}
Let’s dissect the sketch:
int pushButton = 2;
int pushButton = 2; is a variable declaration statement that precedes the void setup() function. A variable is the bread and butter of all programming. It is used to store information to be used later in the code. In this case we are declaring that a variable called pushButton of the type int(integer) is assigned to digital pin number 2 on the Arduino. Variables that are declared before the void setup() are called global variables because they can be used by any function within the code. Since we declared pushButton before the void setup(), this variable can be used in the void setup() and the void loop(). On the other hand variables that are declared within a function, can only be used by that function and they are called local variables (we will see an example later on).
Variables have different types used to store different types of data:
Variable type Size Range
boolean 8 bits 0 or 1
byte 8 bits 0 to 255
char 8 bits -128 to 127
unsigned char 8 bits 0 to 255
int 16 bits -32768 to 32767
unsigned int 16 bits 0 to 65535
word 16 bits 0 to 65535
long 32 bits -2,147,483,648 to 2,147,483,647
unsigned long 32 bits 0 to 4,294,967,295
float(decimal numbers) 32 bits -3.4028235E+38 to 3.4028235E+38
double 32 bits -3.4028235E+38 to 3.4028235E+38
Once a global variable is declared, it can be called upon by any function using the name selected by the programmer (case sensitive). If the programmer decides to use pin 5 on the Arduino instead of 2, the only change needed is “int pushButton = 5;”. There is no need to go through the code to replace 2 with 5. Also it’s good coding ethics to select a descriptive name for the variable to easily identify it and also include the line comments “//” to elaborate further.
void setup() {
Serial.begin(9600); // initialize serial communication at 9600 bits per second
pinMode(pushButton, INPUT); // make the pushbutton’s pin an input
}
Serial.begin(): starts the serial monitor port and sets the speed rate in bauds per second. According to arduino.cc you can use one of the following speeds to communicate with the computer 300, 600, 1200, 2400, 4800, 9600, 14400, 19200, 28800, 38400, 57600, or 115200. This is useful to display information on your computer screen. In this case we will display the state of the button by displaying 1 if the button is pressed and 0 if the button is not pressed. Once the program is uploaded to the Arduino you can start the serial monitor by clicking on Tools then Serial Monitor from the Arduino IDE.
pinMode(pushbutton, INPUT): Sets the mode of the pin defined by the variable pushbutton to INPUT.
void loop() {
int buttonState = digitalRead(pushButton); // read the input pin:
Serial.println(buttonState); // print out the state of the button
delay(1); // delay in between reads for stability
}
A new variable is declared within the void loop() called buttonState (local variable). This variable is of the type int and is initialized with the value of the pin 2. Here is a good example on how to initialize a variable without using a number but by using statement called digitalRead().
digitalRead(): is a statement that can be used with pins that are set to INPUT. Since pin 2 was set to INPUT mode, using digitalRead() we can read the value in this pin. In this case the value will be either 1 if the button is pressed or 0 if the button is not pressed. The syntax is digitalRead(pin# or variable);.
Serial.println(): This statement prints the value within the brackets on the serial monitor with a line break. You can use the statement Serial.print() to print without line break. In this sketch the value stored in the variable buttonState will be printed.
delay(1): This is a delay for only 1 millisecond used to give stability in between reads
Step 4: AnalogRead() and AnalogWrite()
In this example I will demonstrate the use of the two statements analogRead() and analogWrite(). The sketch I am using is called ReadAnalogVoltage that it can be loaded from File/ Examples/01.Basics, and I added few lines to demonstrate analogwrite().
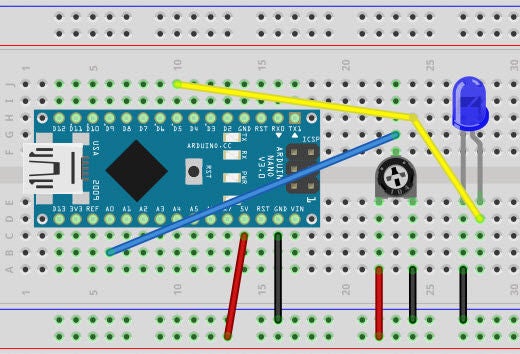
You will need an Arduino, a potentiometer, an LED and few jumper wires. Connect the middle pin of the potentiometer to pin A0 (analog 0) on the Arduino, then the +ve lead to the 5v on the Arduino and the -ve lead to the GND on the Arduino. And Connect the +ve Lead of the LED to D5 on the Arduino and the -ve lead to GND.
In this Sketch the value of the pin A0 will be printed on the serial monitor and at the same time the brightness of the LED will change when we turn the potentiometer.
The Sketch:
int LEDpin = 5; //digital pin 5 has an LED attached to it
void setup() {
Serial.begin(9600); // initialize serial communication at 9600 bits per second
pinMode(LEDpin, OUTPUT); // set the pin mode on pin 5 to OUTPUT
}
void loop() {
int sensorValue = analogRead(A0); // read the input on analog pin 0
float voltage = sensorValue * (5.0 / 1023.0); // Convert the analog reading (which goes from 0 – 1023)
to a voltage (0 – 5V)
analogWrite(LEDpin, voltage); //Apply the voltage value to the LED pin
Serial.println(voltage); // print out the value you read:
}
Let’s dissect the sketch:
int LEDpin = 5;
This is a variable of the type int called LEDpin decalring that there is an LED on pin 5 on the Arduino.
void setup() {
Serial.begin(9600);
pinMode(LEDpin, OUTPUT);
}
Serial.begin(9600): Starts the serial monitor with the speed 9600 bauds per seconds
pinMode(LEDpin, OUTPUT): Sets the pin Mode of pin 5 on the Arduino to OUTPUT.
void loop() {
int sensorValue = analogRead(A0);
float voltage = sensorValue * (5.0 / 1023.0);
analogWrite(LEDpin, voltage);
Serial.println(voltage);
}
analogRead(): The first line is declaring a new local variable called sensorValue of the type int and is assigned the value that we read from the analog pin A0 on the Arduino. The digital pins can read and write 1 and 0, however the analog pins on the Arduino can read and write values between 0 and 1023.
The second line introduces a new variable of the type float (with decimals) called voltage, the value of this new local variable is sensorValue*(5.0/1023.0). Now we can see that the value of a variable can be manipulated using a mathematical equation. Since the analog pins yield results between 0 and 1023, and we want to convert this value to volts between 0 and 5 volts. So we take the value we got in sensorValue and multiply it by 5.0/1023.0 this gives us a value between 0 and 5 volts.
Example: If we turn the potentiometer half way, the analog read will be 512. Then we assign this value 512 to sensorValue.
According to the code float voltage = sensorvalue*(5.0/1023.0) then voltage = 512* (5.0/1023.0) = 2.50 volts
analogWrite(): using this statement we can write a new value into a pin, using the example above, assigning the value voltage to LEDpin will power up the LED if there is enough voltage.
Serial.println(): this will print the value of voltage on the serial monitor.
The LED that I used will turn on faintly when the voltage reaches 1.3 volts
Read more: Arduino 101 Fundamentals
- What are the two required functions in every Arduino sketch?
Every Arduino sketch must contain void setup() and void loop(), even if they are empty. - How does pinMode() work in the setup function?
It sets Arduino pins to OUTPUT or INPUT modes, such as setting pin 13 as an output. - Can I use variables instead of pin numbers in code?
Yes, you can assign variable names like LED1 or echo to specific pin numbers for easier management. - What is the difference between global and local variables?
Global variables declared before setup() can be used by any function, while local variables inside a function are only accessible within that function. - How do I read the state of a push button connected to an input pin?
You use the digitalRead() statement on the pin set to INPUT mode to get a value of 1 or 0. - What speed rates can be used for Serial.begin() communication?
Common speeds include 9600, 14400, 19200, 28800, 38400, 57600, and 115200 bits per second. - How does analogRead() differ from digitalRead()?
Analog pins read values between 0 and 1023, whereas digital pins only read 1 and 0. - What happens when I use analogWrite() with a voltage value?
It applies the calculated voltage value to the specified pin to control device behavior like LED brightness.