Summary of Android talks to Arduino board
This project modifies Google's Android Bluetooth Chat sample so text typed on the Android app is sent via Bluetooth to an Arduino Uno and displayed on a parallel LCD; the Arduino also sends a periodic message back to the Android app. It details required hardware, software, BAUD-rate configuration (set BlueSMiRF to 57600), wiring, and testing steps to enable two-way Bluetooth communication between Android and Arduino.
Parts used in the Bluetooth Chat to Arduino LCD project:
- Arduino Uno (ATmega328, 16MHz, 5V)
- Bluetooth modem BlueSMiRF Gold / FireFly (Sparkfun WRL-00582)
- Parallel LCD (e.g., Sparkfun LCD-09051)
- 10k potentiometer
- Wires for connections
- Computer with FTDI chip (to change BAUD rate)
- Android phone (for running Bluetooth Chat app)
- HyperTerminal or TeraTerm (for changing BAUD)
- NewSoftSerial library (Mikal Hart)
This project slightly modifies the Google Android sample app called “Bluetooth Chat” so you can type a message in the Android app and that same message will appear on an LCD attached to an Arduino Uno.
Functionality: Android talks to Arduino
1. Run the Android “Bluetooth Chat” sample app (after we modify the app in this instructable). Type a message in the app’s text box and press the “send” button. The message you typed echoes on the app display.
2. Message travels through the air from the built-in Android Bluetooth modem to the Bluetooth modem connected to the Arduino Uno.
3. Arduino Uno receives the typed message.
4. The Arduino Uno prints the typed message on the LCD.
Functionality: Arduino talks to Android
1. Every 30 seconds, the Arduino sends a message (“hello from Arduino”) to the Android phone via Bluetooth.
2. The Arduino message appears on the Android “Bluetooth Chat” sample app display.
Why? Just an easy way to test the Arduino’s ability to not only receive messages from, but send messages to the Android phone. You can take the example sketch and change it however you want.
Step 1: Hardware list
– Arduino Uno (328, 16MHz, 5V).
– Bluetooth Modem: BlueSMiRF Gold, aka FireFly (Sparkfun sku: WRL-00582).
– Parallel LCD (Sparkfun sku: LCD-09051 but you can use pretty much any parallel LCD).
– 10k Potentiometer.
– Wires to connect electronic components.
– Computer and FTDI chip (to change BAUD rate).
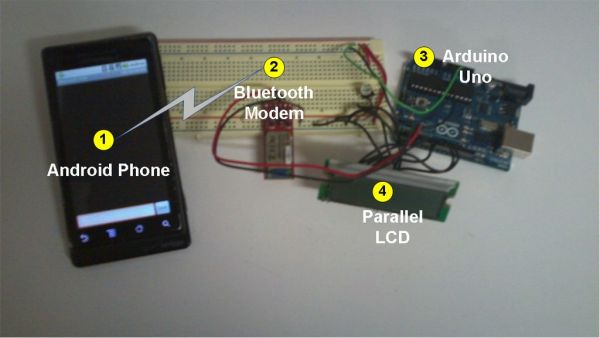
– Android Phone (I used a Motorola Droid – operating system v2.2.2 – but Google has sample code for all versions).Assemble your circuit as shown in the diagram. You don’t have to assemble anything between circle #1 and circle #2: that is the message going through the air from Android to the Bluetooth modem. Hey, I’m an Arduino beginner so I’m not assuming anything. 🙂
Step 2: Software List
– Arduino Source code from this project (bluetooth_chat_LCD.pde attached below)
– NewSoftSerial library from Mikal Hart: http://arduiniana.org/libraries/newsoftserial/
– Eclipse
– Android Development Kit (explicitly follow all of Google’s installation instructions)
– “Bluetooth Chat” Android sample code from Google: http://developer.android.com/resources/samples/BluetoothChat/index.html
– Hyperterminal or TeraTerm to change BAUD rateAndroid Beginners (like me):
Make sure you do at least a couple tests before you execute the rest of this instructable:
– Create a “hello, world” app (lots of examples out there) to make sure you have Android/Eclipse setup correctly to run an app on a virtual device.
– Plug in your Android phone and ensure that you can copy the “hello, world” app to your phone. Make sure your phone has debugging turned on. Settings –> Applications –> Development –> USB debugging (turn it on)
After you successfully copy an Android app to your actual phone, you can proceed with this instructable. Keep in mind that you are not going to be able to run this instructable on a virtual device; you have to have a real phone to deploy the “Bluetooth Chat” code.
 bluetooth_chat_LCD.pde
Step 3: Change BAUD rate on BlueSMiRF Gold
Change the BAUD rate from the default 115.2k to 57.6k. If you leave the BAUD at 115.2k, the parallel LCD will display gibberish when you send a message from Android to Arduino. If you set the BAUD below 57.6k, the Android phone will “cut up” the message that the Arduino sketch sends every 30 seconds. So 57.6k BAUD is just right.
– Arduino Uno (328, 16MHz, 5V).
– Bluetooth Modem: BlueSMiRF Gold, aka FireFly (Sparkfun sku: WRL-00582).
– Parallel LCD (Sparkfun sku: LCD-09051 but you can use pretty much any parallel LCD).
– 10k Potentiometer.
– Wires to connect electronic components.
– Computer and FTDI chip (to change BAUD rate).
– Android Phone (I used a Motorola Droid – operating system v2.2.2 – but Google has sample code for all versions).Assemble your circuit as shown in the diagram. You don’t have to assemble anything between circle #1 and circle #2: that is the message going through the air from Android to the Bluetooth modem. Hey, I’m an Arduino beginner so I’m not assuming anything. 🙂
Step 2: Software List
– Arduino Source code from this project (bluetooth_chat_LCD.pde attached below)
– NewSoftSerial library from Mikal Hart: http://arduiniana.org/libraries/newsoftserial/
– Eclipse
– Android Development Kit (explicitly follow all of Google’s installation instructions)
– “Bluetooth Chat” Android sample code from Google: http://developer.android.com/resources/samples/BluetoothChat/index.html
– Hyperterminal or TeraTerm to change BAUD rateAndroid Beginners (like me):
Make sure you do at least a couple tests before you execute the rest of this instructable:
– Create a “hello, world” app (lots of examples out there) to make sure you have Android/Eclipse setup correctly to run an app on a virtual device.
– Plug in your Android phone and ensure that you can copy the “hello, world” app to your phone. Make sure your phone has debugging turned on. Settings –> Applications –> Development –> USB debugging (turn it on)
After you successfully copy an Android app to your actual phone, you can proceed with this instructable. Keep in mind that you are not going to be able to run this instructable on a virtual device; you have to have a real phone to deploy the “Bluetooth Chat” code.
For more detail: Android talks to Arduino board
- What does this project do?
It modifies the Android Bluetooth Chat sample so messages typed on Android appear on an Arduino-connected LCD and the Arduino sends periodic messages back to Android. - What hardware is required?
Arduino Uno, BlueSMiRF Gold Bluetooth modem, parallel LCD, 10k potentiometer, wires, computer with FTDI, and an Android phone. - What software is required?
Arduino sketch bluetooth_chat_LCD.pde, NewSoftSerial library, Eclipse, Android Development Kit, Google Bluetooth Chat sample, and HyperTerminal or TeraTerm. - What BAUD rate should the BlueSMiRF be set to?
Set the BlueSMiRF BAUD rate to 57600. - Why not use 115200 or lower than 57600 BAUD?
115200 yields gibberish on the LCD; rates below 57600 cause the Android phone to cut up the Arduino's periodic messages. - Do I need a real Android phone to run this?
Yes, you must use a real Android phone; the instructable cannot be run on a virtual device. - How often does the Arduino send messages to the Android app?
The Arduino sends a message every 30 seconds. - What message does the Arduino send periodically?
The Arduino sends hello from Arduino every 30 seconds. - What initial Android setup steps are recommended?
Create and run a hello world app to verify Android/Eclipse setup and enable USB debugging on the phone.