LEDs are designed to emit light, but they also make surprisingly capable sensors. Using only an Arduino UNO, an LED and a resistor, we will build a hot LED anemometer that measures wind speed, and turns off the LED for 2 seconds when it detects you are blowing on it. You can use this to make breath controlled interfaces, or even an electronic candle that you can blow out!
Materials:
An Arduino UNO (with USB cable to connect to your computer)
A 1/4W 220 ohm resistor (https://www.amazon.com/Projects-25EP514220R-220-Re…)
A pre-wired, 0402 yellow LED (https://www.amazon.com/Lighthouse-LEDs-Angle-Pre-W…)
Breakaway header (https://www.amazon.com/SamIdea-15-Pack-Straight-Co…)
You will also need:
A computer to run the Arduino environment
Basic soldering equipment/skills
Step 1: How Does This Work?
When you run current through an LED, its temperature rises. The amount of rise depends on how effectively you are cooling it. When you blow on a hot LED, the extra cooling lowers the running temperature. We can detect this because the forward voltage drop of an LED increases as it gets cooler.
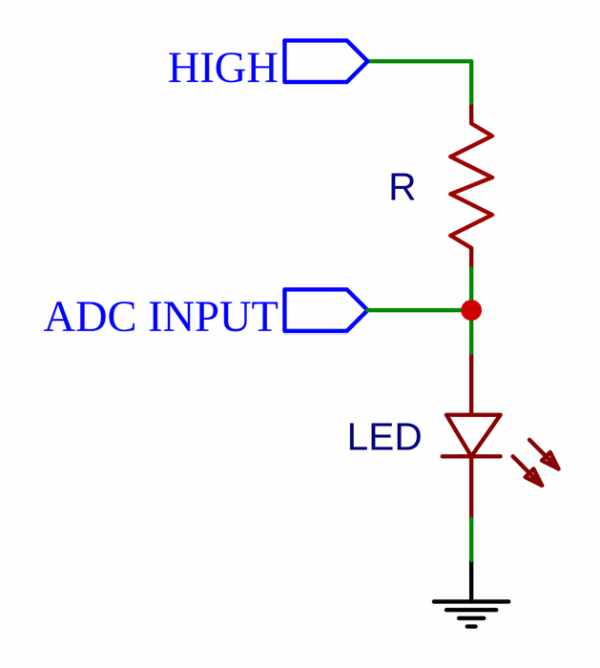
The circuit is very simple and looks much like driving an LED. The only difference is that we will add an extra wire to measure the voltage drop of the LED while it is on. To work well, you want to use a very small LED (I suggest using an 0402 surface mount LED) connected by the thinnest possible wires. This will allow the LED to heat and cool very quickly, and minimize the heat lost through the wires. The voltage changes we are looking for are just millivolts – at the very edge of what can be reliably detected via the UNOs analog pins. If the LED is resting on something that conducts heat away, it may not be able to get hot enough, so it works best if it is up in the air.
Step 2: Get the LED and Resistor Ready to Connect to Your Arduino UNO
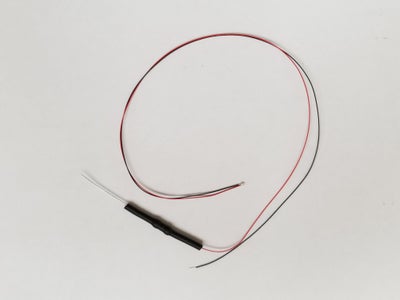
Soldering extremely thin wires to very small surface mount LEDs takes a fair amount of skill. Fortunately, you can simply buy pre-wired, 0402 LEDs. These often come with a resistor (covered in heat shrink in the picture) that is sized for 12V operation. If that’s what you get, you will need to cut off the resistor. If you cut through the heat shrink tubing next to the resistor bulge, you’ll probably be able to pull off the remaining tubing leaving some exposed wire lead for soldering. If you just cut the wire, you will need to strip off a small amount of insulation so that you can solder, and given the thickness of the wire, this can be tricky.
The wires are much too skinny to make a good connection in an Arduino header, so we will need to solder them to something fatter. I used pins from a breakaway header to do the connections, but you can use just about any scrap of appropriate gauge wire. The back (cathode) wire from the LED is soldered to a single breakaway header pin. The red (anode) wire should be soldered to the bent resistor as shown. Trim the leads on the resistor to equal length and solder them to two adjacent header pins as shown in the figure.
Step 3: Connections
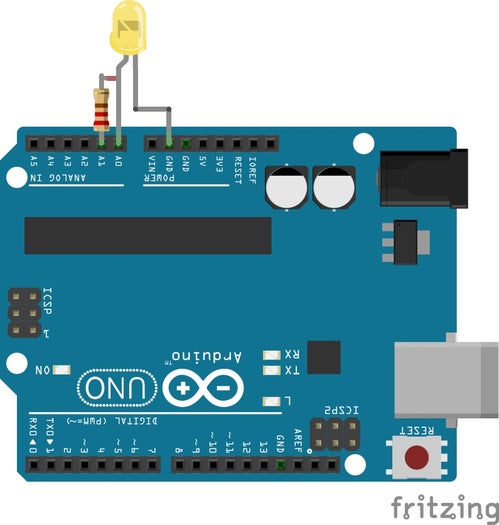
Connect the LED/resistor as shown in the figures. The side of the resistor connected to the red LED wire goes to A0. This will be where we measure the voltage on the LED using the analog input capability. The other side of the resistor goes to A1, which we will use as a digital output, setting it high to turn on the LED. The black wire must be connected to GND. Any of the Arduino GND pins can be used.
Step 4: Code
Download the code and open it in the Arduino IDE. You can then upload it to your Arduino.
The program first sets up the pin directions and lights the LED. It then measures the forward voltage drop of the LED via an analogRead on pin A0. To improve the accuracy of the measurement, we read the voltage 256 times in quick succession, and sum the result. (Oversampling like this can increase the effective resolution of the conversion so that we can see changes that are smaller than the smallest step on the converter.) If the data buffer sensedata[] is full, we compare the latest sum to the oldest we have stored in the buffer to see if a recent cooling has raised the LED voltage by at least MINJUMP. If it hasn’t, we store sum in the buffer, update the buffer pointer, and start the next measurement. If it has, we turn off the LED for 2 seconds, reset the buffer and then start the process over again.
Source: An LED You Can Blow Out Like a Candle!