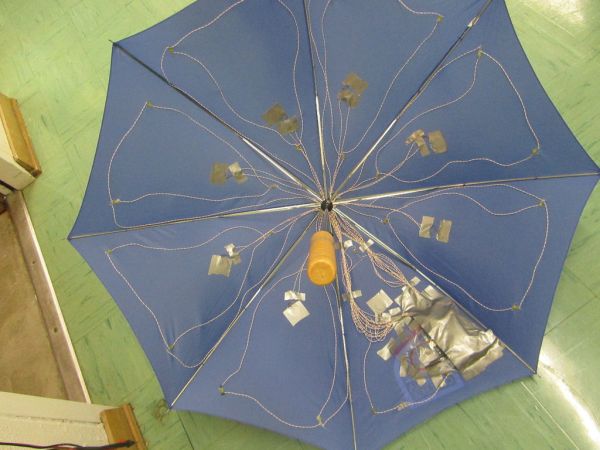
Once upon a time, 2 girls greatly enjoyed walking in the rain with umbrellas.
They decided the enjoyment of this experience could be maximized by building their own pressure-activated web of LEDs to install under their umbrella.
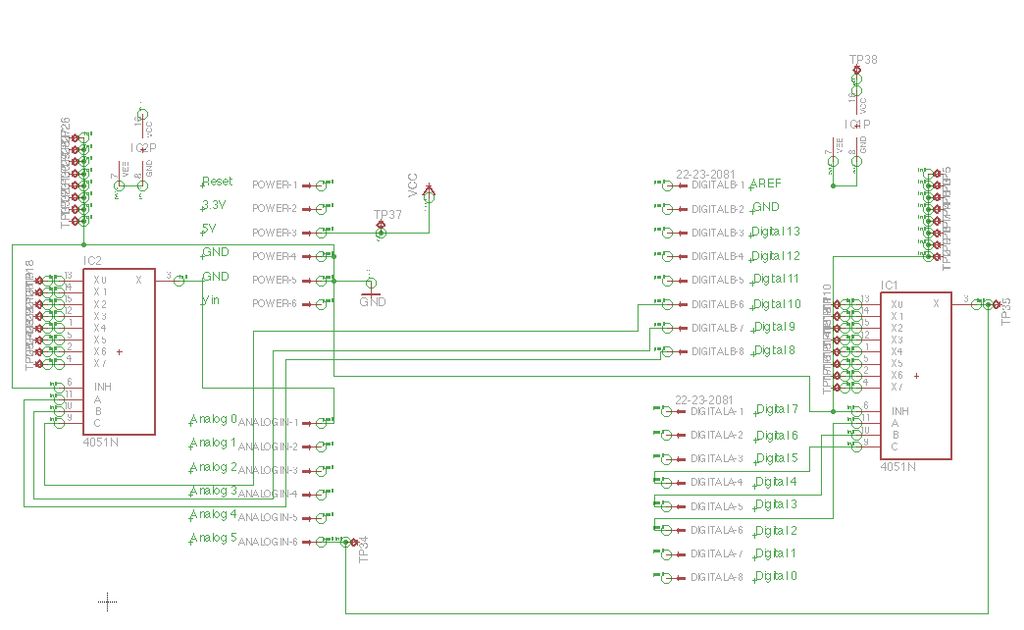
Thus, with the help of an Arduino, some 4051 multiplexers, a lot of wire and a lot of solder, they set off on their path to success.
Step 1: Materials List
Just based on size, we decided to use 24 LEDs to light our umbrella, with 8 strands of 3 LEDs each emanating out from the central hub.
We used the following materials:
1 umbrella
1 Arduino Uno R3 microcontroller
1 9 V Battery
24 yellow LEDs (we advise that you use one with diffused light and a wide viewing angle, otherwise the size and color is up to you)
8 piezo sensor disks (we specifically ordered these from sparkfun: http://www.sparkfun.com/products/10293, though they are a bit fragile. You might want to look for something different.)
2 4051 multiplexers/demultiplexers
8 1 MΩ resistors (to be in parallel with the piezo sensors)
8 10 Ω resistors (to be in series with the LED strings)
LOTS of wire
LOTS of solder
Hot glue/hot glue gun
Electrical tape
Duct tape
Step 2: Program Arduino Code
Program your Arduino with the following code:
/***************************************
Pressure Activated Light-up Umbrella
by Shannon Lubetich and Emily Yang
***************************************/
int sensorReading = 0;
int r0 = 0;
int r1 = 0;
int r2 = 0;
int w0 = 0;
int w1 = 0;
int w2 = 0;
int count = 0;
void setup() {
Serial.begin(9600);
//initialize digital arduino pins as outputs to control the selecting process for our 4051 multiplexers
pinMode(2, OUTPUT); //r0
pinMode(3, OUTPUT); //r1
pinMode(4, OUTPUT); //r2
pinMode(8, OUTPUT); //w0
pinMode(9, OUTPUT); //w1
pinMode(10, OUTPUT); //w2
}
void loop(){
//cycle through each piezo disk and corresponding string of LEDs
for(int i = 0 ; i < 8; i++){
//read the analog value of the piezo disk pressure sensor
reading(i);
//send the trigger from the pressure to the LEDs
writing(i);
}
}
void reading(int sensor){
//uses binary to select the correct input to read on the 4051 multiplexer
sensorReading = 0;
r0 = bitRead(sensor, 0);
r1 = bitRead(sensor, 1);
r2 = bitRead(sensor, 2);
digitalWrite(2, r0);
digitalWrite(3, r1);
digitalWrite(4, r2);
sensorReading = analogRead(A5);
//slowly prints results to the serial monitor
count++;
if(count % 1000 == 0){
Serial.println(sensorReading);
}
}
void writing(int LED){
//uses binary to select the correct output to write to on the 4051, here used as a demultiplexer
w0 = bitRead(LED, 0);
w1 = bitRead(LED, 1);
w2 = bitRead(LED, 2);
digitalWrite(8, w0);
digitalWrite(9, w1);
digitalWrite(10, w2);
//if measured pressure above a certain threshold, trigger string of LEDs
if (sensorReading >= 15){
analogWrite(A0, sensorReading*25);
delay(125);
}
//otherwise, leave LEDs off
else{
analogWrite(A0,0);
}
}
***We were inspired by the following project, and looked at the code for it, but ended up developing our own. However, if you are interested in making an umbrella that plays musical notes due to press, this is a great page: http://whyyesihaveawebsite.com/arduino/?p=6&fb_source=message
IMPORTANT: 4051 chips are TRICKY! Take heed!
For more information about the 4051 chip, used as a multiplexer or demultiplexer, refer to Arduino playground’s page at http://www.arduino.cc/playground/Learning/4051

You should keep the schematic handy to reference all the input/output pins and where they need to be connected.
Step 3: Mock-up
You should test out your circuit on a small scale before going crazy with wires and solder.
We did this by using 2 bread boards, placing a 4051 multiplexer/demultiplexer in each, and then connected inputs/outputs to the correct places on the Arduino.
Once again, refer to the schematic at http://www.arduino.cc/playground/Learning/4051.
1 Arduino Uno R3 microcontroller
1 9 V Battery
24 yellow LEDs (we advise that you use one with diffused light and a wide viewing angle, otherwise the size and color is up to you)
8 piezo sensor disks (we specifically ordered these from sparkfun: http://www.sparkfun.com/products/10293, though they are a bit fragile. You might want to look for something different.)
2 4051 multiplexers/demultiplexers
8 1 MΩ resistors (to be in parallel with the piezo sensors)
8 10 Ω resistors (to be in series with the LED strings)
LOTS of wire
LOTS of solder
Hot glue/hot glue gun
Electrical tape
Duct tape
For more detail: Pressure Activated Light-Up Umbrella using an Arduino

