
Summary of Arduino light seeker
This Swiss project demonstrates a simple Arduino Uno light seeker. A servo motor rotates to face the brightest light source using two photoresistors for input. LEDs provide visual feedback: the right LED illuminates when turning clockwise, and the left LED lights up during counter-clockwise movement. The code calculates the difference between sensor readings; if the gap exceeds 30 units, the servo adjusts its angle by increments of 5 degrees.
Parts used in the Arduino Light Seeker:
- Arduino Uno
- Servo motor
- Two photoresistors
- Two LEDs
- 9V battery
- Resistors (200 Ohm for LEDs, 10 KOhm for photoresistors)
First of all, I’m from Switzerland so please excuse my english mistakes.
Here is one of my first little project I did with my Arduino Uno.
It’s is just a little light seeker. The servo turns towards the light.
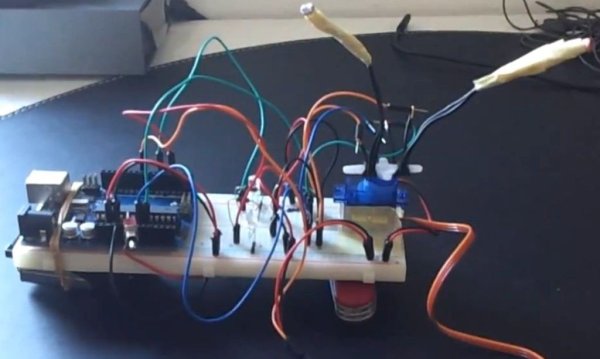
Step 1: The wiring
Here is the exact wiring I used.
The only difference is that I fixed the photoresistors on the servo (but I couldn’t do it with the program)
Also I used a 9V battery in the video, it was plugged in Vin and GND.
The resistors are 200 Ohm for the LED’s and 10 KOhm for the photoresistors.
Step 2: The code
This is my first code. I tried to translate the comments in english.
The Arduino calculate the difference between the left and right photoresistor and turns the servo if the difference is greater than 30.
When the servo is turning clockwise, the right LED lights up. When it turns counter clockwise, the left LED lights up
If you see any errors or weird thing, please tell me 🙂
#include
Servo servo; //define servo
//Variables
int photoD = 0;  //define pin 0 for right photoresistor
int photoG = 1;  //define pin 1 for left photoresistor
int ledD = 3;    //define pin 3 for right LED
int ledG = 5;    //define pin 5 for left LED
int incr = 5;     //value to add to the angle
int valS;          //angle
long temps;      //Time
long temps2;     //Time 2
long temps3;     //Time 3
long temps4;     //Time 4

//----------------------------------------------------------------------------
For more detail: Arduino light seeker
- How does the servo determine which direction to turn?
The Arduino calculates the difference between the left and right photoresistor values and turns the servo only if this difference is greater than 30. - What happens when the servo turns clockwise?
The right LED lights up when the servo rotates clockwise. - What resistor values are used for the components?
The project uses 200 Ohm resistors for the LEDs and 10 KOhm resistors for the photoresistors. - How much does the servo angle change per step?
The servo angle increases or decreases by an increment value of 5 degrees. - Which pins are assigned to the photoresistors?
Pin 0 is defined for the right photoresistor and Pin 1 is defined for the left photoresistor. - How is the power supply connected in the video?
A 9V battery was plugged into the Vin and GND pins. - What visual feedback indicates counter-clockwise movement?
The left LED lights up when the servo turns counter clockwise.