Summary of Infinite Disco
This article details the construction of a sound-reactive infinity mirror shaped like a dodecahedron using an Arduino Uno. The project involves prototyping on a breadboard, programming via the Arduino IDE with the FastLED library, and assembling physical components from MDF and plexiglass cut to specific dimensions. The final assembly includes soldering LED strips into sections and connecting them to a perfboard for a durable build.
Parts used in the Sound-Reactive Dodecahedron Infinity Mirror:
- Arduino Uno
- 3mm thick 100x50cm MDF
- 2mm thick 100x50cm plexiglass
- 3 meter WS2812B LEDstrip 60 LEDs/m
- Sound Detection Sensor Module 3-PIN
- Thin electric wire (10ish meter total)
- Breadboard
- Perfboard/stripboard
- Simple rectangular rocker switch
- Wall plug to 5V 8A adapter
- 220Ω resistor
- 1 m^2 one-way mirror film
- 470uF 16V capacitor
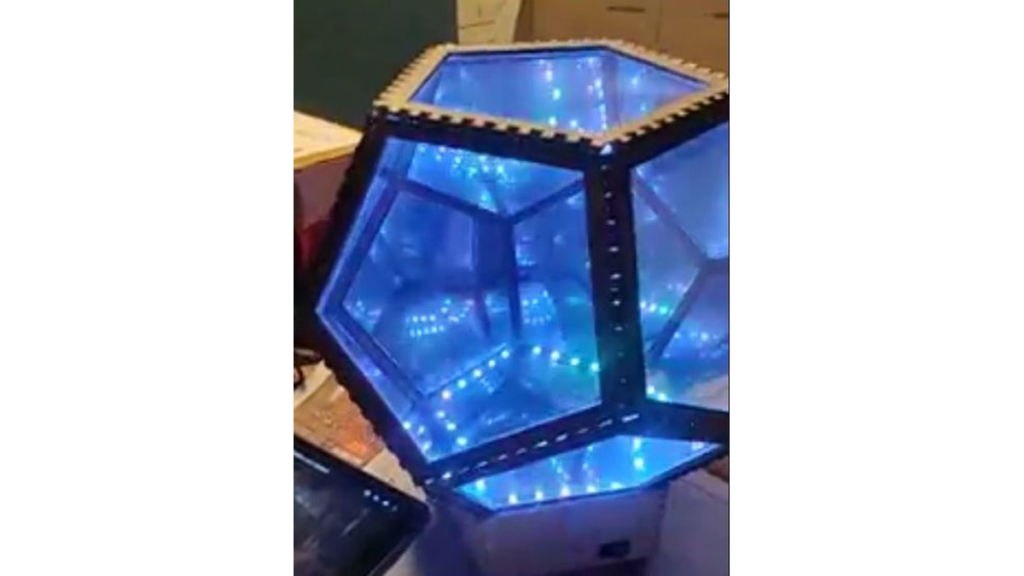
In this project, I made an infinity mirror based on a dodecahedron that reacts to sound .
Step 1: Materials
Essential materials:
- Arduino Uno
- 3mm thick 100x50cm MDF
- 2mm thick 100x50cm plexiglass
- 3 meter WS2812B LEDstrip 60 LEDs/m
- Sound Detection Sensor Module 3-PIN
- Thin electric wire (10ish meter total)
- Breadboard
- Perfboard/stripboard
- Simple rectangular rocker switch
- Wall plug to 5V 8A adapter
- 220Ω resistor
- 1 m^2 one-way mirror film (enough to cover the plexiglass pentagons)
- 470uF 16V capacitor
Optional materials:
- Spray paint
Tools:
- Soldering tools
- Somewhere to laser-cut (you could probably figure saw it with a lot of patience, but laser-cutting is advised)
- Multimeter
- Soap and water
- Small window wiper
- Scissors
- Hobby knife/Stanley knife
- Ruler
- Clear glue (or any strong glue you prefer)
- Insulation tape
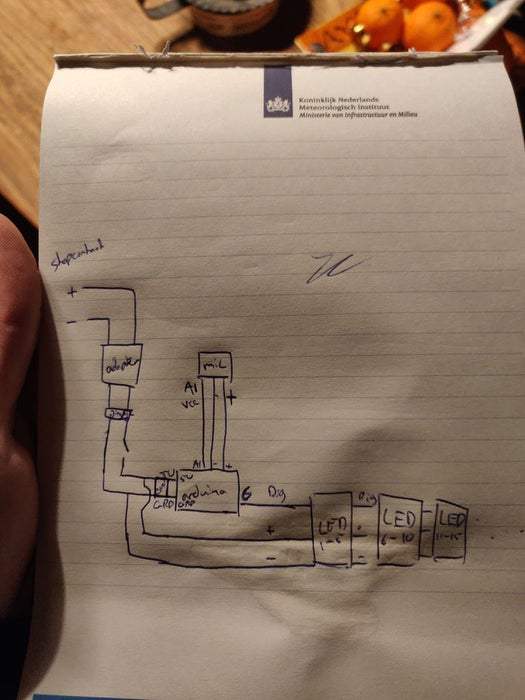
Step 2: Breadboard Prototyping
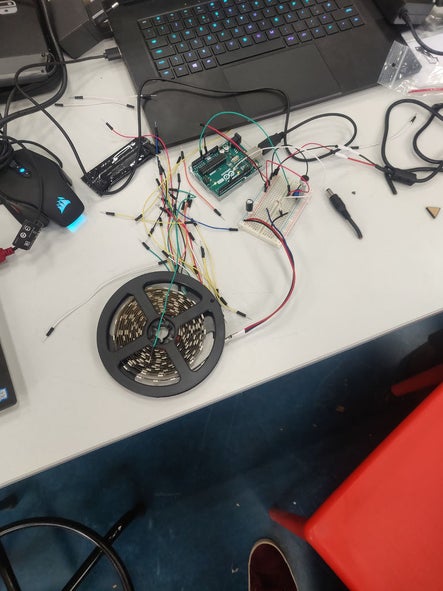
When you finally have all your materials it’s time for experimenting. Basically just connect all the components following the picture and see if they all function correctly before assembling the whole thing for real. (the screw-like thing on the mic is there to adjust the sensitivity). Don’t connect the Arduino to both the power supply and your computer, always just either one.
Step 3: Programming
To program the Arduino you need the Arduino IDE software, which you can download here.
Just copy paste the text into the editor and upload it to you Arduino after installing the FastLED library: Sketch > Import Library > FastLED.
Step 4: Cutting Parts
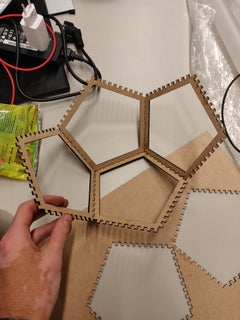
The next step is to actually produce the parts for the frame. this is where you will need the MDF and the plexiglass. If you’re going the laser-cutting route just import the .dxf files into the machine and resize them if necessary (the box around the parts is purely for resizing purposes and does not have to be cut). the frame should be 90×50 cm and the plexiglass should be 64×44 cm. Make sure you do this with someone that is experienced with laser cutters.
After you cut the frame it should all fit together to form the dodecahedron.
Step 5: Soldering
When you’re absolutely sure that the breadboard prototype works you can continue with soldering. For this, you need to cut the LEDstrip into 30 sections of 5 LEDs. The routing for the wires (which way they should go and if they should be long or short) can be found on the included picture (white being the strips, blue being returning wires and purple being the ribs that were already routed).
I recommend testing the newly added section with the Arduino to make sure everything works in the end. Also, don’t forget that you’re soldering LEDs so you can’t make the current go through them backward and neither can you solder them parallel.
After you’re done with the LEDstrip solder the rest of the electronics to the Perfboard, in the same manner, you connected them with the use of the breadboard (same circuit), just add the switch in the red cable of the power adapter before it’s connected to anything else, so you can use this as an off/on switch.
Source: Infinite Disco
- What software is required to program the Arduino?
You need the Arduino IDE software which can be downloaded online. - How should the LED strip be cut for this project?
The LED strip must be cut into 30 sections containing 5 LEDs each. - Can I connect the Arduino to both the power supply and my computer simultaneously?
No, you should always connect to either the power supply or your computer, but not both. - What is the recommended method for cutting the frame parts?
Laser-cutting is advised, though sawing is possible with patience if laser cutting is unavailable. - Which library must be installed before uploading the code?
You must install the FastLED library by going to Sketch > Import Library > FastLED. - Where should the rocker switch be placed in the circuit?
Add the switch in the red cable of the power adapter before it connects to anything else. - What are the dimensions for the laser-cut plexiglass?
The plexiglass should be cut to 64x44 cm. - How many LEDs are there per section of the strip?
Each section of the cut LED strip contains exactly 5 LEDs.