Summary of Automatic Arduino Pet Feeder – 3D Printed (With Stepper Motor)
This article details a DIY automatic 3D printed pet feeder controlled by an Arduino. The device uses a stepper motor to dispense food at two user-programmed times via a keypad interface and real-time clock. The project involves 3D modeling, printing parts over five days, assembling electronics with specific drivers and displays, and uploading custom code to manage feeding schedules and manual overrides.
Parts used in the Automatic Arduino Pet Feeder:
- Stepper Motor NEMA17 - 42HB34F08AB
- Stepper Motor Driver A4988
- Arduino UNO
- Arduino Keypad 4x4
- RTC DS3231 Clock
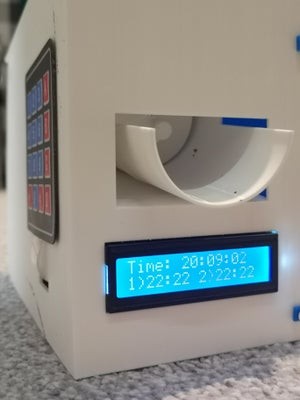
- LCD Display 16x2
- Step Down Module (LM2596S DC/DC) 12V to 5V
- 12V Power Supply
- Wires
- 3mm bolts (m3)
- 3mm nuts
Hi guys,
I made an automatic 3D Printed Pet Feeder (or just dispenser, but I use it to feed my dog). I 3D modelled all that project. U can print it by yourself. All parts are down there.
Basically how it works, is u type in two Feeding Times, for example 8:30 and 17:30, then when time is right stepper motor enables and feeds your little pet.
Electric Components:
- Stepper Motor NEMA17 – 42HB34F08AB
- Stepper Motor Driver A4988
- Arduino UNO
- Arduino Keypad 4×4
- RTC DS3231 Clock
- LCD Display 16×2
- Step Down Module (I used LM2596S DC/DC) 12V to 5V
- 12V Power Supply
- a lot of wires
Step 1: Printing All Parts

Printing all the parts took me about 5 days. To assemble everything together I used 3mm bolts (m3) and 3mm nuts.
Step 2: Electronics

Wire everything like in the circuit. If your LCD screen is too dark or too bright try different values of resistors or play with the voltage regulator.
Step 3: Arduino Code
Arduino Code includes additional libraries: DS3231 RTC, Arduino Keypad 4×4
When you press ‘A’ – Program asks for first feed time and waits untill you type in HH:MM:SS
When you press ‘B’ – Program asks for second feed time and waits untill you type in HH:MM:SS
When you press ‘C’ – Stepper Motor runs for one cycle (one feed)
When you press ‘D’ – LCD displays current Date
LCD displays normally current Time and hour and minutes of first and second feed time.
All functions are described in code:
#include <DS3231.h>
#include <LiquidCrystal.h>
#include <Keypad.h>


const byte ROWS = 4;
const byte COLS = 4;
const int stepPin = 10;
const int dirPin = A3;

char keys[ROWS][COLS] = {
  {'1','2','3','A'},
  {'4','5','6','B'},
  {'7','8','9','C'},
  {'*','0','#','D'}
};
byte rowPins[ROWS] = { 2, 3, 4, 5 };
byte colPins[COLS] = { 6, 7, 8, 9 };

Keypad keypad = Keypad( makeKeymap(keys), rowPins, colPins, ROWS, COLS );
DS3231 rtc(A4, A5);

LiquidCrystal lcd(A0, A1, A2, 11, 12, 13); // (rs, enable, d4, d5, d6, d7)

int feed_time = 2000;    //define how fast stepper motor works
int feed_length = 600;   //define how much steps should your motor do (mine does 200 for full spin)

String feed1;
String feed2;
char key[8];
int j = 0;
char button;


 void setup() {

  rtc.begin();
  lcd.begin(16,2);
  Serial.begin(9600);
  pinMode(A0, OUTPUT);
  pinMode(A1, OUTPUT);
  pinMode(A2, OUTPUT);
  pinMode(stepPin,OUTPUT);
  pinMode(dirPin,OUTPUT);
}

 void loop() {

 lcd.setCursor(0,0);
 lcd.print("Time: ");
 lcd.print(rtc.getTimeStr());
 lcd.setCursor(0,1);
      //lcd.print("Date: ");               //Date to display
      //lcd.print(rtc.getDateStr());
 lcd.print("1)");
 lcd.print(feed1);
 lcd.setCursor(7,1);
 lcd.print(" 2)");
 lcd.print(feed2);
 lcd.setCursor(15,1);
 lcd.print(" ");

 button = keypad.getKey();

 if(button == 'A'){
  lcd.clear();
  lcd.setCursor(0,0);
  lcd.print("HH:MM:SS 1st");
  delay(500);
  j = 0;
  lcd.setCursor(j,1);
  key[0] = keypad.waitForKey();
  lcd.print(key[0]);j++;
  lcd.setCursor(j,1);
  key[1] = keypad.waitForKey();
  lcd.print(key[1]);j++;
  lcd.setCursor(j,1);
  key[2] = ':';
  lcd.print(key[2]);j++;
  lcd.setCursor(j,1);
  key[3] = keypad.waitForKey();
  lcd.print(key[3]);j++;
  lcd.setCursor(j,1);
  key[4] = keypad.waitForKey();
  lcd.print(key[4]);j++;
  lcd.setCursor(j,1);
  key[5] = ':';
  lcd.print(key[5]);j++;
  lcd.setCursor(j,1);
  key[6] = keypad.waitForKey();
  lcd.print(key[6]);j++;
  lcd.setCursor(j,1);
  key[7] = keypad.waitForKey();
  lcd.print(key[7]);
  key[8] = '\0';
  feed1 = String(key);
  delay(1000);
  lcd.clear();
 }

 if(button == 'B'){
  lcd.clear();
  lcd.setCursor(0,0);
  lcd.print("HH:MM:SS 2nd");
  delay(500);
  j = 0;
  lcd.setCursor(j,1);
  key[0] = keypad.waitForKey();
  lcd.print(key[0]);j++;
  lcd.setCursor(j,1);
  key[1] = keypad.waitForKey();
  lcd.print(key[1]);j++;
  lcd.setCursor(j,1);
  key[2] = ':';
  lcd.print(key[2]);j++;
  lcd.setCursor(j,1);
  key[3] = keypad.waitForKey();
  lcd.print(key[3]);j++;
  lcd.setCursor(j,1);
  key[4] = keypad.waitForKey();
  lcd.print(key[4]);j++;
  lcd.setCursor(j,1);
  key[5] = ':';
  lcd.print(key[5]);j++;
  lcd.setCursor(j,1);
  key[6] = keypad.waitForKey();
  lcd.print(key[6]);j++;
  lcd.setCursor(j,1);
  key[7] = keypad.waitForKey();
  lcd.print(key[7]);
  key[8] = '\0';
  feed2 = String(key);
  delay(1000);
  lcd.clear();
 }
 if(button == 'D'){
  lcd.clear();
  lcd.setCursor(0,0);
  lcd.print("Time: ");
  lcd.print(rtc.getTimeStr());
  lcd.setCursor(0,1);
  lcd.print("Date: ");               //Date to display
  lcd.print(rtc.getDateStr());
  delay(5000);
  lcd.clear();
 }
 if(button == 'C'){
 digitalWrite(dirPin,HIGH);        // Enables the motor to move in a particular direction

  for(int x = 0; x < feed_length; x++) {     // Makes 200 pulses for making one full cycle rotation
    digitalWrite(stepPin,HIGH);
    delayMicroseconds(feed_time);
    digitalWrite(stepPin,LOW);
    delayMicroseconds(feed_time);
  }
  delay(1000);
 }
 if (feed1==rtc.getTimeStr())
 {
   digitalWrite(dirPin,HIGH);        // Enables the motor to move in a particular direction

  for(int x = 0; x < feed_length; x++) {     // Makes 200 pulses for making one full cycle rotation
    digitalWrite(stepPin,HIGH);
    delayMicroseconds(feed_time);
    digitalWrite(stepPin,LOW);
    delayMicroseconds(feed_time);
  }
  delay(1000);
 }
 if (feed2==rtc.getTimeStr())
 {
  digitalWrite(dirPin,HIGH);        // Enables the motor to move in a particular direction

  for(int x = 0; x < feed_length; x++) {     // Makes 200 pulses for making one full cycle rotation
    digitalWrite(stepPin,HIGH);
    delayMicroseconds(feed_time);
    digitalWrite(stepPin,LOW);
    delayMicroseconds(feed_time);
  }
  delay(1000);
 }
 }
Source: Automatic Arduino Pet Feeder – 3D Printed (With Stepper Motor)
- How do I program the feeding times?
Press 'A' to set the first feed time or 'B' for the second feed time, then type in HH:MM:SS format. - Can I manually trigger a feed?
Yes, pressing 'C' causes the stepper motor to run for one cycle to dispense food. - What does pressing 'D' do?
Pressing 'D' makes the LCD display the current date along with the time. - Does the feeder work automatically?
Yes, when the current time matches the programmed feed times, the stepper motor enables and feeds the pet. - How long did it take to print all parts?
Printing all the parts took about 5 days according to the author. - What assembly hardware is required?
You need 3mm bolts (m3) and 3mm nuts to assemble everything together. - Which libraries are needed for the code?
The code requires the DS3231 RTC library and the Arduino Keypad 4x4 library. - How can I fix a dark or bright LCD screen?
Try using different resistor values or adjusting the voltage regulator settings.